Category filter
Set up Hexnode Access to allow login to Windows using IdPs
This document helps you configure the Hexnode Access policy that allows to login to Windows using IdPs.
Cloud-based credentials are commonly used to sign up or log in to websites and apps, eliminating the need to create new login credentials each time. While this approach is widely adopted in organizations for work-related apps and websites, it would be highly beneficial if users could also use these same cloud credentials to log in to their work devices. This is where Hexnode Access comes into play. Hexnode Access for Windows simplifies logging into Windows devices by integrating with IdPs like Microsoft Entra ID and Google Workspace. It lets organizations get started with access management and allows employees to login to Windows using their cloud IdP credentials.
Not only does this integration of Hexnode with IdPs streamline the device login process, but it also offers a range of customization options for the login window. This customization includes providing users with access to help links related to the sign-in procedures and enabling network access, all directly from the login window itself. Learn how to configure Hexnode Access for Windows to enhance the login experience for users.
How to allow login to Windows using IdPs?
Here’s how you configure the Hexnode Access policy to allow login to Windows using IdPs.
- Login to the Hexnode UEM portal.
- Navigate to Policies, under Device Policies, select an existing policy, or click on New Policy to create a new one.
- Navigate to Windows > Security > Hexnode Access and click Configure.
Clicking “Configure” will present you with the following options for Hexnode Access configuration:
Basic Settings:
Identity provider – Admins can choose the preferred IdP from the dropdown list. Hexnode Access supports Microsoft Entra ID, Google Workspace and Okta.
-
Microsoft Entra ID
- Configure authentication by – There are two available options for configuring authentication with Microsoft Entra ID. Administrators can either proceed with the IdP domains already added to the Hexnode UEM portal or create a new app registration in the IdP portal. These two options are explained briefly as follows.
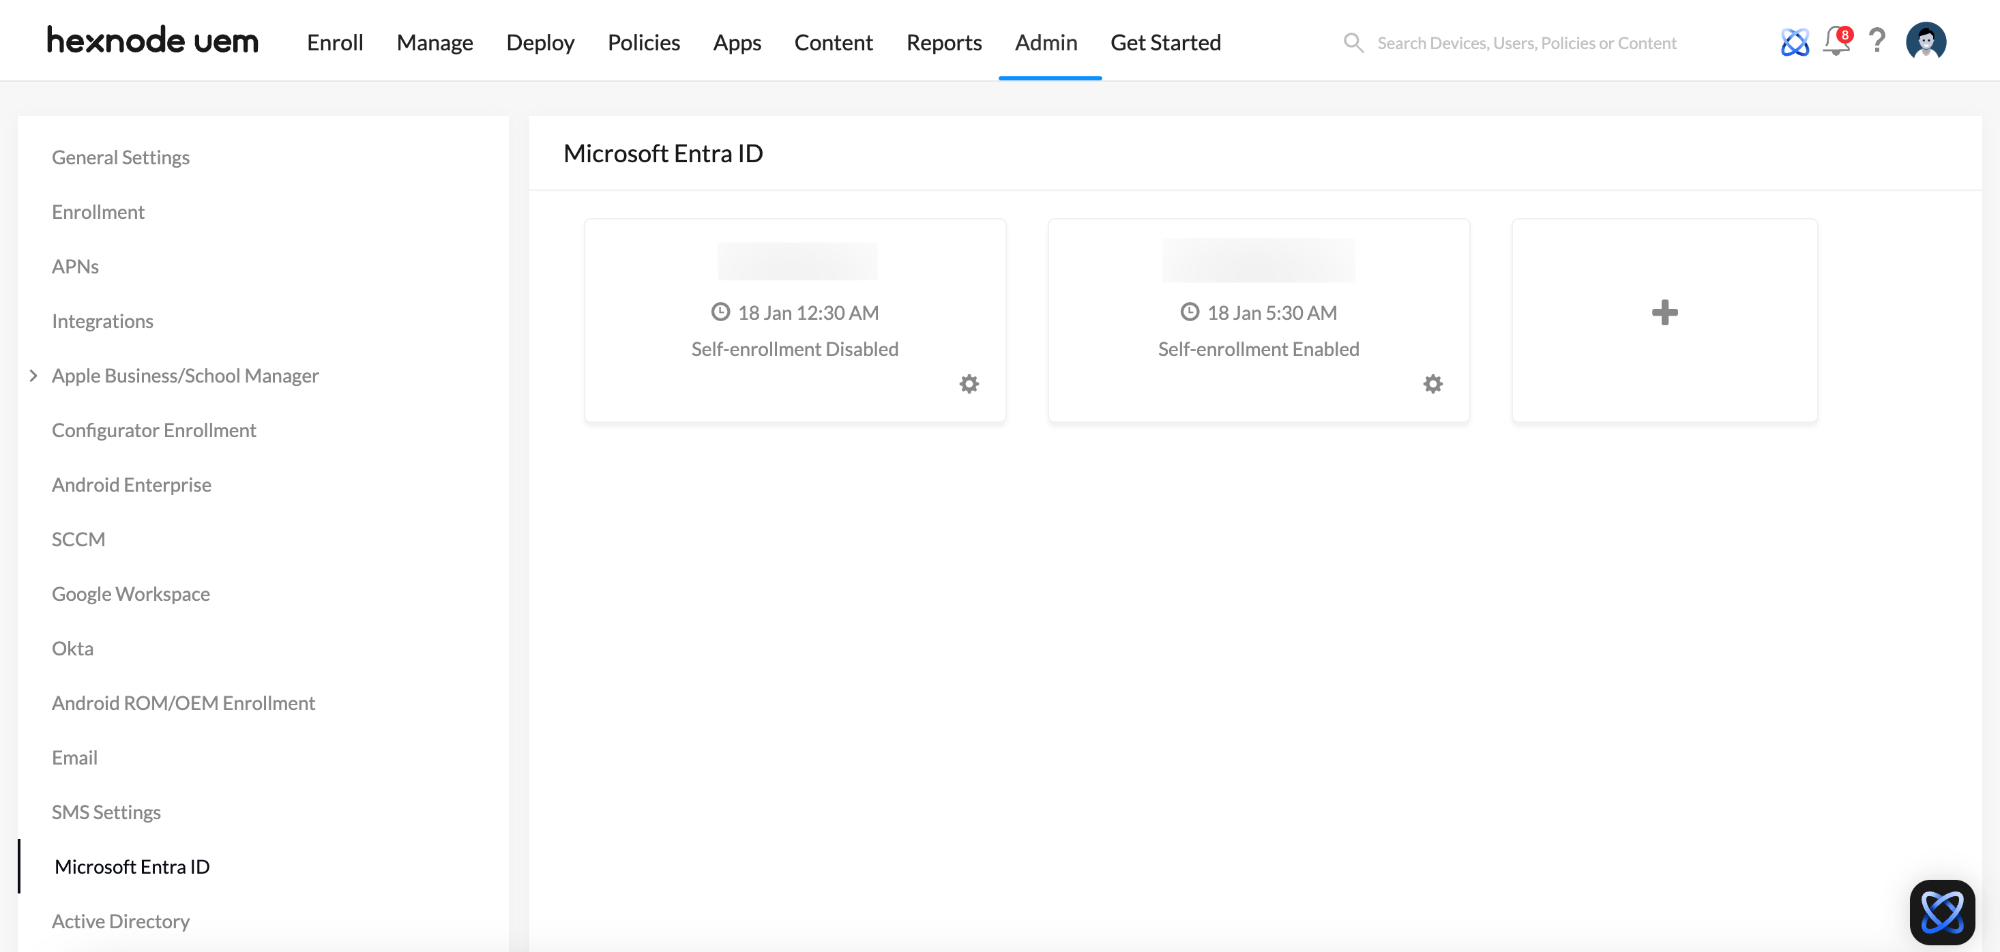
Microsoft Entra ID domains added to Hexnode portal – Administrators have the option to choose from the domains listed under Admin > Microsoft Entra ID in the Hexnode UEM portal to configure the authentication.
- Domains – Choose one or more domains from the drop-down list. The selected domains will be displayed below the drop-down menu, and you have the option to remove any that are not needed.
- Allow access for all users – Check this box if you want to grant device access to all the user groups within the domain.
- Allow access only for – If access to the device should not be granted to all user groups in the selected domains, specify the ones that should be granted access in this field.
- Create a new app registration in Microsoft Azure portal – A new app registration must be created for the Hexnode Access app in the Microsoft Entra ID portal.
- Login to the Microsoft Azure portal.
- Click on the Show portal menu icon at the left top corner of the page and navigate to Microsoft Entra ID > Manage > App registrations > New registration.
- Enter Hexnode Access in the Name field.
- Under the Supported account types field, select Accounts in this organizational directory only (company name only – Single tenant).
- Under the Redirect URI field, select Web from the Select a platform drop-down and enter a valid URI in the adjacent field. The URI will be of the format https://portalname.hexnodemdm.com/azure_devicelogin_callback . In the above URI format, replace the
portalnamewith the name of the corresponding Hexnode UEM portal’s name. - Click Register.
- Click on the menu icon located at the top left corner of the page.
- Navigate to Microsoft Entra ID > Manage > App registrations > All applications.
- Select the specific application you require and view its Client ID.
- Click on the Show portal menu icon located in the top-left corner of the page.
- Navigate to Microsoft Entra ID > Manage > App registrations > All applications.
- Select the required application.
- Click on Client credentials.
- Then, click on Add a certificate or secret.
- Select New client secret and click Add.
-
Google Workspace
- LDAP Certificate: Admins can create and upload an LDAP certificate to set up authentication for Google Workspace domains listed under Admin > Google Workspace.
Create LDAP certificate for Hexnode Access:
- Login to the Google Admin portal.
- Click on the Main menu icon at the top left corner of the page.
- Navigate to Apps > LDAP.
- Click ADD CLIENT.
- In the LDAP client name field, enter Hexnode Access and provide a description for the client.
- Click Continue.
- On the next page, set up the access permissions based on your organization’s requirements.
- Click ADD LDAP CLIENT.
- A confirmation window will appear indicating that the LDAP client was successfully created.
- Click on the Download certificate option to download a zip file containing the LDAP certificate.
Choose file: Select the downloaded zip file containing the LDAP certificate.
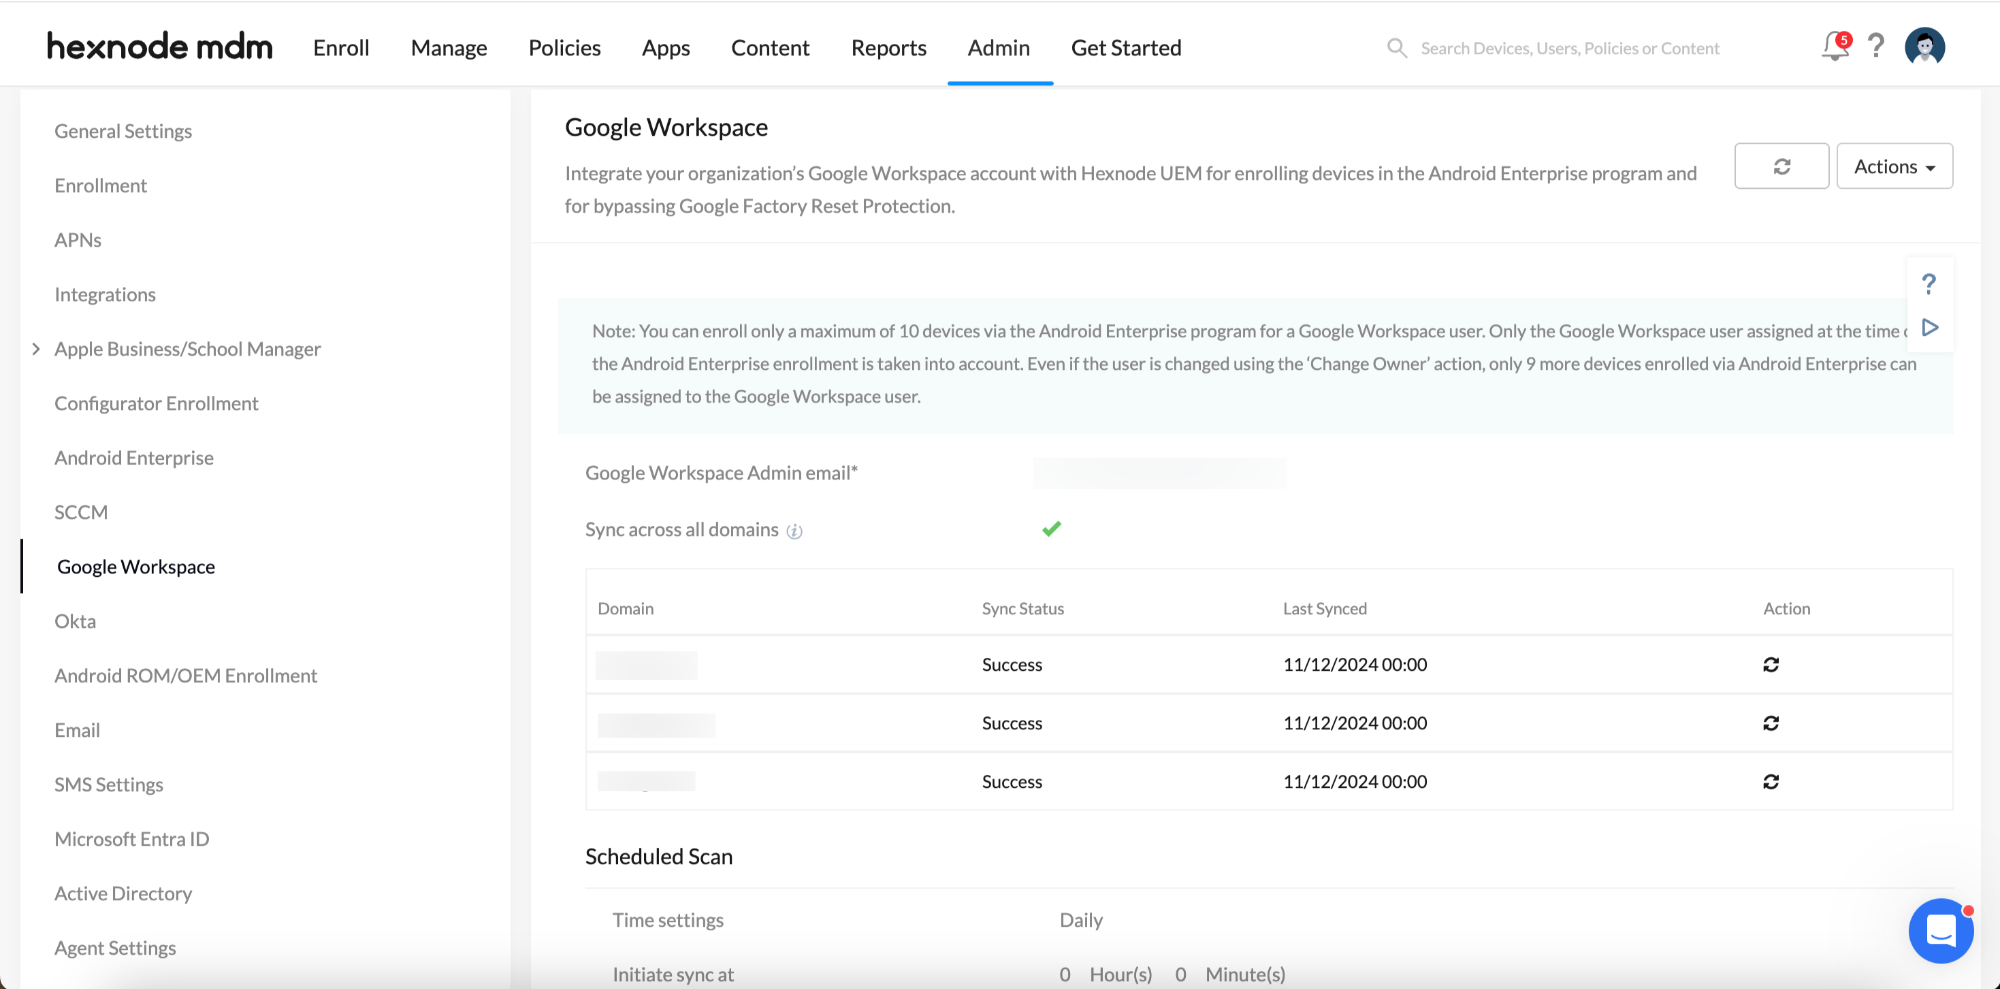
- Google Workspace domains added to Hexnode portal – Administrators can choose domains listed under Admin > Google Workspace in the Hexnode UEM portal to set up authentication configurations.
- Domains – Select one or more domains from the drop-down.
- Allow access for all users – Check this box if you want to grant device access to all the user groups within the domain.
- Allow access only for – If access to the device should not be granted to all user groups in the selected domains, specify the ones that should be granted access in this field.
- Creating OAuth credentials in Google Cloud – OAuth credentials must be created for the Hexnode Access app in Google Cloud.
How to create OAuth credentials for Hexnode Access?
- Login to Google Cloud.
- Click on the Navigation menu icon at the left top corner of the page and navigate to APIs and Services > Credentials.
- Click Create Credentials and select OAuth client ID.
- Select Web Application from the Application type drop-down.
- Enter Hexnode Access in the Name field.
- Click Add URI under Authorized Redirect URIs and enter a valid URI. The URI will be of the format https://portalname.hexnodemdm.com/gsuite_devicelogin_callback . Replace
portalnamewith the corresponding Hexnode UEM portal’s name. - Click Create.
After registering the app and generating OAuth credentials in Google Cloud, return to the Hexnode UEM portal to continue configuring the authentication settings.
Client ID – Provide the Client ID generated after creating the credentials, as it serves the purpose of authenticating users.
Client secret – Provide the Client secret generated once the credentials are created. This value is confidential and is known only by the app and the IdP.
-
Okta
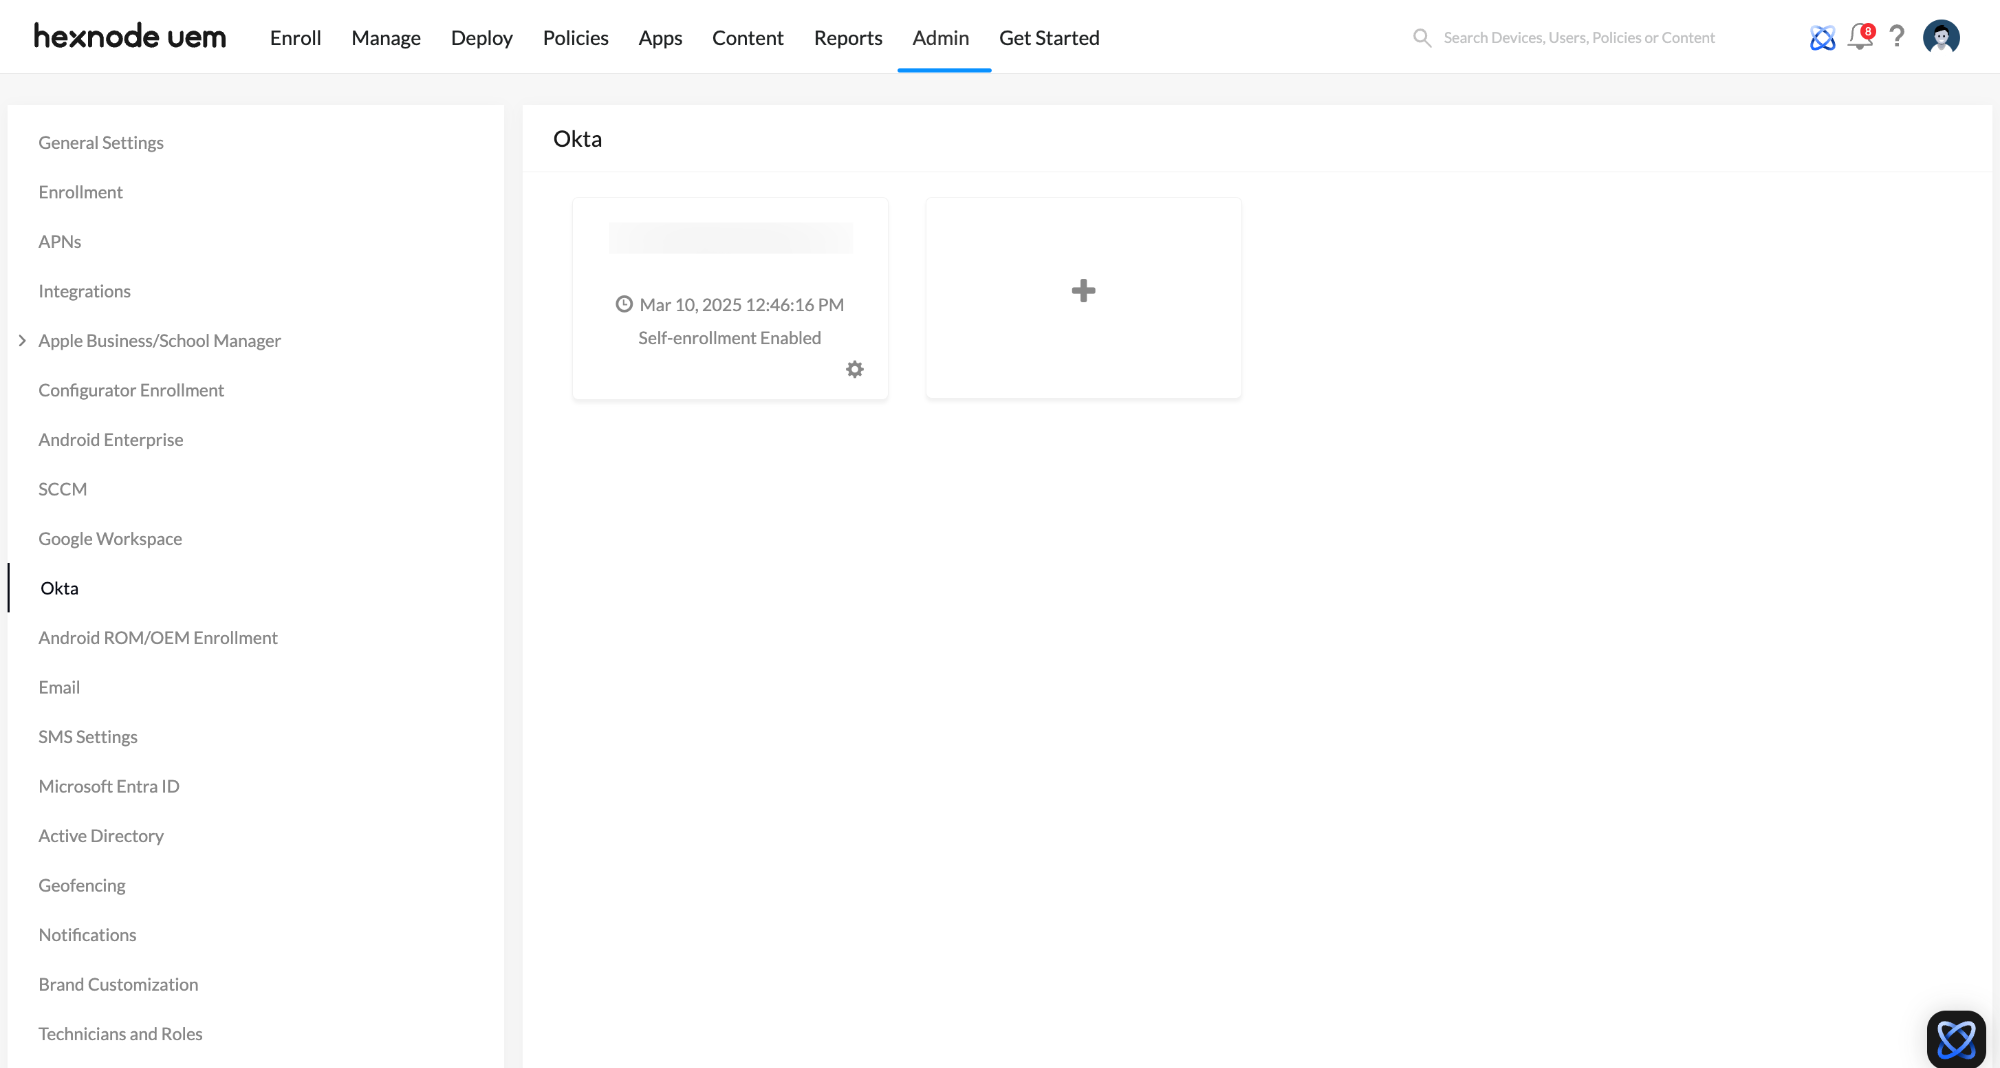
- Okta domains added to Hexnode portal: Selecting this option lets admins choose from the domains listed under Admin > Okta in the Hexnode UEM portal to configure authentication.
- Domains: Select one or more domains from the drop-down.
- Allow access for all users: Enable this option to grant access to all user groups in the selected domains.
- Allow access only for specific groups: If access should be restricted to certain user groups, specify them here.
- Creating a new app registration in the Okta domain: If a new app registration is required, it must be created for the Hexnode Access app in Okta.
Registering Hexnode Access in Okta
- Sign in to the Okta portal.
- Open the Admin Console for your organization.
- Go to Applications > Applications to view the existing integrations.
- Click Create App Integration.
- Select OIDC – OpenID Connect as the sign-in method.
- Choose Native Application as the application type and click Next.
- Enter a name for the app integration.
- Under the Grant type section, click Advanced and select Resource Owner Password.
- In the Sign-in redirect URIs section, add the URI in the format: https://portalname.hexnodemdm.com/okta_devicelogin_redirect.
Replaceportalnamewith the corresponding Hexnode UEM portal name. - Click Save to create the application.
Configuring the Client Secret
- Once the application is created, its details page will open automatically.
- Navigate to the General tab and click Edit.
- Under Client authentication, select Client secret.
- Click Save in the CLIENT SECRETS section.
- A client secret will be generated.
Once the app is registered in Okta, return to the Integrations tab in the Hexnode UEM portal to complete the authentication setup.
Configuring Okta as a Cloud IdP for Windows logins
Admins can set up Okta as the Cloud IdP for Windows logins by clicking the Add Hexnode Access Configuration Instance (+) button under Admin > Integration > Configured Integration.
- Configuration Name: Enter a name for the setup.
- Identity Provider: Select Okta from the drop-down.
- Client ID: Enter the Application/Client ID of the registered Okta app.
- ROPG ID: Enter the Tenant ID/ROPG ID (e.g., dev-123456.okta.com).
- Client Secret: Enter the client secret generated for the registered app.
-
OneLogin
- Sign in to the OneLogin portal.
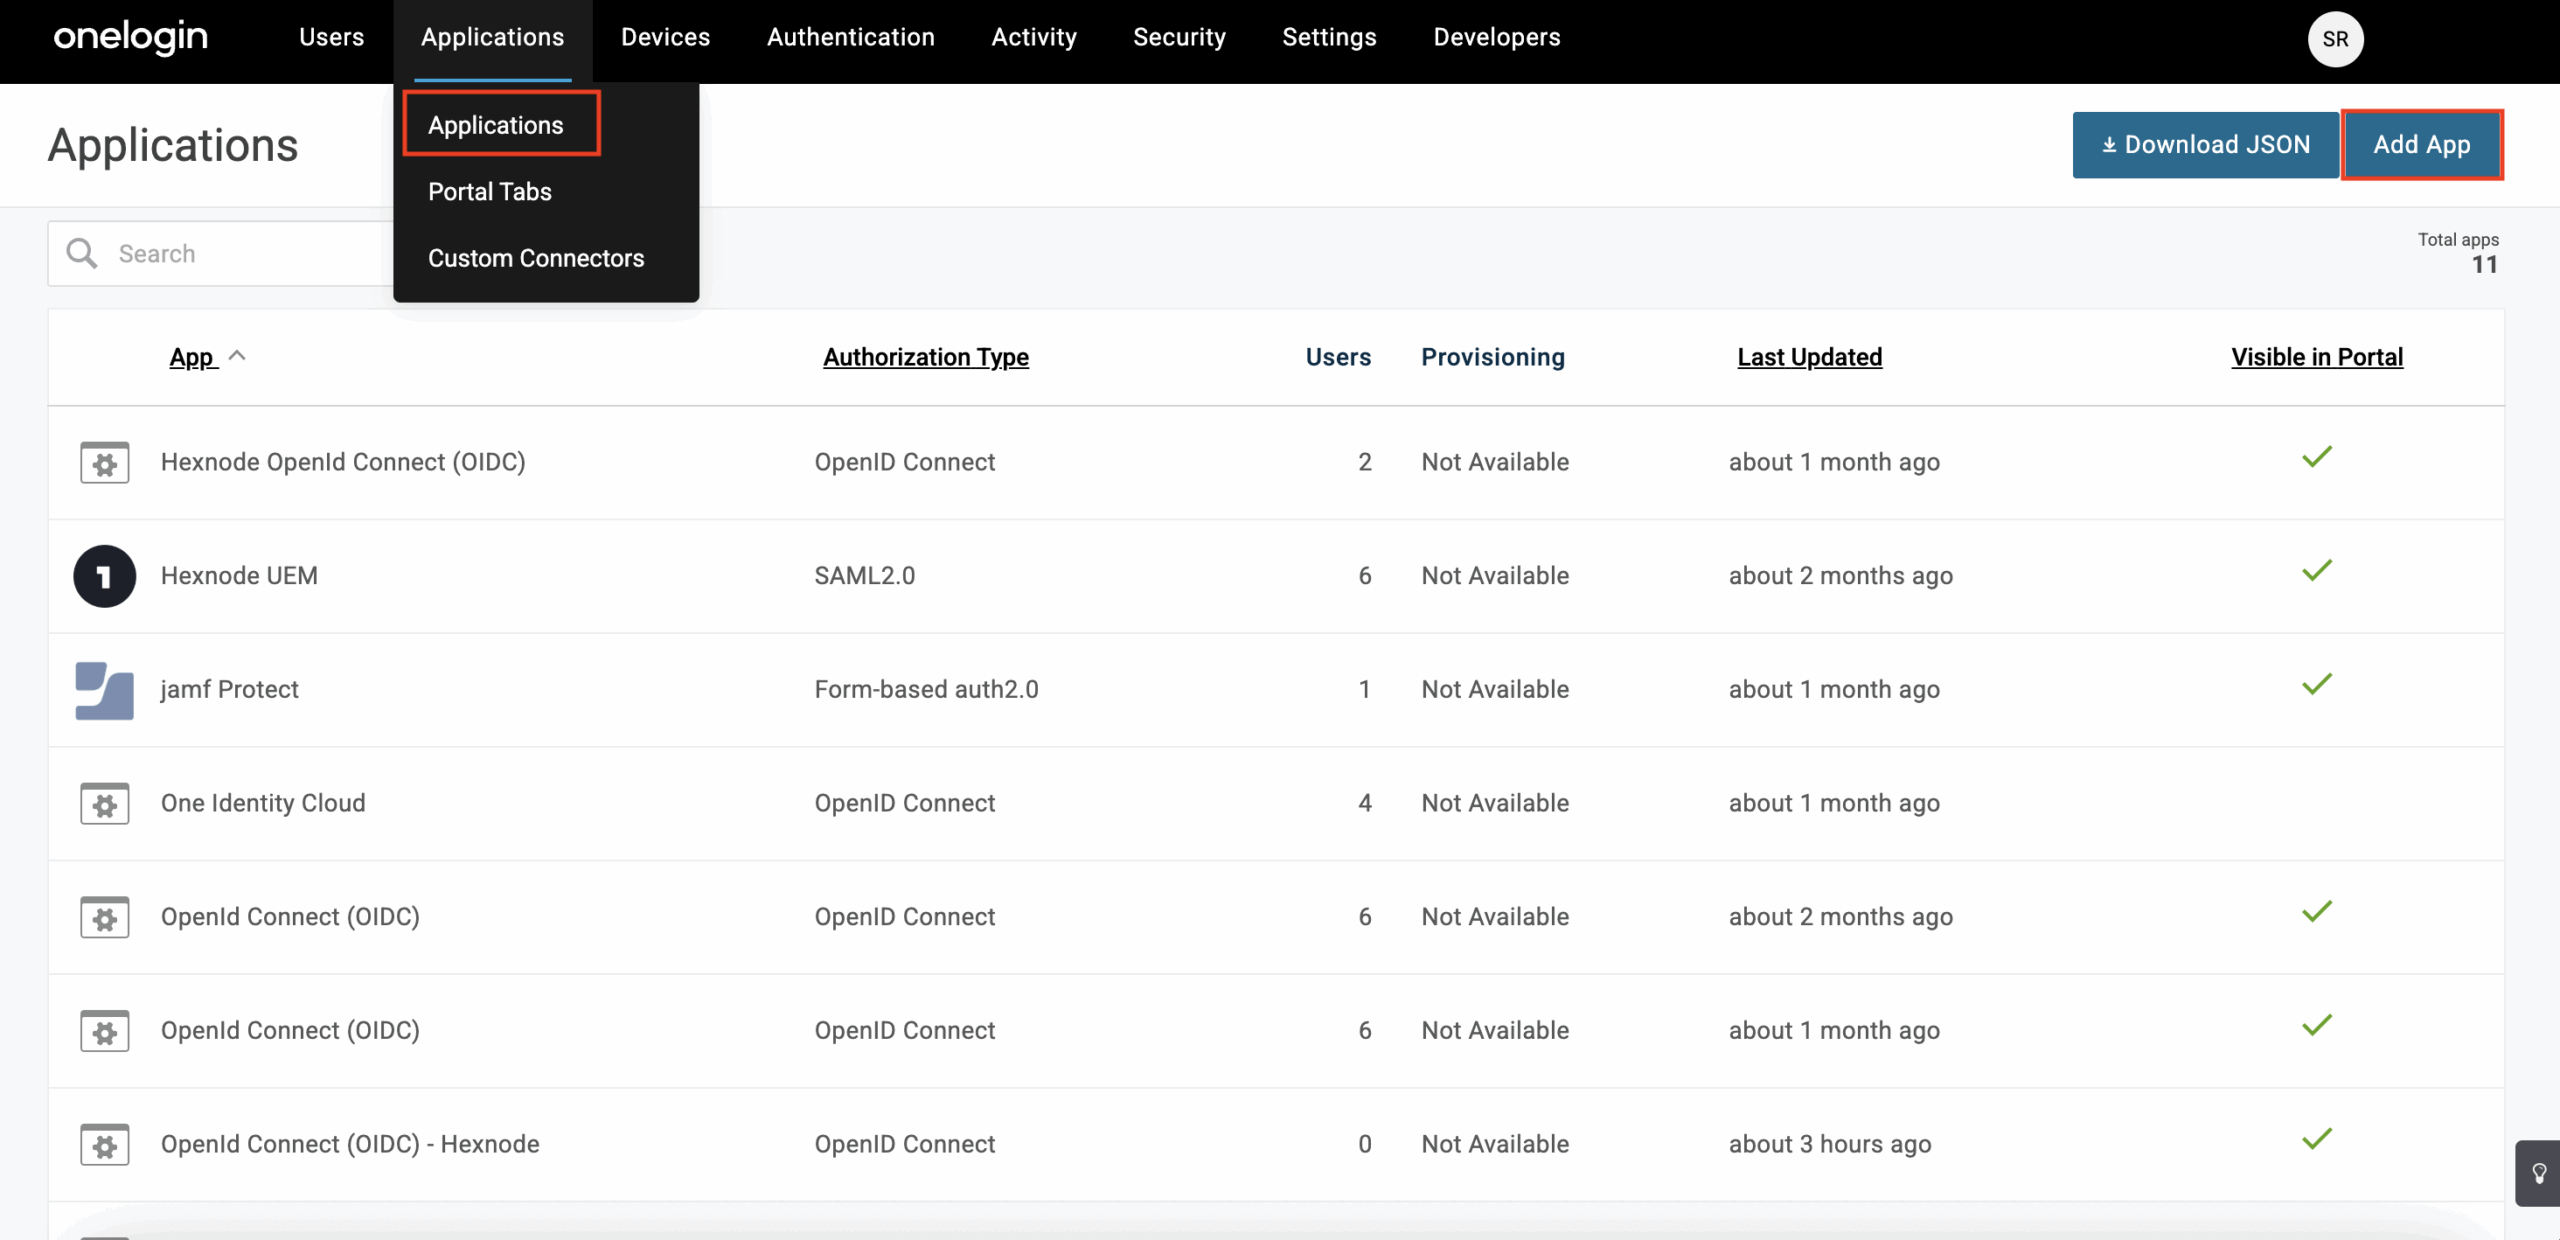
- Navigate to the Applications tab in the top menu and select Applications from the drop-down menu.
- Click on the Add App button on the top right corner.
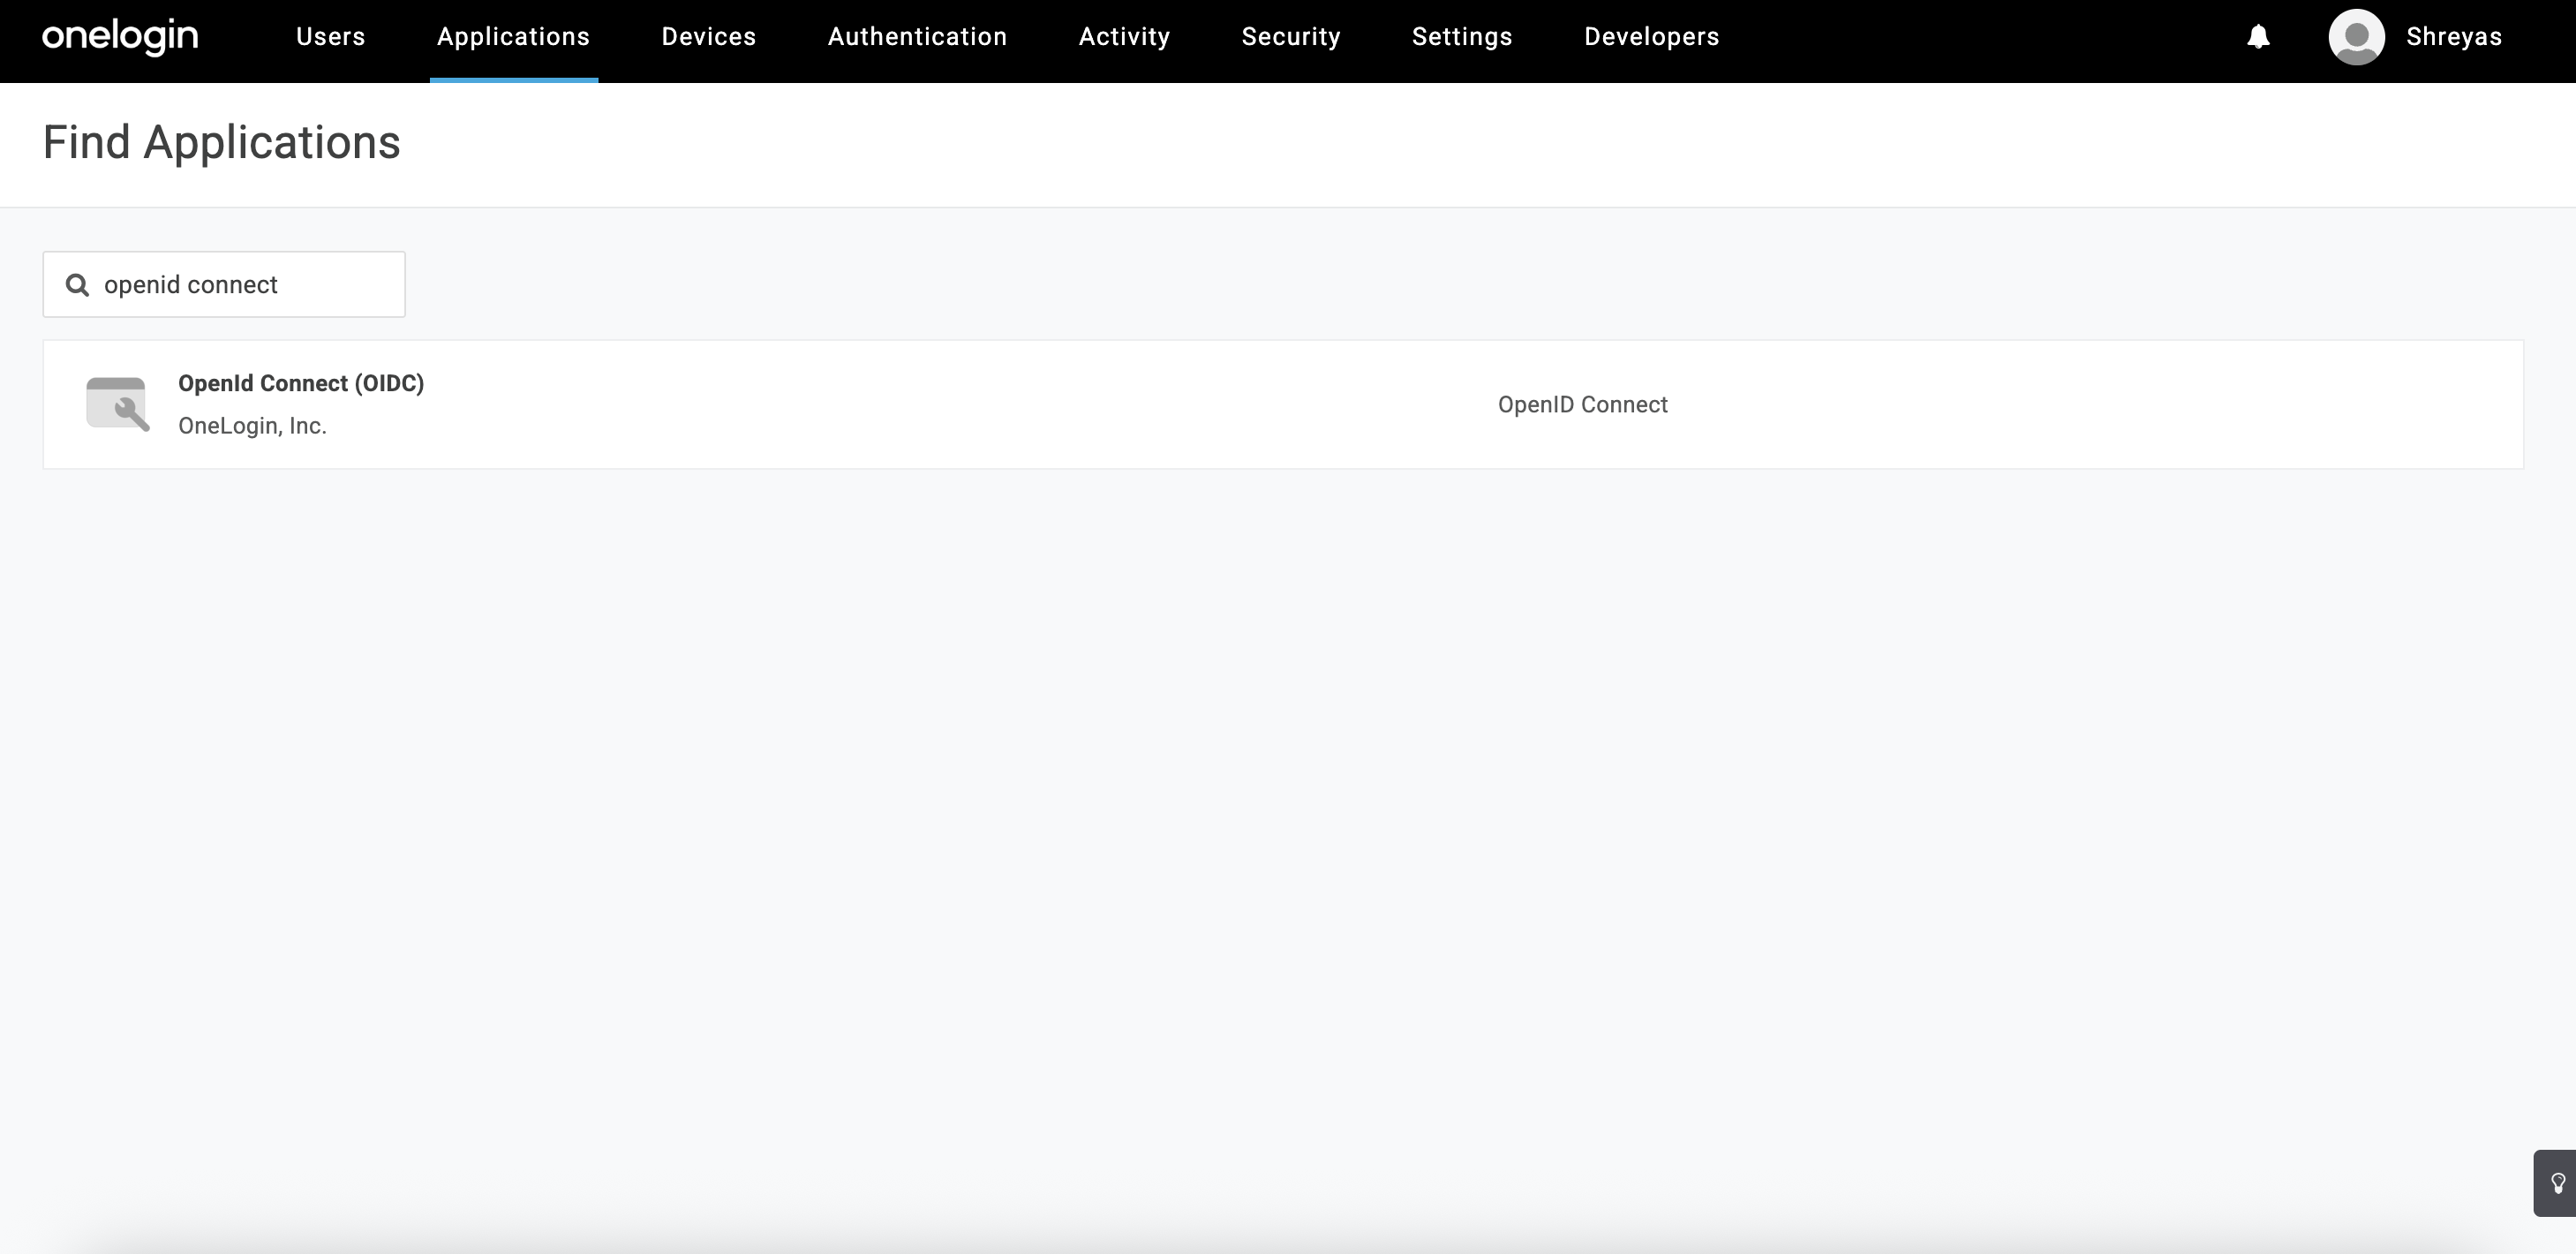
- Search for and select OpenID Connect (OIDC).
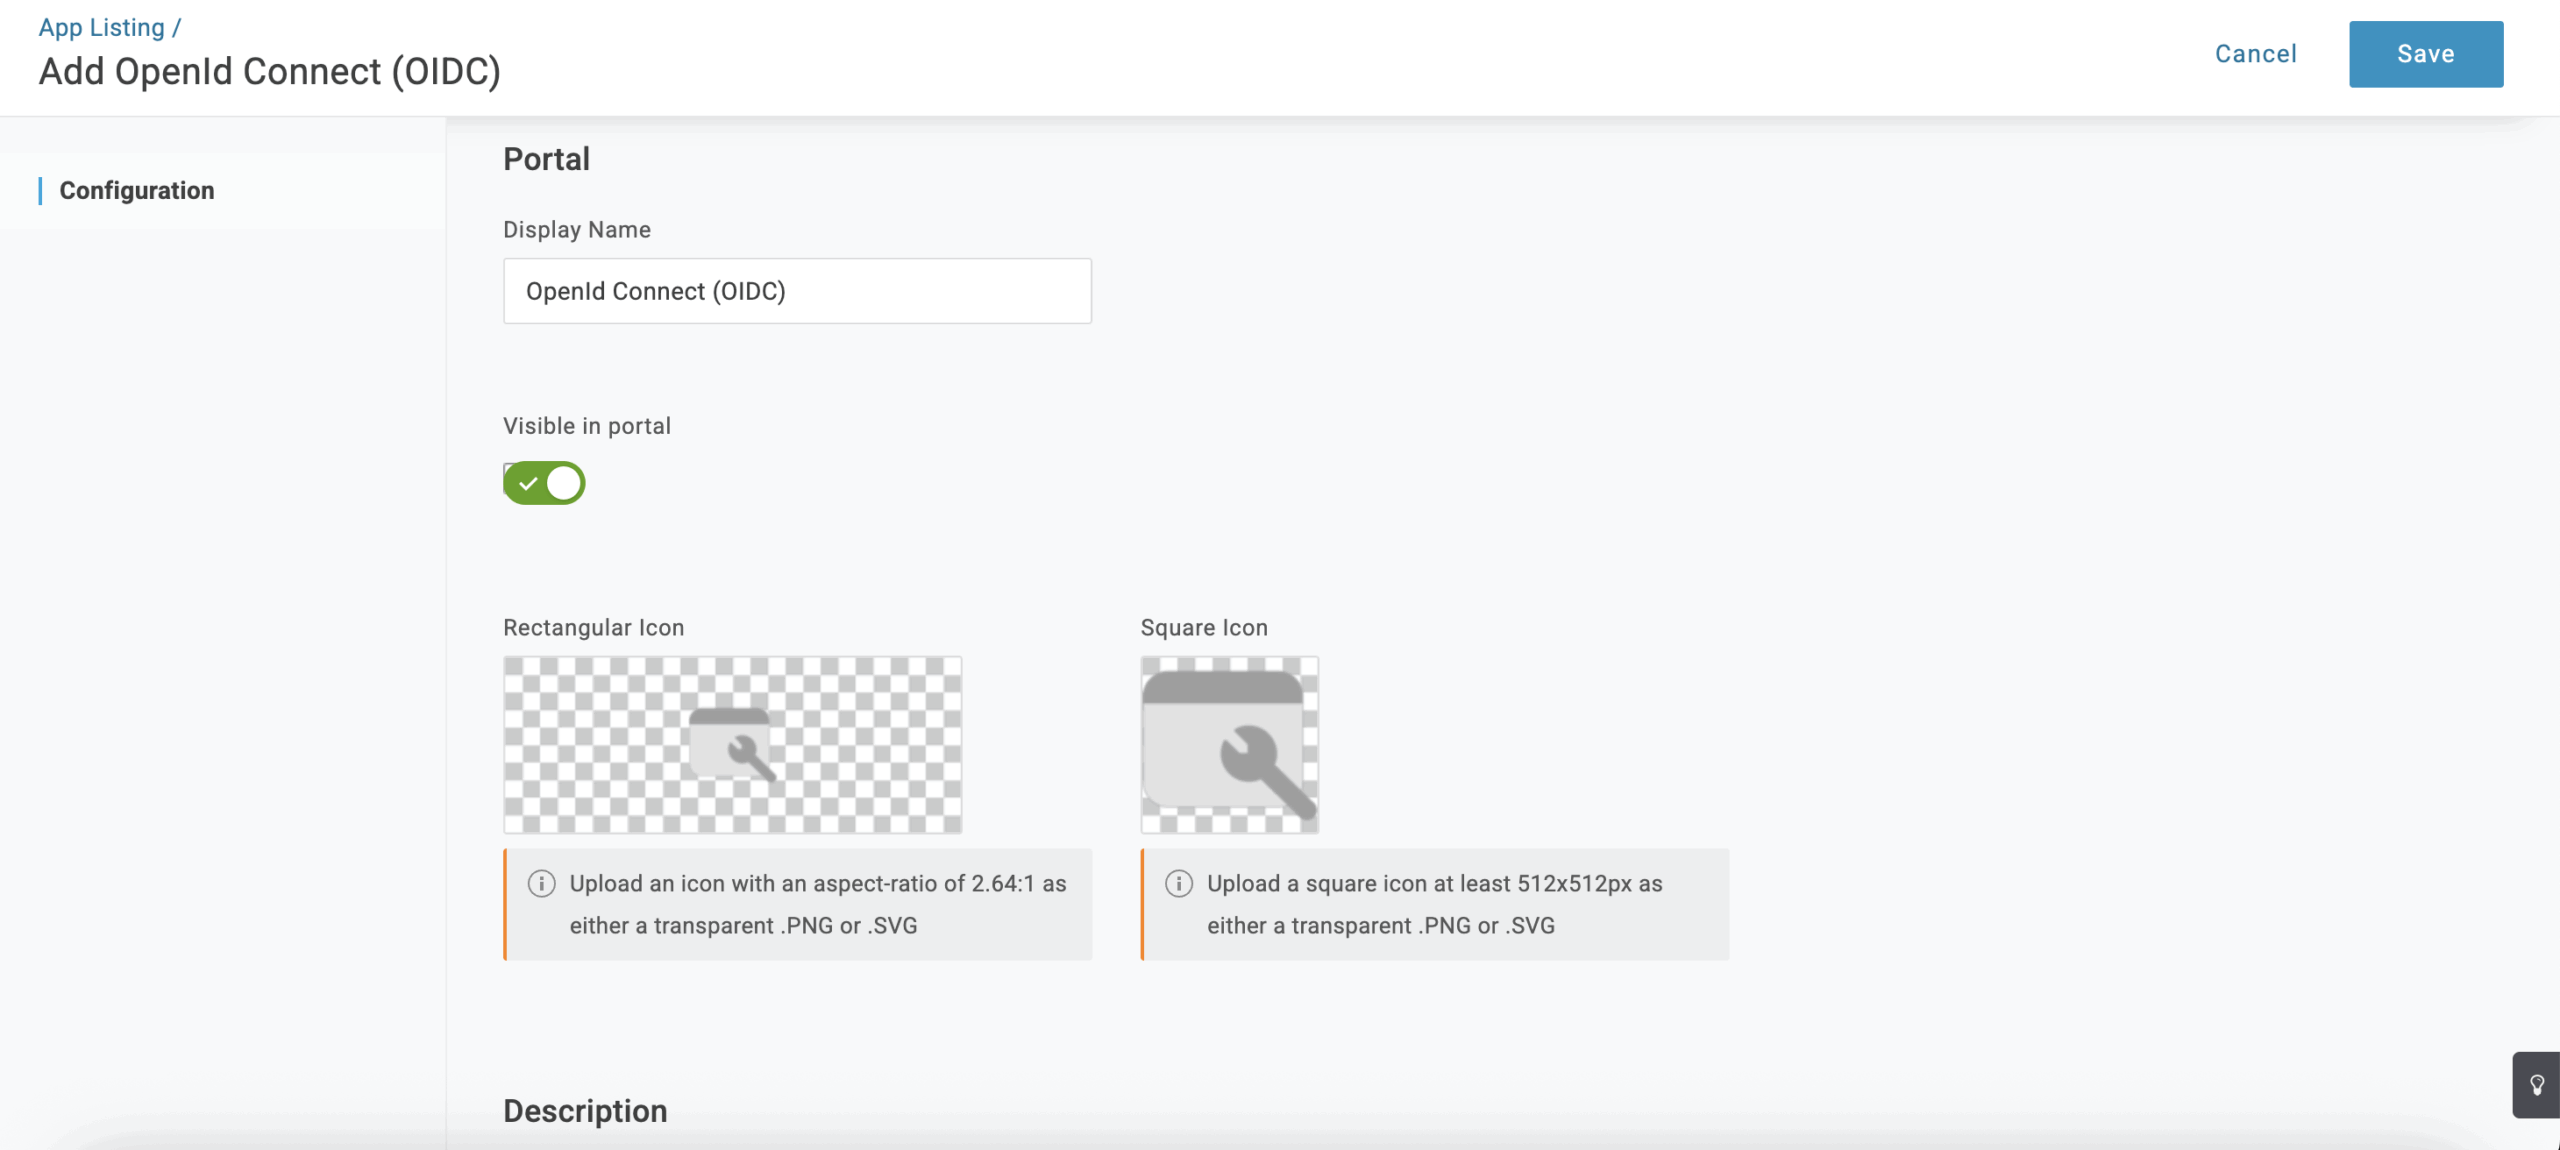
- Enter a Display Name and fill in the other fields (if required), then click Save.
- Select the Configuration tab from the left side menu
- In the Redirect URI’s field, add the URI in the format: https://portalname.hexnodemdm.com/okta_devicelogin_redirect. Replace
portalnamewith the corresponding Hexnode UEM portal’s name.
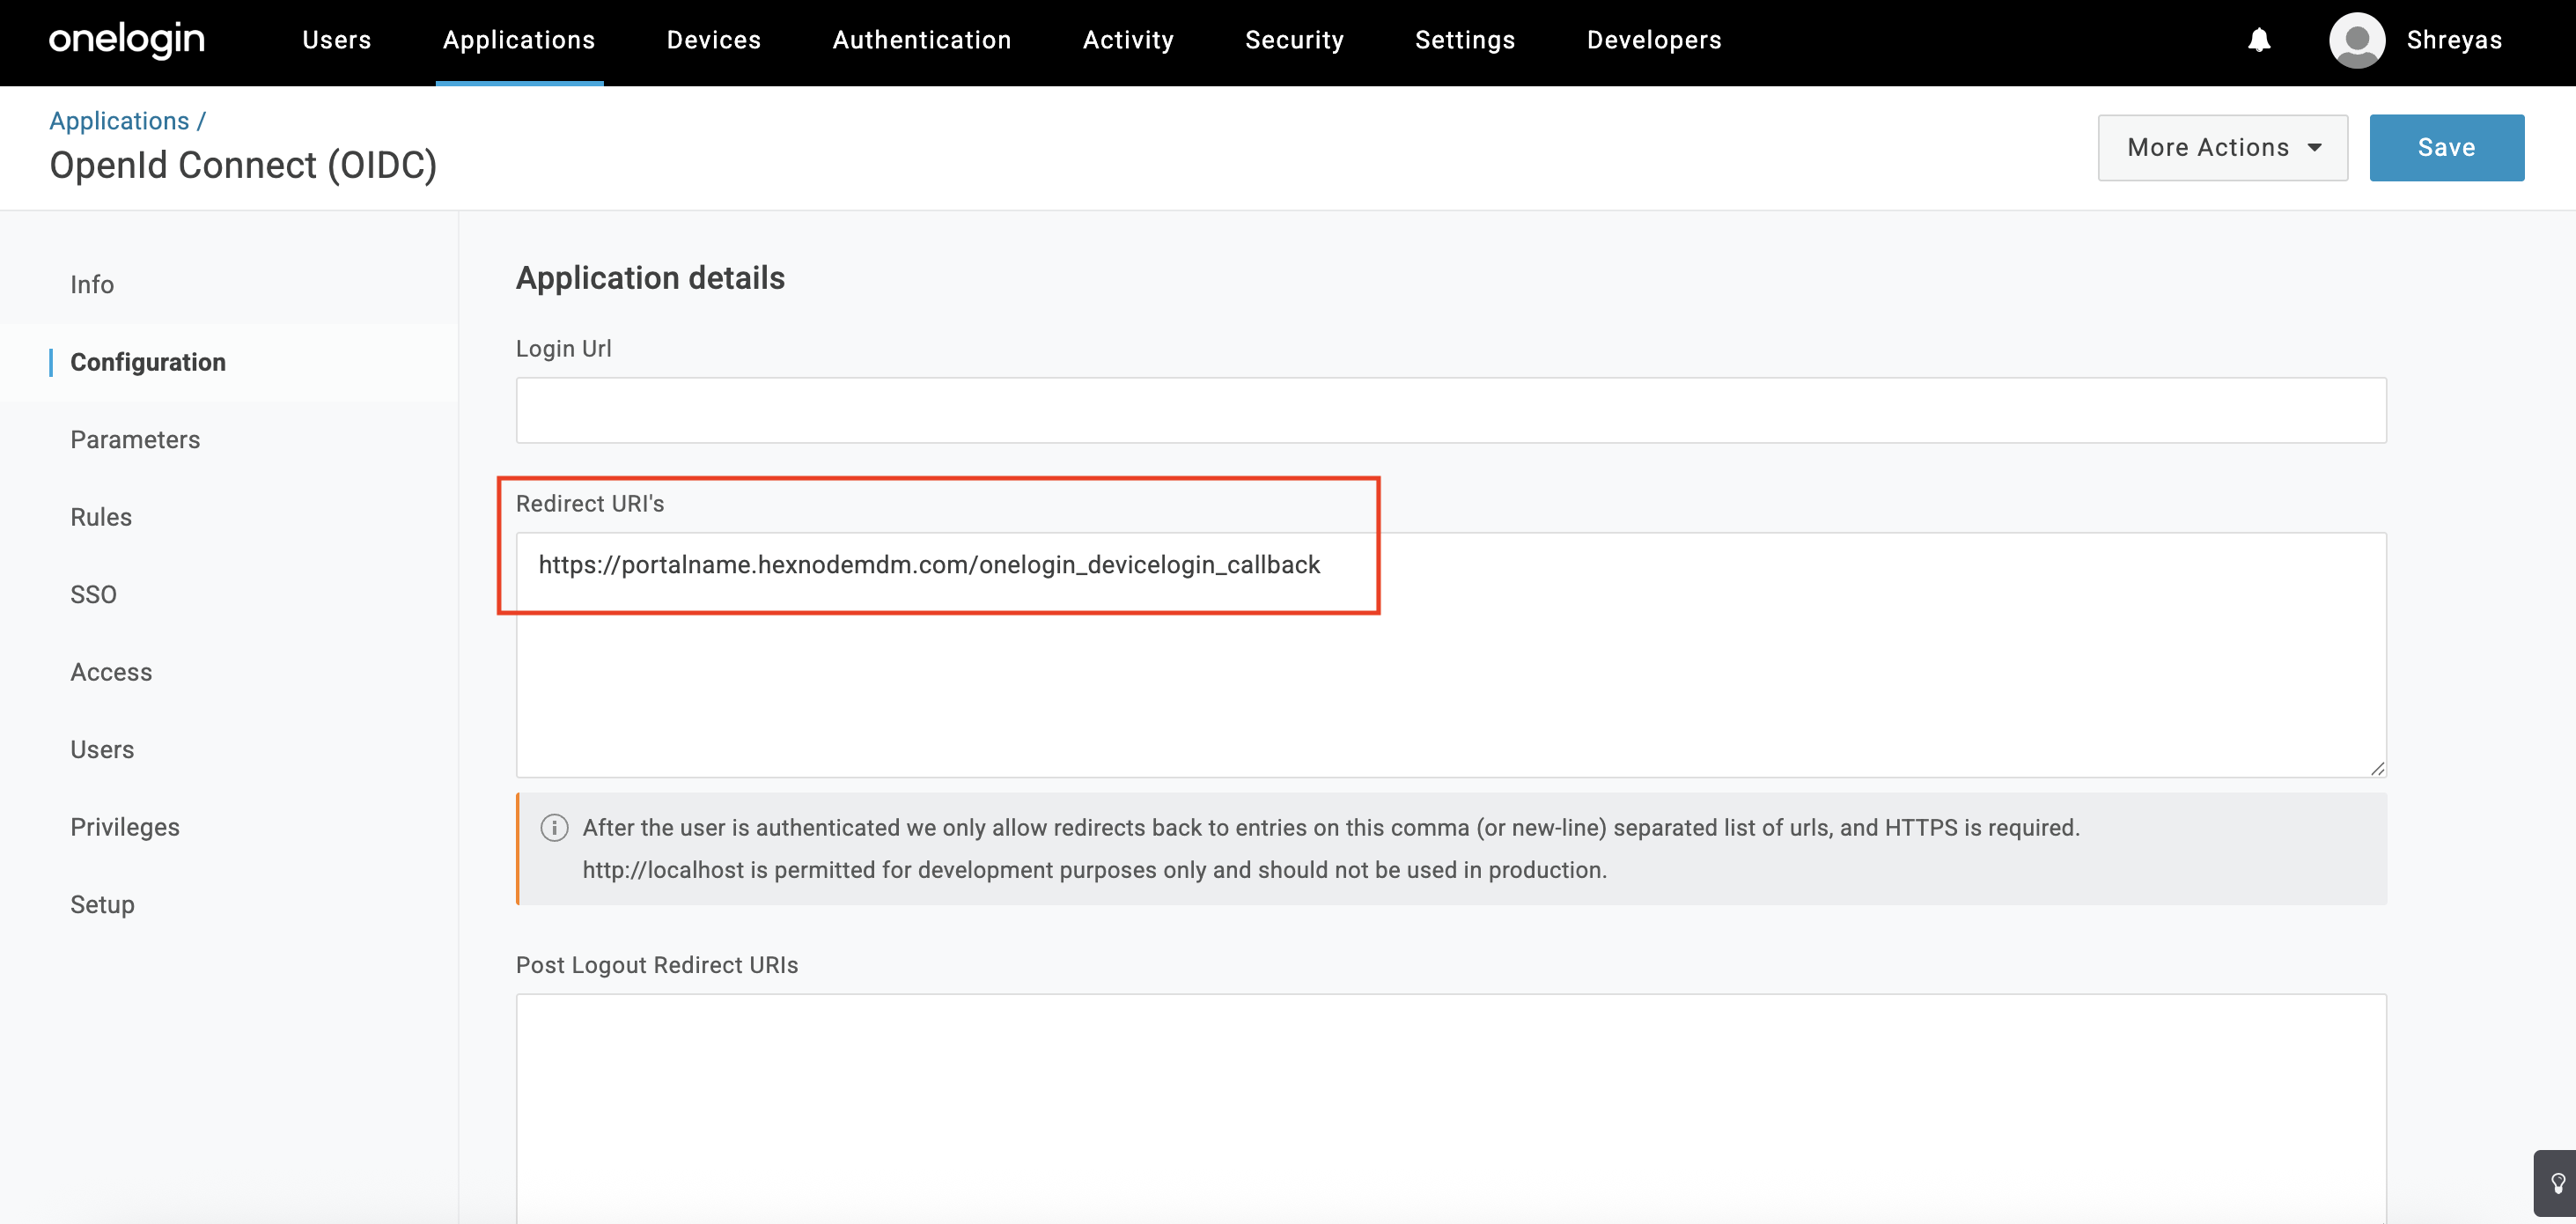
- Click Save.
- Select the SSO tab from the left side menu and copy the Client ID, Client Secret (click on Show client secret to view it), and Issuer URL.
- Select POST as the Authentication Method from the Token Endpoint drop-down menu.
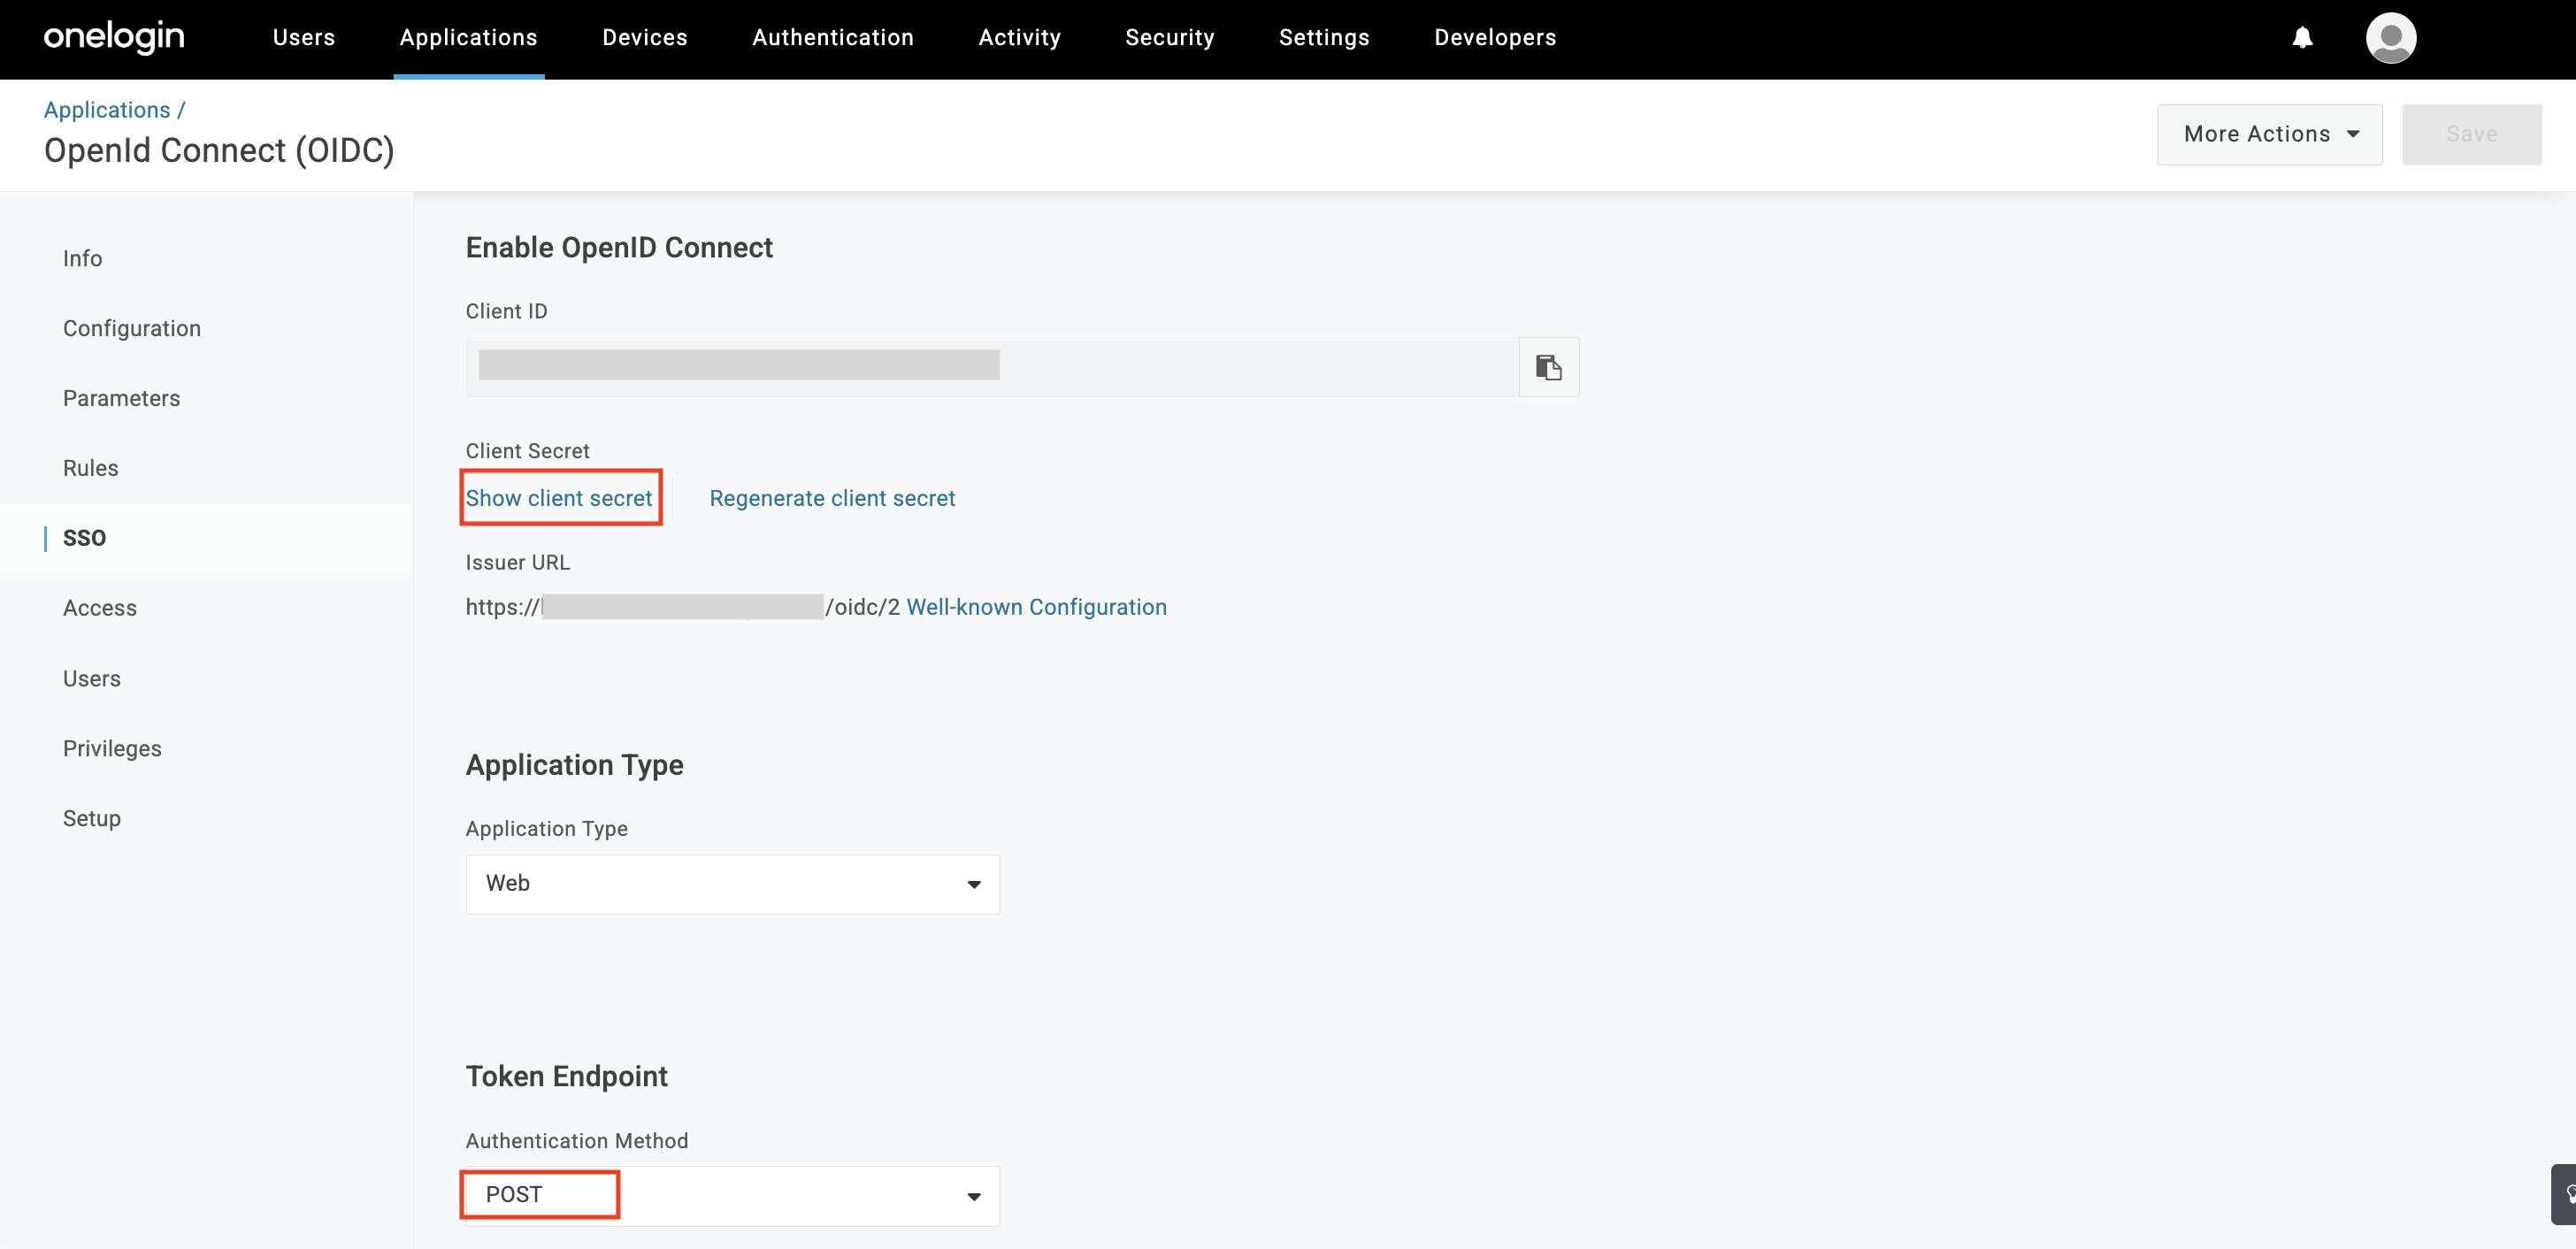
- Navigate to Admin > Integrations > Configured Integrations > Access and click on the Add Hexnode Access Configuration Instance (+) button.
- Configuration Name: Enter a name for the setup.
- Identity Provider: Select OneLogin from the drop-down.
- Client ID: Enter the Client ID of the registered app.
- Issuer URL: Enter the Issuer URL of the OneLogin portal in the format portalname.onelogin.com. Replace
portalnamewith the corresponding OneLogin portal’s name. - Client Secret: Enter the client secret generated for the registered app.
- Click Save.
How to register Hexnode Access with Microsoft Entra ID?
Create a new app registration:
After registering the app in the Microsoft Azure portal, return to the Hexnode UEM portal to continue configuring the authentication settings.
Client ID – Provide the Application/Client ID of the registered app obtained from the Microsoft Azure portal. This will be used to authenticate the user.
To find the Client ID,
Tenant ID – Provide the Directory/Tenant ID obtained from the Microsoft Azure portal.
Client secret – Provide the client secret of the registered app, which is known only by the app and your IdP.
To obtain the client secret from the Microsoft Azure portal, follow these steps:
Click on Client credentials to view the Client secret.
If the Client secret hasn’t been generated yet, follow these additional steps:
Configure authentication by – There are two available options for configuring authentication with Google Workspace.
Configure authentication by: Admins can set up authentication in Hexnode UEM using Okta domains that are already added to the portal or by creating a new app registration in Okta. The preferred method can be selected from the drop-down.
Configure authentication by: Configure authentication by: Admins can set up authentication in Hexnode UEM using by creating a new app registration in the OneLogin portal.
Registering Hexnode Access in OneLogin
Return to the Hexnode UEM portal and follow the steps below to complete the authentication setup:
Select Configuration: Choose an existing app registration from the drop-down or select Create new configuration, which redirects to the Integrations tab for setting up a new registration.
Scheduled Sync: Choose how often the identity provider’s user list syncs with Hexnode UEM:
- Every 12 hours
- Every 24 hours
- Every 2 days
- Every 4 days
- Every week
Account Settings
-
When selecting domains that have been added to the Hexnode portal:
- Set user type of newly created user to Admin – Check the box to designate the user types of the newly created users as administrators.
- Set Admin user type only for – If not all users require administrative privileges, indicate which users should be created as administrators. This option is unavailable when Okta is selected as the identity provider.
-
When creating app registration with IdP:
- Set user type of newly created user to Admin – Select the checkbox to grant admin privileges to the newly added users.
Login Settings
While you allow login to Windows devices using IdPs, you can also specify the login authentication settings. These settings let you determine if the user can access the device offline or how often the user should authenticate using the cloud IdP credentials.
- Sync password with cloud account – When this option is checked, the local account password will automatically stay in sync with the user’s cloud account password. Users can sign in to their device using the same password they use for their cloud account. If unchecked, the local account will not sync with the cloud account password.
- Limit Offline Access – Mark the checkbox to mandate users to re-authenticate themselves using their cloud Identity Provider (IdP) credentials after a set period.
- Require authentication every – If the option Limit Offline Access is checked, select the frequency for the periodic authentication from the drop-down:
- Every login
- Every 15 days
- Every 30 days
- Every 45 days
- Every 60 days
- Every 90 days
- Every 120 days
- Every 180 days
Login Window Appearance
- Set login page background – Upload an image to configure it as the background for the login page.
- Login page logo – Upload an image to configure it as the logo for the login page.
Click the ‘Preview‘ button to see a preview of how the login window will appear with the settings you’ve configured above.
Advanced Settings:
- Allow access to network settings– Mark the checkbox to allow users to connect to a network from the login window. If enabled, users will have the option to click on ‘Network Settings’ on the login page and select their preferred network for connection.
- Help URL – Provide a link that could prove useful to users when logging into the device, during the enrollment process, or onboarding.
- Allow users to reset password – Mark this checkbox to allow users to reset their local user account password after authenticating with cloud account.
EULA Settings
You can distribute End User License Agreement (EULA) for users to acknowledge. To do this, you can select a pre-configured EULA from the drop-down.
Login scripts
As you allow login to Windows using IdPs, the admin can also select a script to be executed automatically at every user login. The supported file formats for scripts include .bat, .cmd, and .ps1.
- Choose script file source
- Upload file – The option enables the user to upload the script directly from the device.
- Hexnode Repository– The script can also be uploaded from the Hexnode Repository if the file is already added to My Files under the Content tab in the Hexnode UEM portal. Scripts can also be generated using Hexnode Genie.
- Script Name – On uploading files, the file name field will be auto-populated.
- Arguments – If necessary, specify the arguments that would be required in the script.
- Timeout – Scripts that don’t complete execution within the specified period will be forcefully terminated. It is recommended to leave this value unchanged. The minimum value is 15 minutes.
Associate policy with Windows devices
If the policy has not been saved:
- Navigate to Policy Targets.
- Click on Devices/ Device Groups/ Users/ User Groups/ Domains.
- Choose the targets and click OK and then Save.
If you have the policy saved already:
- Go to the Policies tab and choose the desired policy.
- Click on the Manage drop-down and select Associate Targets.
- Choose the target entities and click Associate. You can choose devices, users, groups, and domains as the policy targets.
What happens at the device end?
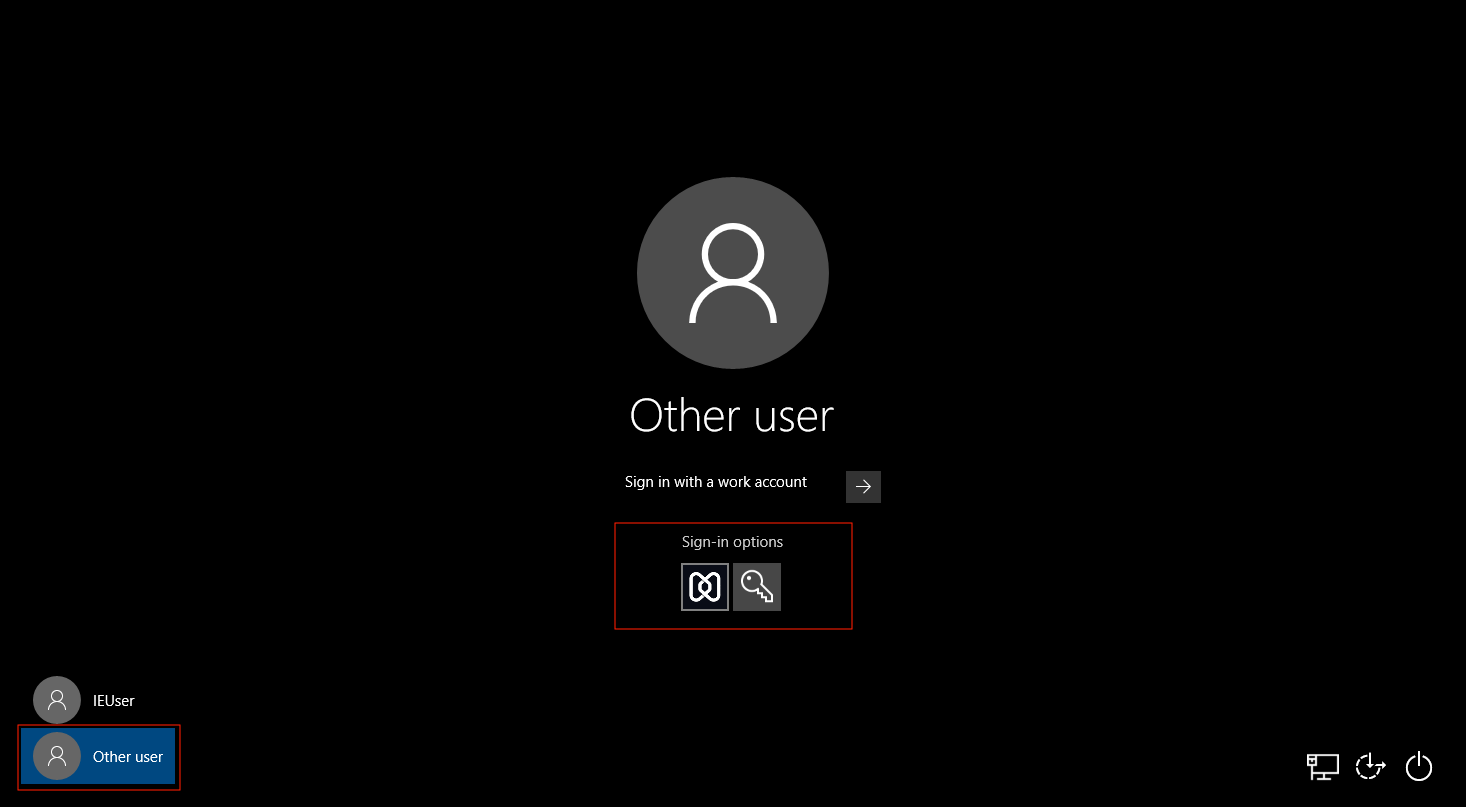
After the policy is applied to the device, the user has the option to either log in as they normally do with their local accounts or select the “Login with a work account” alternative. When the user clicks on “Log in with work account,” they are required to authenticate themselves using their cloud IdP credentials. After authentication, the user will be prompted to set a password for the new local account that is being created. Once it is done, the user will be logged into the device.
When the latest version of the Hexnode Access app is available, an ‘Install update‘ option will be displayed before the login interface. Users will be able to skip this prompt up to three times by clicking on “Restart later”. (Though, it is not recommended to delay the updates as it might affect the functionality.) After the update is deferred 3 times, users will have to initiate the app update by clicking on “Install update > Restart now”.


