Category filter
How to integrate Drata with Hexnode UEM for Mac
Drata is an automation tool for security and compliance that continuously tracks and gathers proof of a business’s security measures while optimizing operations to assure audit readiness. Drata offers various features via its 60+ advanced integrations, making centralized compliance management simple.
With Hexnode’s integration with Drata, organizations can effectively manage compliance-related info on all their Macs. Once the integration is complete, Drata can retrieve compliance-related information from Hexnode via an API connection rather than installing an agent on a device. This integration enhances the compliance assurance offered by Hexnode’s features. Drata not only extracts compliance-related data from Hexnode UEM and makes it available via the Drata portal, but it also generates reports and notifies the IT administrator in case there are any compliance-related discrepancies.
Start managing the compliance of your company’s Mac devices by learning how to integrate Hexnode with Drata & configure compliance-related policies.
Integrating Drata with Hexnode UEM
In the Hexnode UEM console,
- Log in to your Hexnode UEM console using the admin credentials.
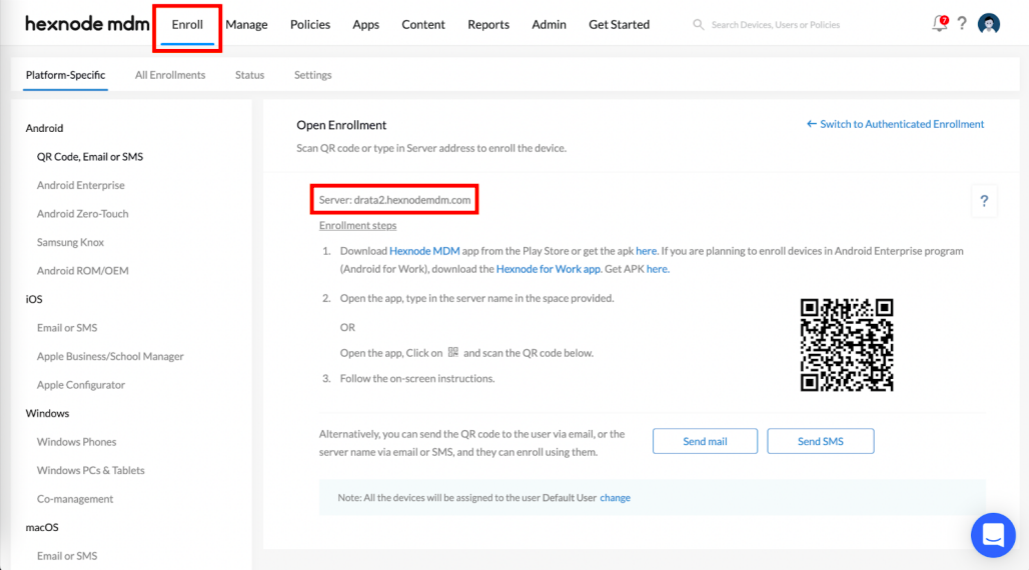
- Navigate to the Enroll tab. Copy the Server URL, this has to be entered as the API URL in Drata during setup.
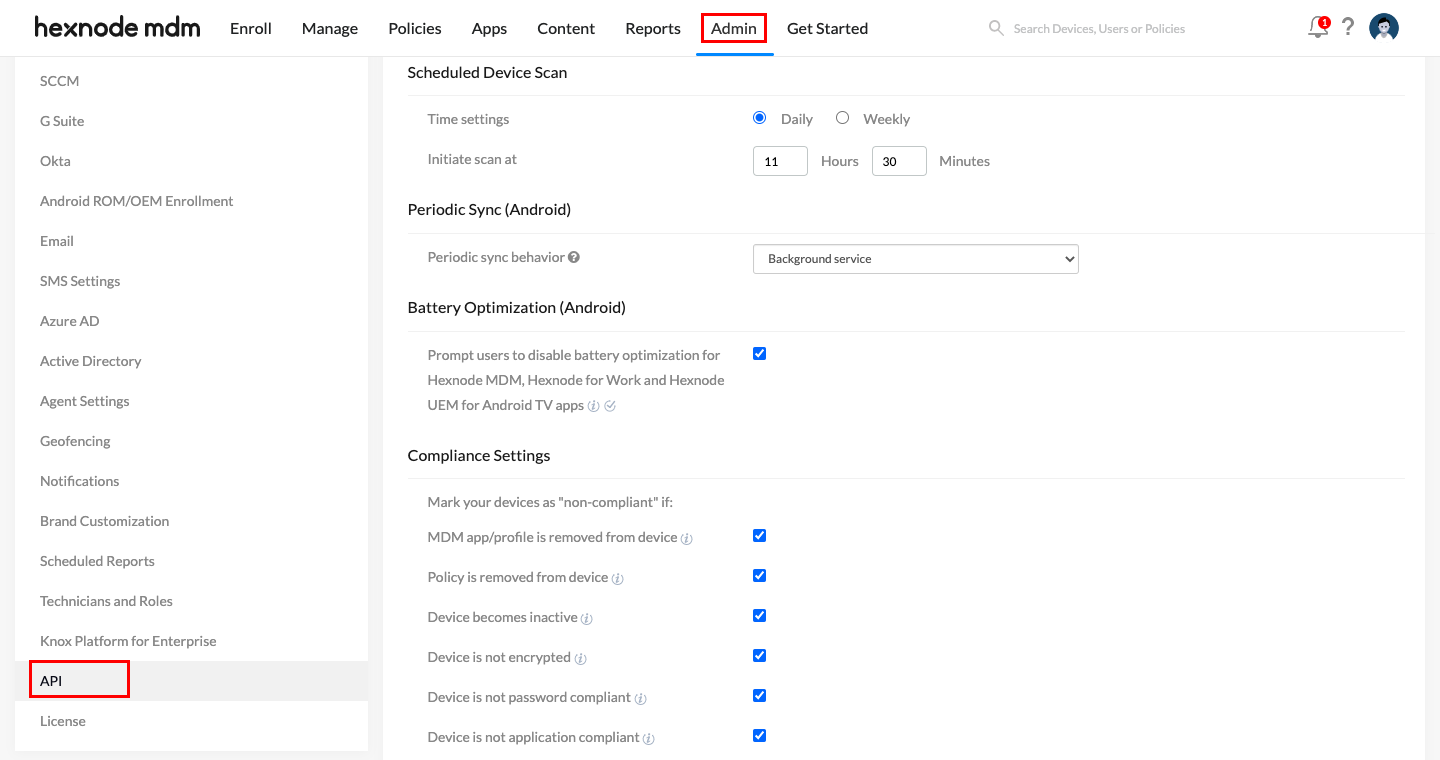
- Now, navigate to Admin > API.
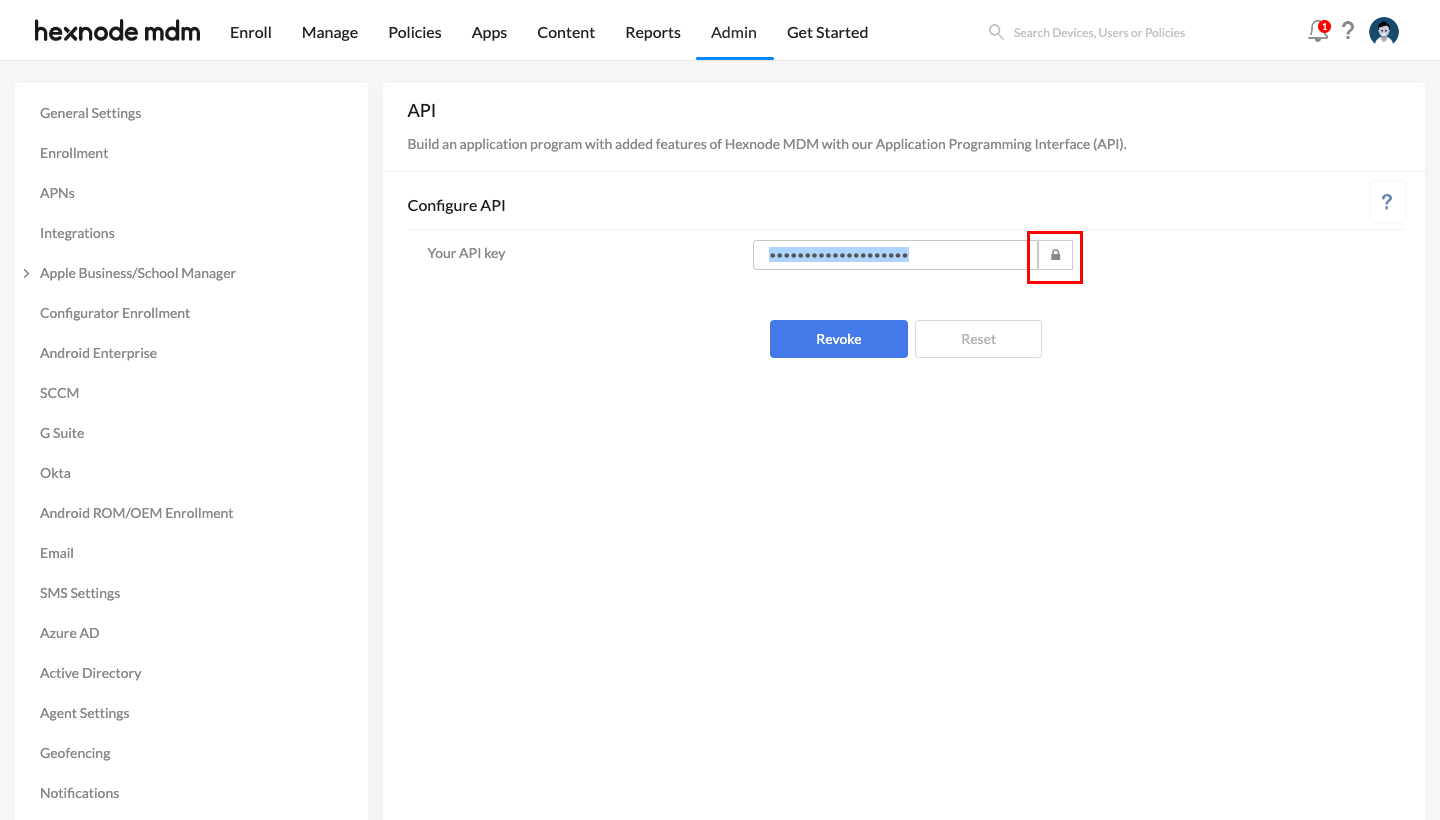
- In the API window, copy the API key and save it somewhere safe. This API key is required to configure the integration in the Drata portal.
In Drata portal,
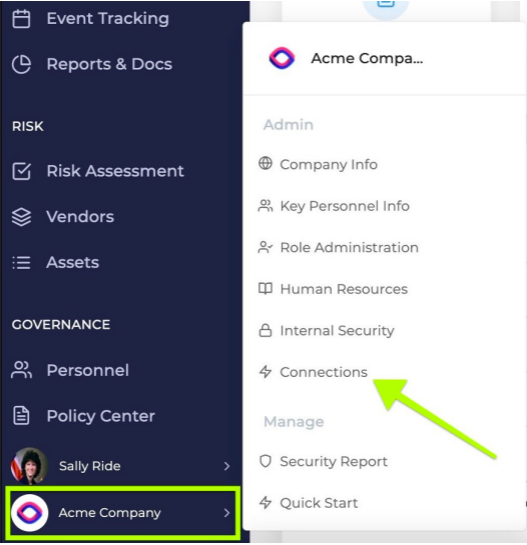
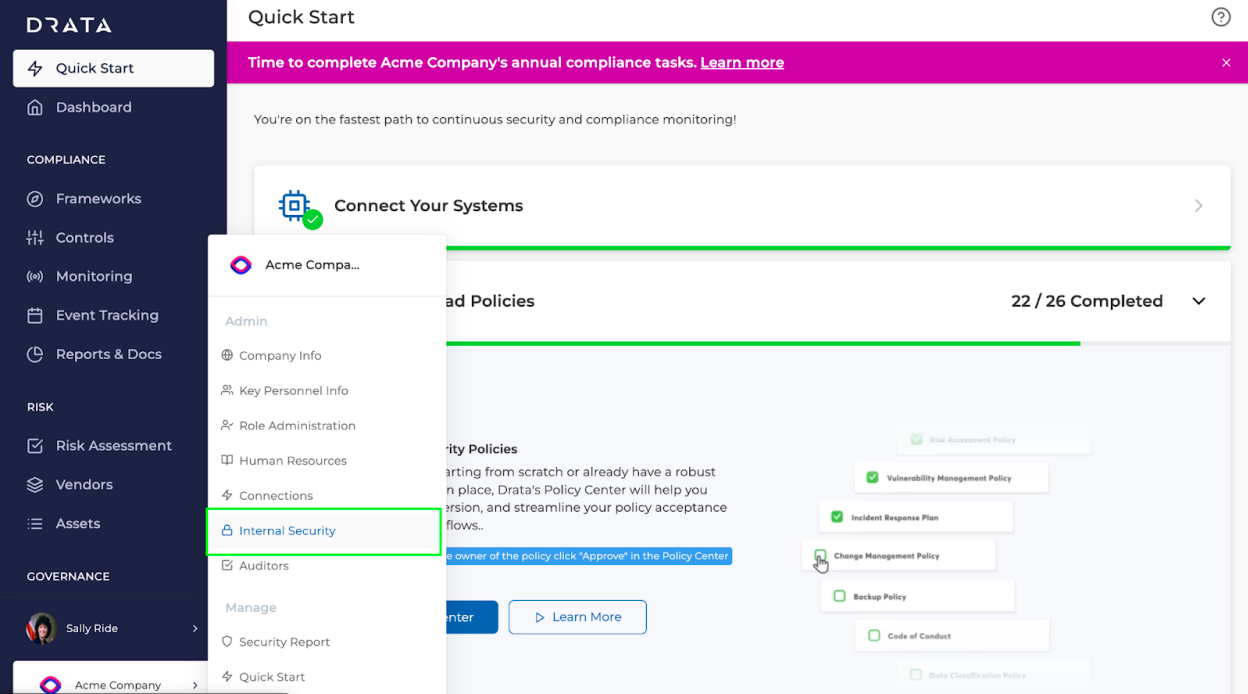
- In Drata, once you are signed in with your company’s credentials, select your company’s name from the blue sidebar present on the lower left. Select Connections from the menu that pops up.
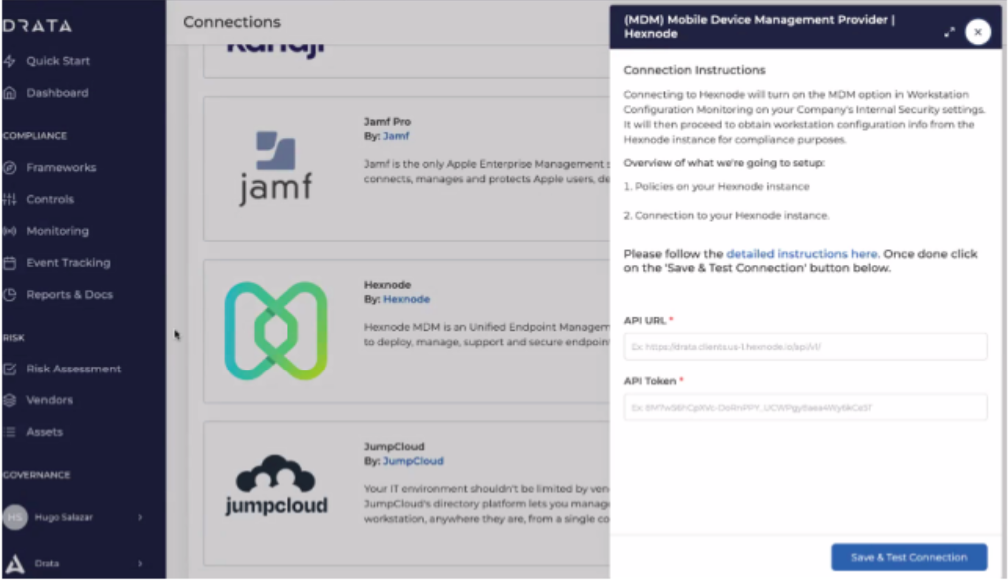
- The list of connections i.e., integrations will be displayed, scroll down and select Hexnode from the list of available integrations and click Connect.
- Once you click Connect, a dialog box will appear asking for the API URL and the API Token. Enter the URL of the server & the API key that you copied previously from the Hexnode console, here. Once you have entered the API URL & API key, click on Save & Test Connection. Make sure to include https:// at the beginning of the server URL (API URL).
- Now, to configure Hexnode in Drata for employee onboarding, navigate back to your company’s name on the blue sidebar. Select Internal Security from the menu that pops up.
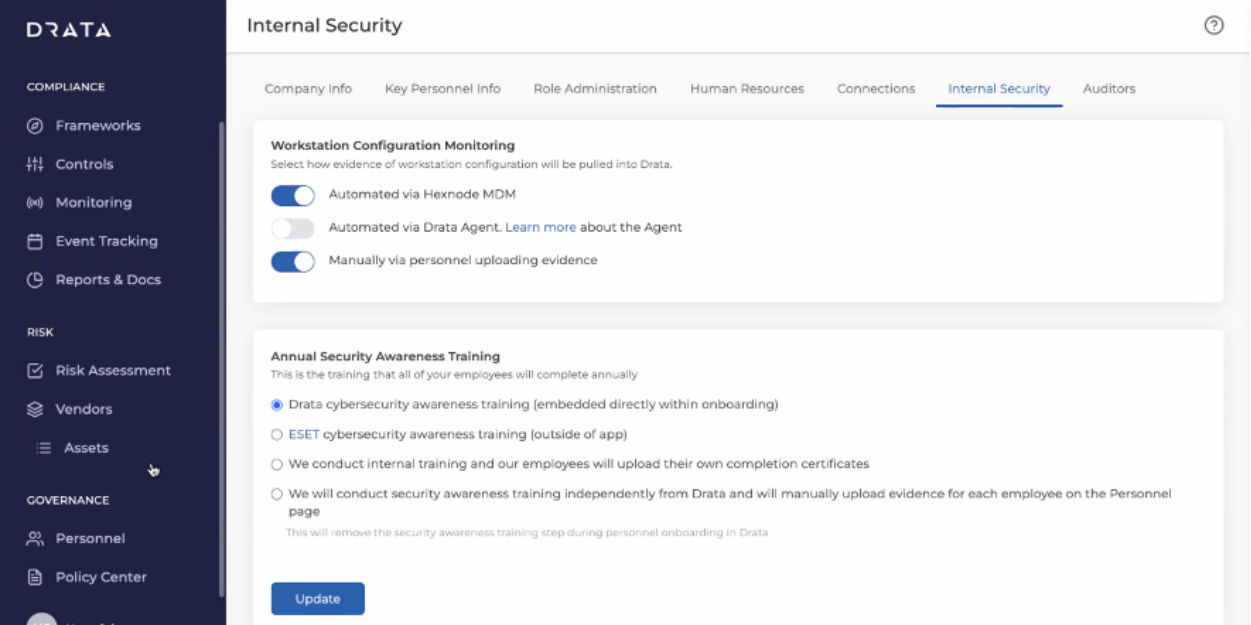
- In the Internal Security tab, enable Automated via Hexnode MDM and disable Automated via Drata Agent.
- Once these steps are completed, compliance-related policies for macOS devices should be configured in Hexnode UEM.
How to configure compliance-related policies in Hexnode?
The policies for Mac devices, such as FileVault, Firewall, Screensaver, Software updates, etc., should be configured in the Hexnode UEM portal & associated with the devices that need to be monitored. This enables Drata to gather compliance information related to macOS disc encryption, network security, screen settings, & macOS updates based on the policies.
So, once when the devices are enrolled and corresponding restrictions and policies are associated with them in Hexnode, Drata monitors and reports the compliance-related information. Follow the steps given below to configure policies related to Mac compliance.
FileVault
- Navigate to Policies > New Policy > New Blank Policy. Click Select.
- Provide a suitable policy name that includes the term “FileVault” so that Drata can detect the policy.
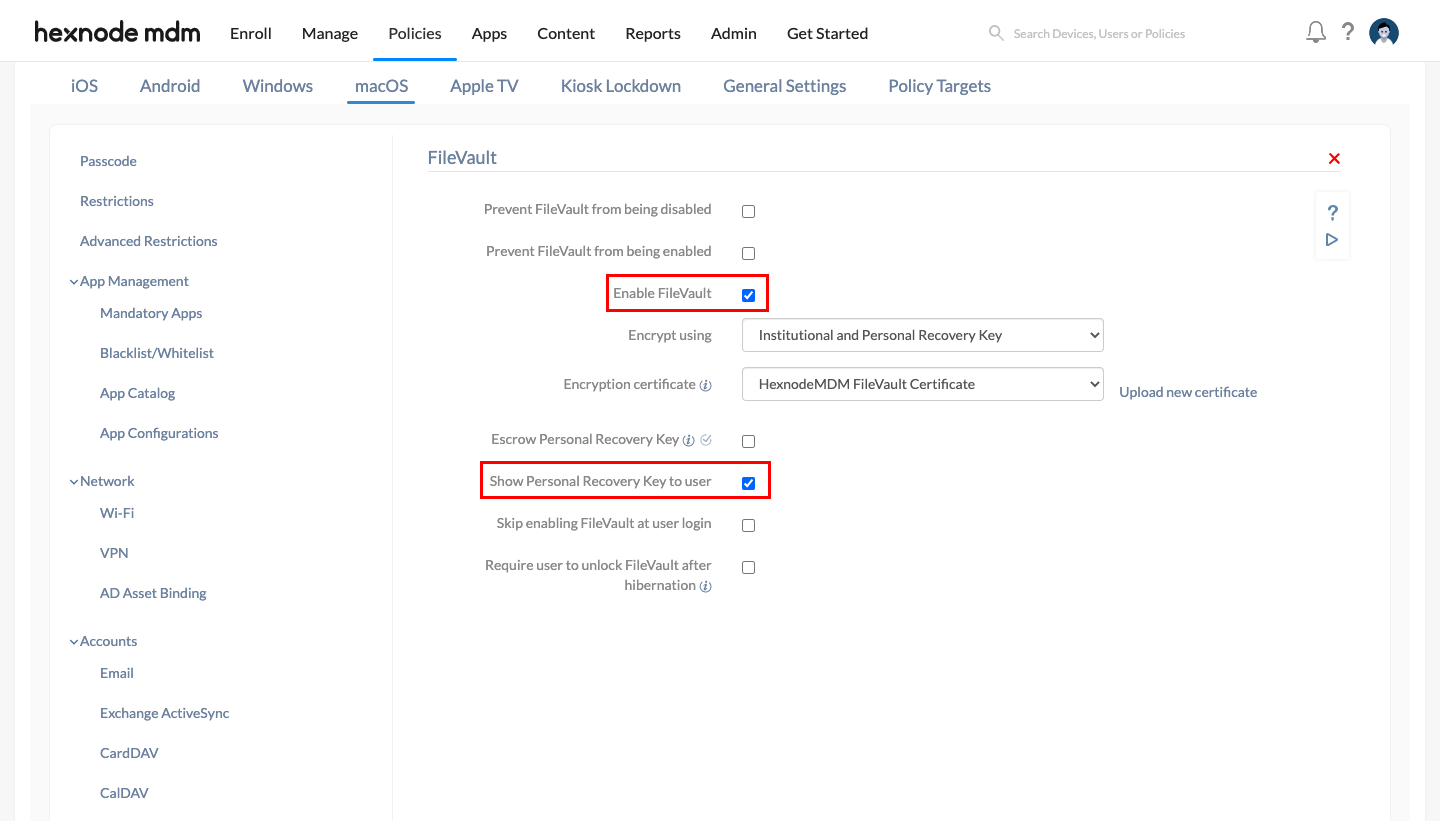
- Navigate to macOS > Security > FileVault and click Configure.
- Ensure that the “Enable FileVault” and “Show Personal Recovery Key to user” boxes are checked and configure the remaining fields as per requirement. For more information and step-by-step explanations, please refer to our document on FileVault.
- Navigate to Policy Targets > Add devices and select the devices to which the FileVault policy must be associated.
- Click Save.
Firewall
- Navigate to Policies > New Policy > New Blank Policy. Click Select.
- Provide a suitable policy name that includes the term “Firewall” so that Drata can detect the policy.
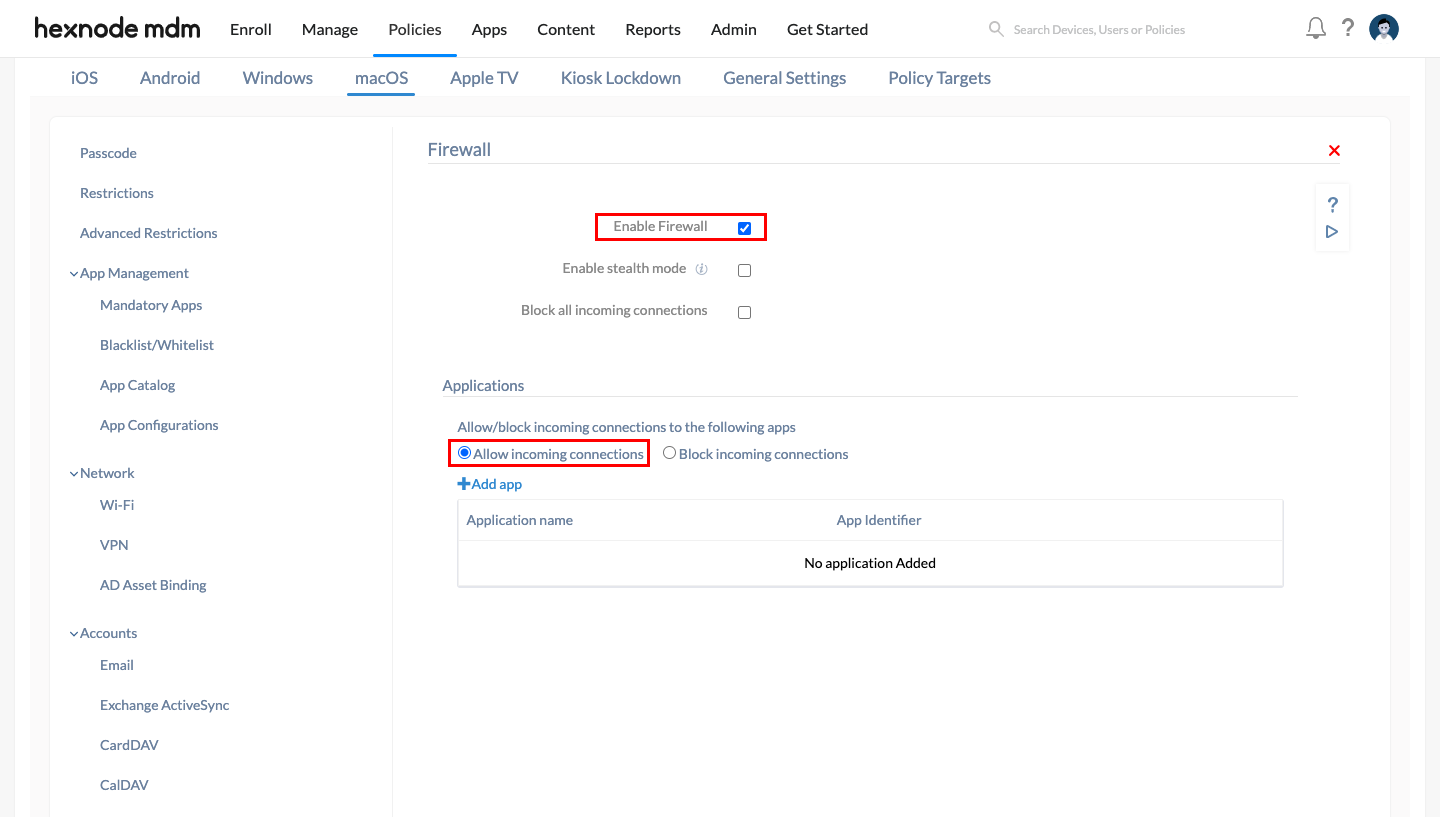
- Navigate to macOS > Security > Firewall and click Configure.
- Ensure that the “Enable Firewall” and “Allow incoming connections” options are checked and configure the remaining fields as per requirement. For more information and step-by-step explanations, please refer to our document on Firewall for Mac.
- Navigate to Policy Targets > Add devices and select the devices to which the Firewall policy must be associated.
- Click Save.
Screensaver
- Navigate to Policies > New Policy > New Blank Policy. Click Select.
- Provide a suitable policy name that includes the term “Screensaver” so that Drata can detect the policy.
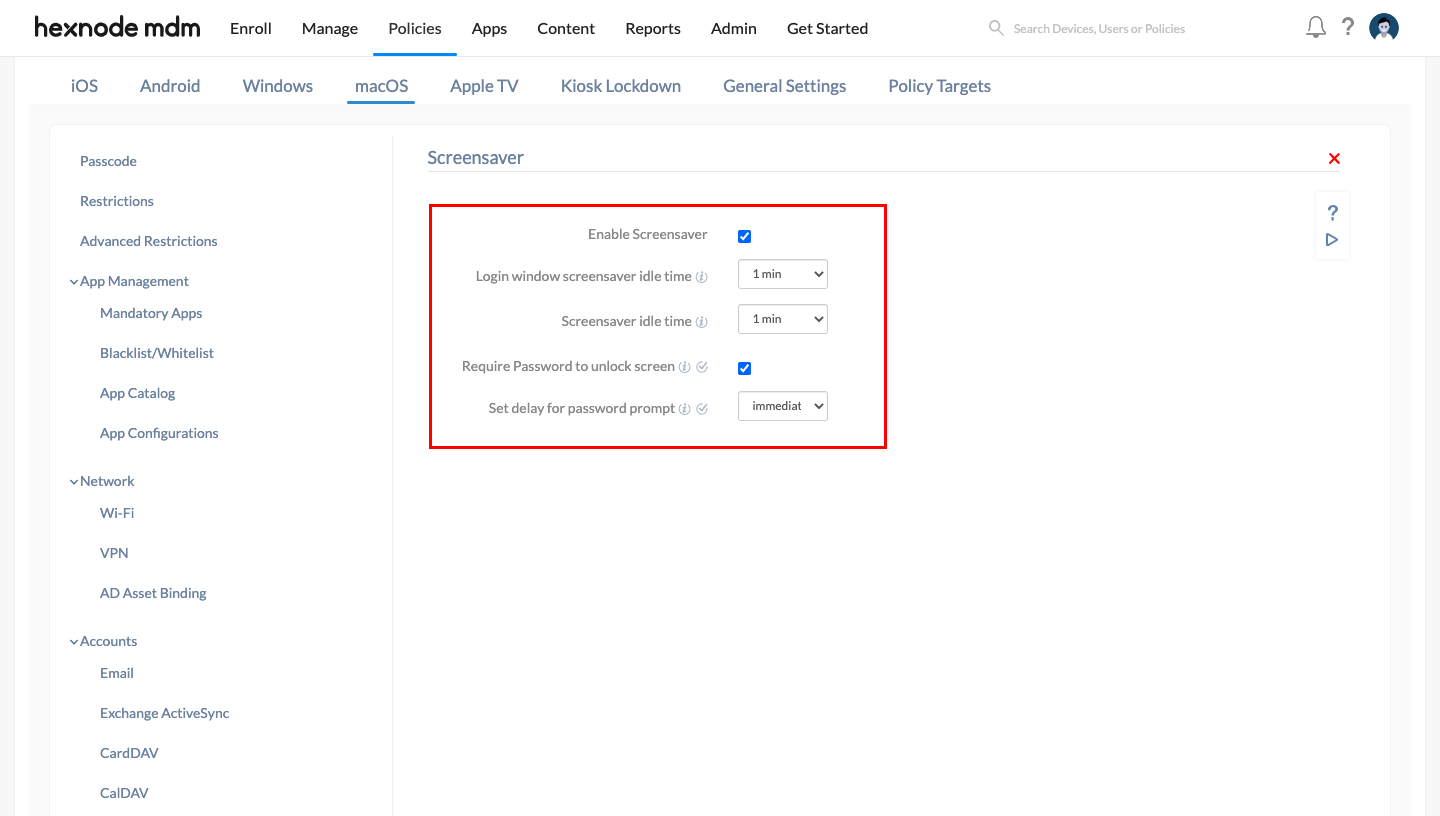
- Navigate to macOS > Configurations > Screensaver and click Configure.
- Ensure that the “Enable Screensaver” and “Require Password to unlock screen” options are checked.
- It is recommended to set both “Login window screensaver idle time” & “Screensaver idle time” as 1 min. Also, it is recommended to set “Set delay for password prompt” as “immediately”. For more information and step-by-step explanations, please refer to our document on configuring the Screensaver policy for Mac.
- Navigate to Policy Targets > Add devices and select the devices to which the Screensaver policy must be associated.
- Click Save.
Software Update
- Navigate to Policies > New Policy > New Blank Policy. Click Select.
- Provide a suitable policy name that includes the term “Software Update” so that Drata can detect the policy.
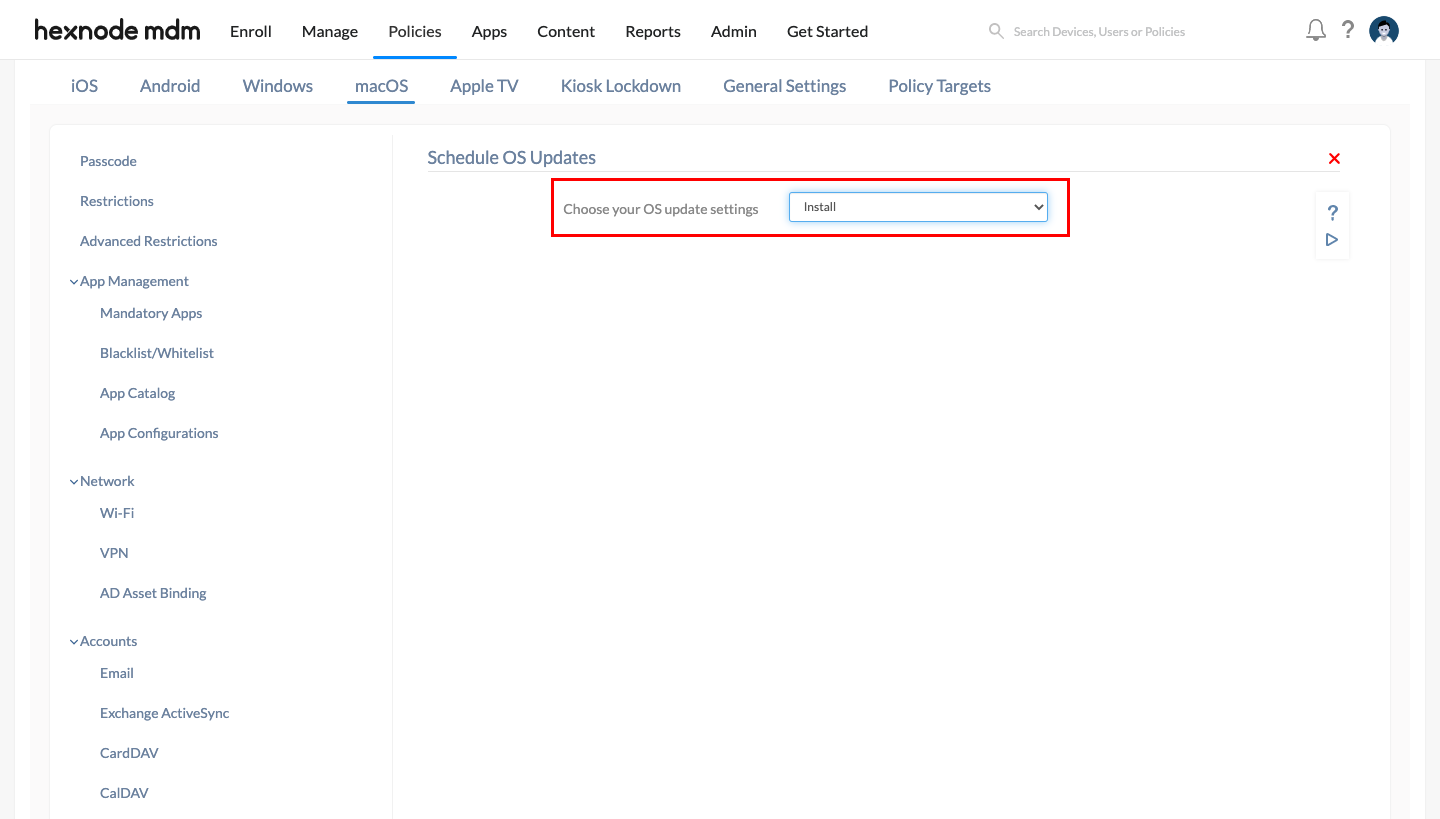
- Navigate to macOS > Security > OS Updates and click Configure.
- It is recommended to set “Choose your OS update settings” as “Install”. For more information and step-by-step explanations, please refer to our document on scheduling OS updates on Mac.
- Navigate to Policy Targets > Add devices and select the devices to which the Schedule OS updates policy must be associated.
- Click Save.
Gate Keeper
- Navigate to Policies > New Policy > New Blank Policy. Click Select.
- Provide a suitable policy name that includes the term “Gate Keeper” so that Drata can detect the policy.
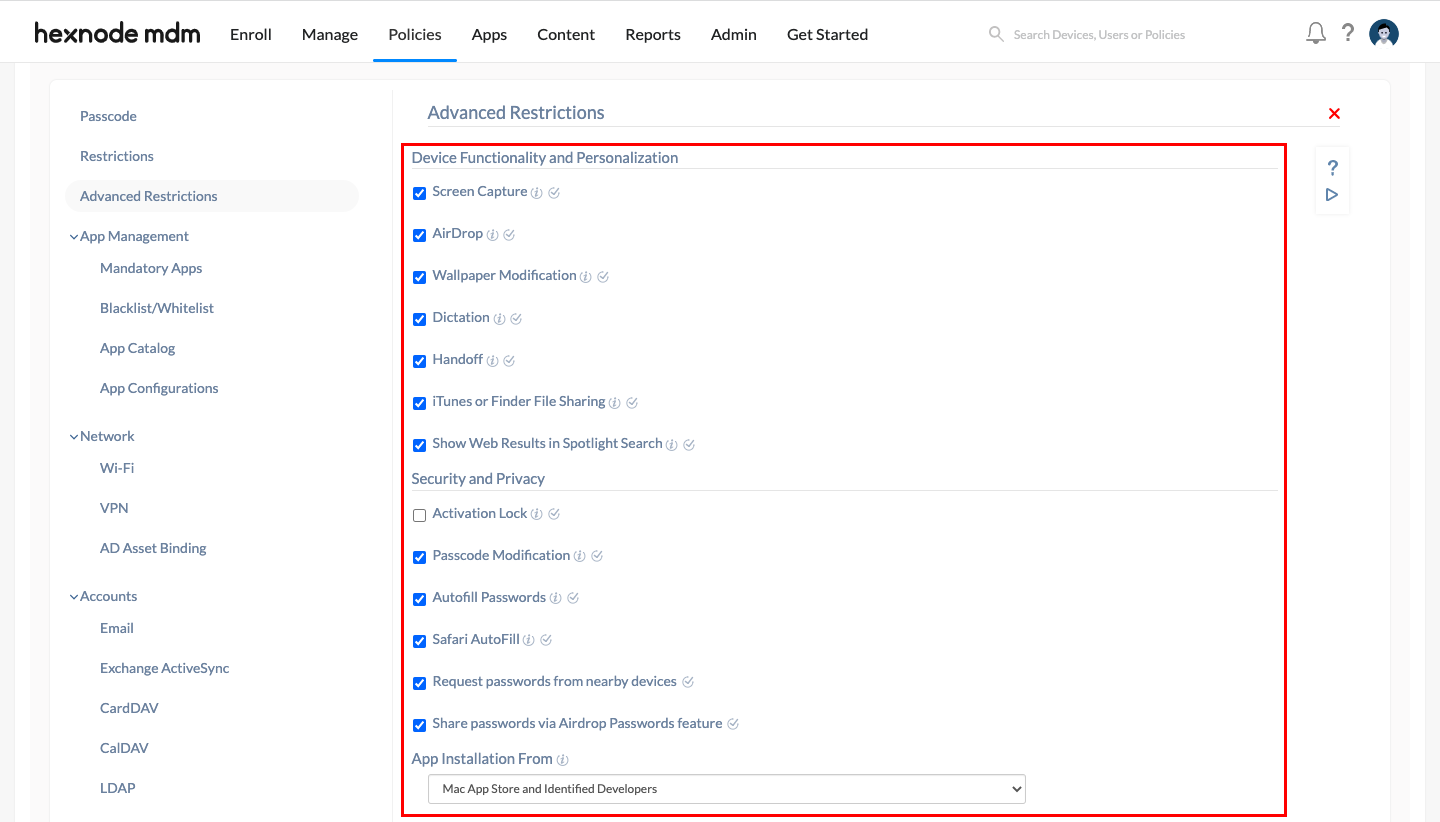
- Navigate to macOS > Advanced Restrictions and click Configure.
- The following options are recommended to be configured under Advanced Restrictions.
- Check all the options under “Device Functionality and Personalization”.
- Check all the options under “Security & Privacy” excluding the “Activation Lock” option.
- In the “App installation From” dropdown, select “Mac App Store and Identified Developers”.
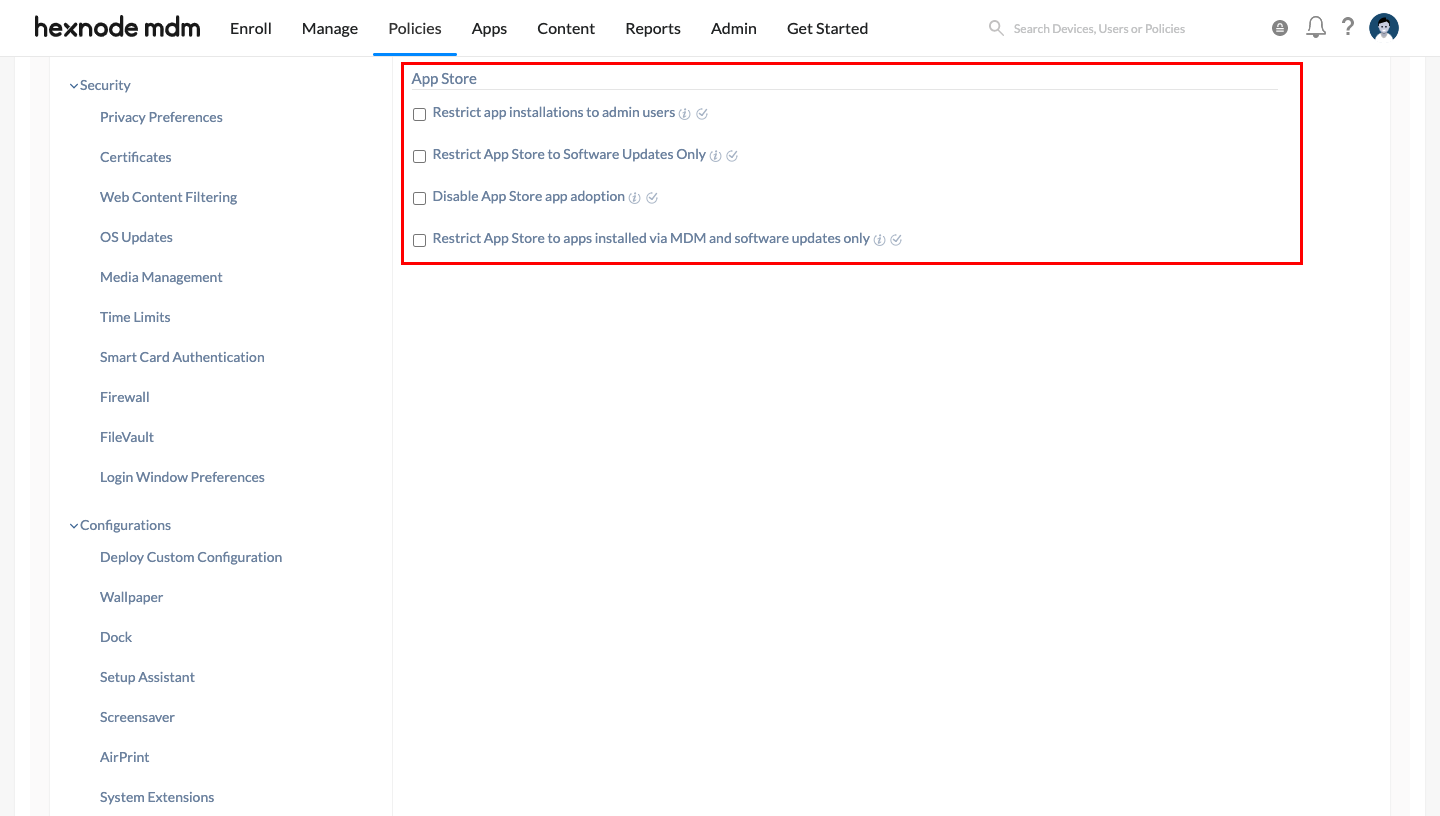
- Uncheck all the options under “App Store”. For more information and step-by-step explanations, please refer to our document on Advanced restrictions for Mac.
- Navigate to Policy Targets > Add devices and select the devices to which the Gate Keeper policy must be associated.
- Click Save.
The integration is now complete and Drata will fetch essential data regarding macOS devices enrolled in Hexnode UEM based on the configured policies.
