Category filter
How to configure VPN Settings on Android Devices
A Virtual Private Network (VPN) lets the users access the organization network remotely. It enhances security by allowing the users to send data through a private network. A private network is created virtually across the public network, and the interaction is done via this virtual network. To start a connection with a VPN server, devices use a VPN connection profile. Hexnode UEM allows you to configure VPN profiles for Android devices. Once configured, the VPN connection will be listed among the available networks.
Configure VPN Settings
- Login to your Hexnode UEM Portal.
- Go to Policies.
- Select an existing policy or create a new one by clicking on New Policy.
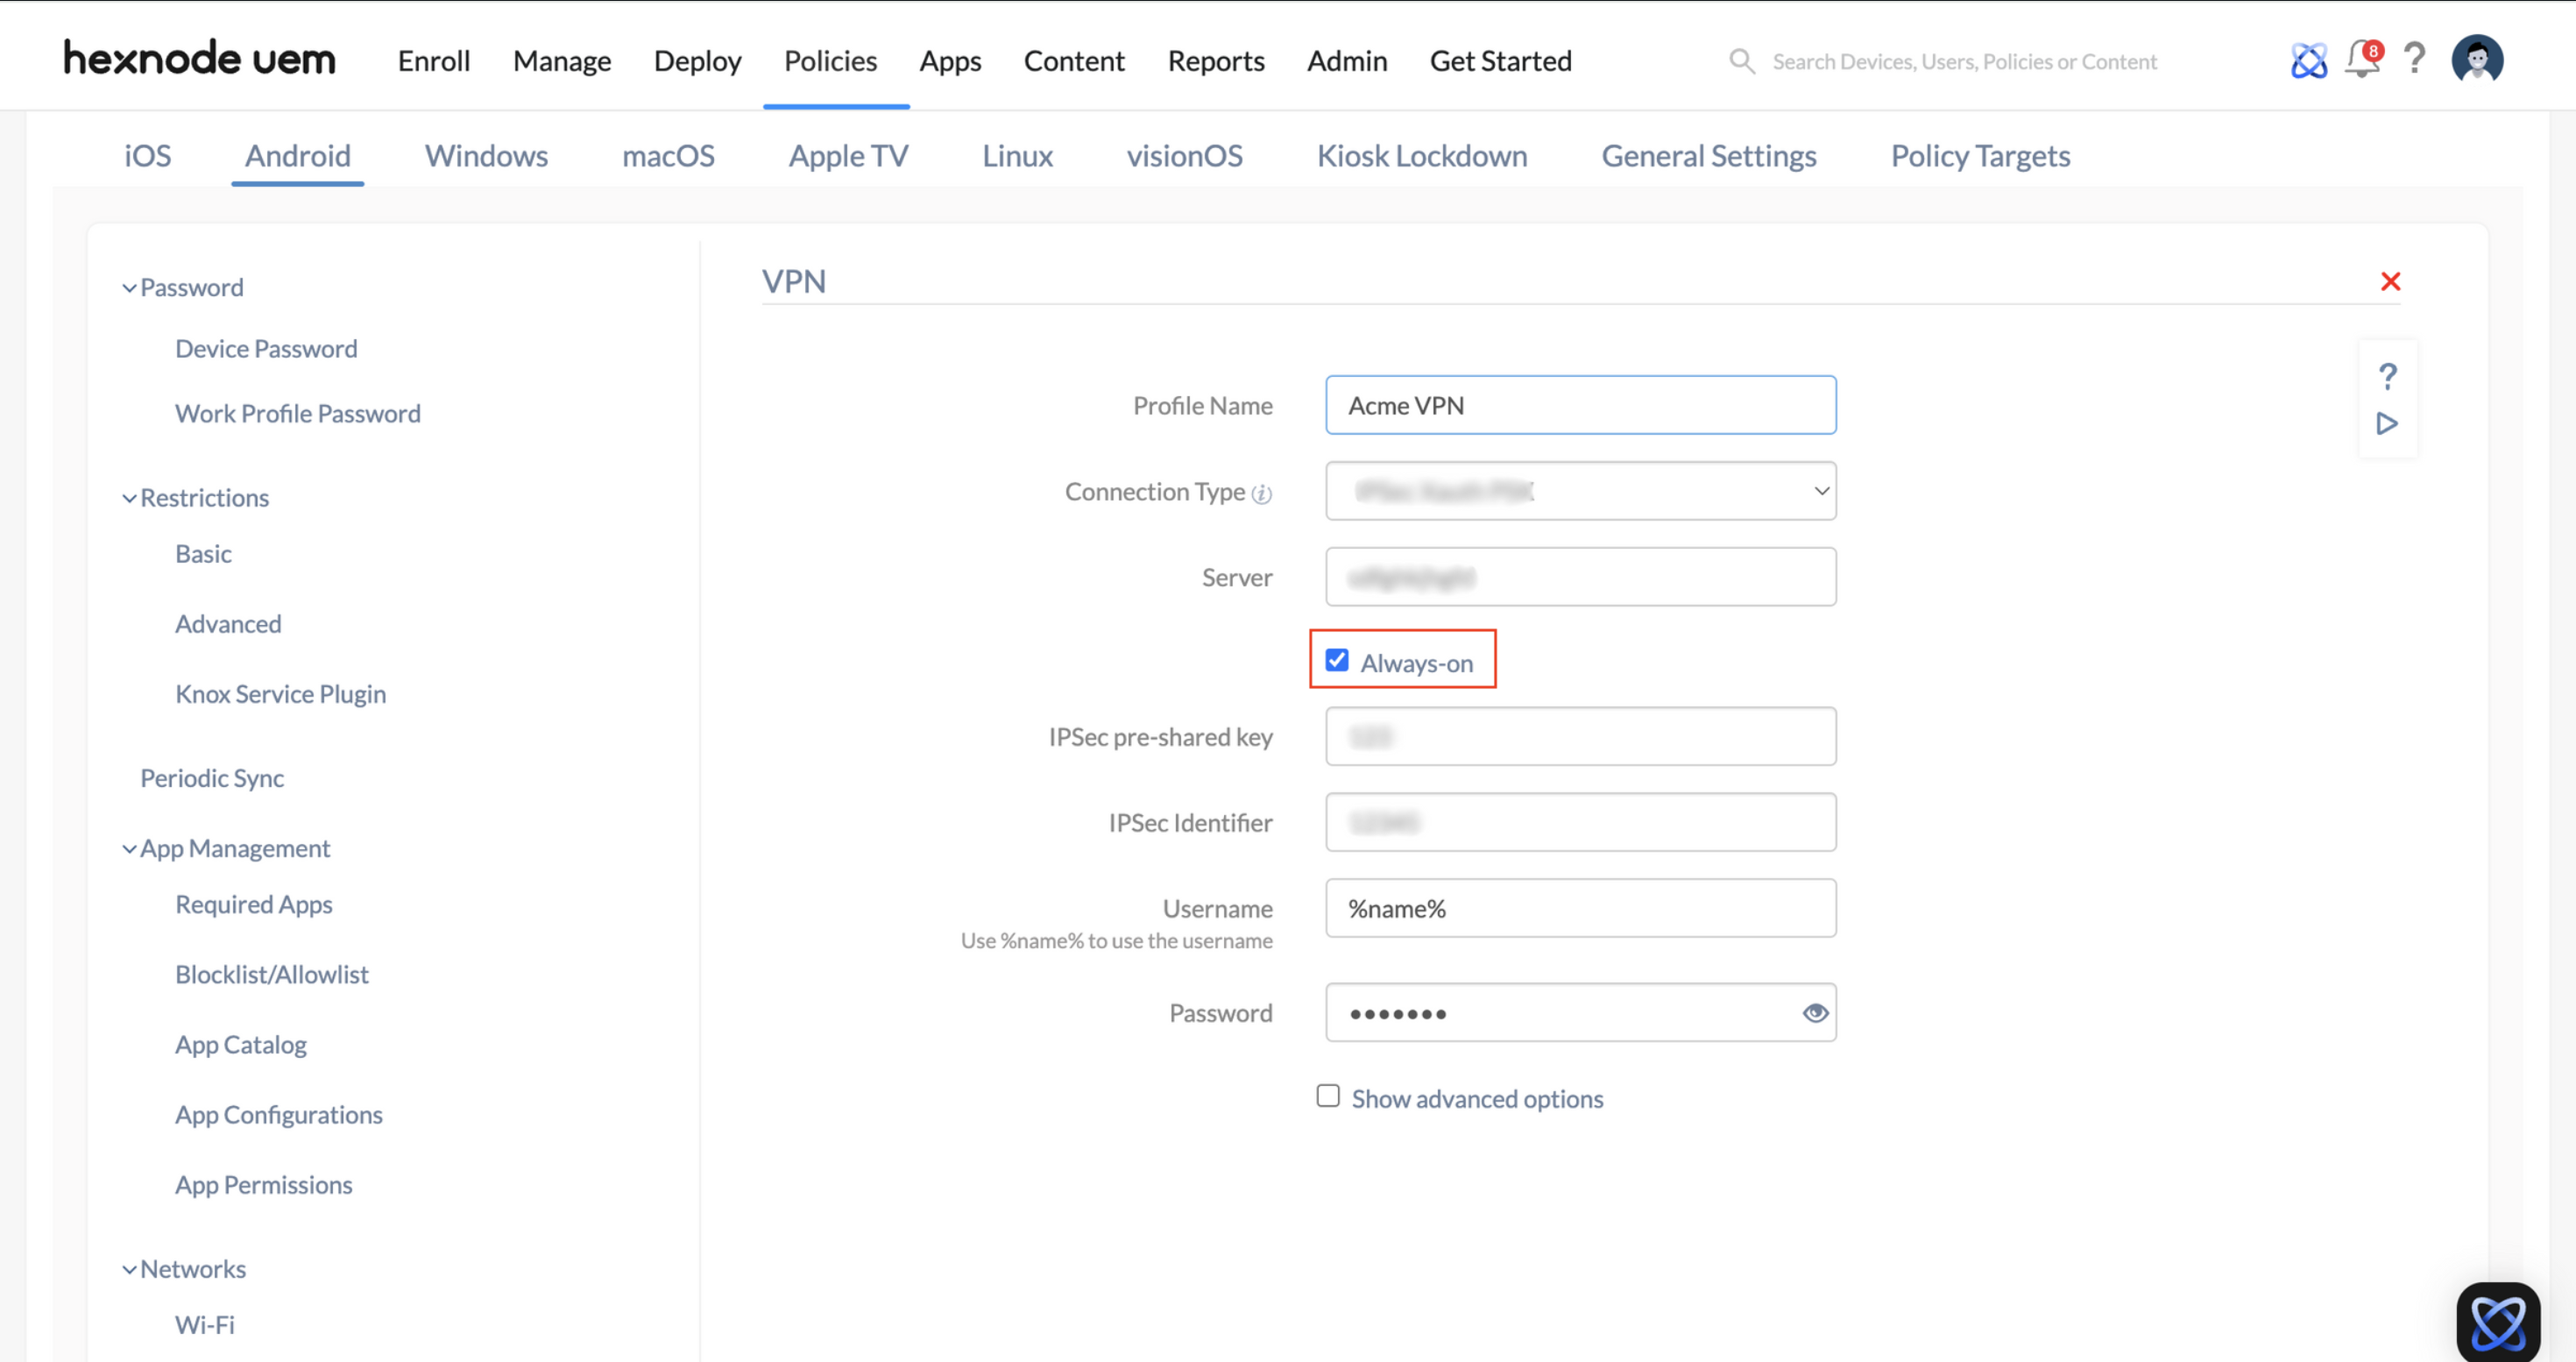
- From Android > Networks, select VPN and click on Configure.
You will have the following options to be configured.

Connection types supported on Knox devices
| Settings | Description |
|---|---|
| Profile Name | Provide a name to identify VPN on the device. Among the list of available connections, this will be the displayed name for the VPN. |
| Server | Provide the domain name of the server or the IP address of the server to which the devices get connected. |
| Connection Type | Select the connection type to be used. The remaining settings changes in accordance with the selected connection type. |
| Username | Provide the username for authenticating the VPN Server. This field supports the use of wildcards. The supported wildcard is %name%. |
| Password | Provide the password of the account used for authenticating the VPN Server. |
The following options will be enabled when Show advanced options is clicked.
| Settings | Description |
|---|---|
| DNS search domains | Provide the internal DNS domain to be used, once the connection is established. |
| DNS servers | Provide the internal DNS server to be used, once the connection is established. |
| Forwarding routes | Provide the forwarding route to send the traffic through the VPN interface to the destination. Forwarding routing is required to tell the devices to send traffic to the destination through the VPN interface. |
Based on the Connection Type selected, you will have the following options to be configured.
Configuring PPTP Connection Type
| PPTP Settings | Description |
|---|---|
| PPP encryption (MPPE) | Check this option to enable PPP (Point-to-Point Protocol) encryption on the android devices. |
Configuring L2TP/IPSec PSK Connection Type
| L2TP/IPSec PSK Settings | Description |
|---|---|
| L2TP secret | A second password required to establish a connection. Also known as pre-shared key, the shared secret is previously known to the device and the VPN server, and no one else. This key is used just to establish a connection and not used for encryption. |
| IPSec pre-shared key | Provide the pre-shared key for IPSec connection type. This key is used only for authentication and not for encryption. |
| IPSec Identifier | Provide the IPSec Identifier to establish the VPN authentication. |
Configuring IPSec Xauth PSK Connection Type
| IPSec Xauth PSK Settings | Description |
|---|---|
| IPSec pre-shared key | Input the pre-shared key required for IPSec connection type. It is used only for authenticating the connection and not for encryption. |
| IPSec Identifier | Provide the IPSec Identifier to establish the VPN authentication. |
Configuring IPSec IKEv2 PSK Connection Type
| IPSec IKEv2 PSK Settings | Description |
|---|---|
| IPSec pre-shared key | IPSec connection type requires the pre-shared key to authenticate the connection. Note that this key is not used for encryption. |
| IPSec Identifier | Provide the IPSec Identifier to establish the VPN authentication. |
Configuring L2TP/IPSec RSA Connection Type
| L2TP/IPSec RSA Settings | Description |
|---|---|
| L2TP secret | L2TP secret, also known as the pre-shared key, is the alternate password for establishing the connection. It is a shared secret previously known only to the VPN server and the device. This pre-shared key can be used only for establishing the connection and not for encryption. |
| Ca Certificate | Select the Certificate Authority (Ca) trusted certificate for establishing L2TP/IPSec RSA connection. The assigned trusted certificate authenticates the device to establish a connection to the VPN server. It must be previously uploaded under Android > Security > Certificates. |
| User Certificate | Select the user certificate required for establishing L2TP/IPSec RSA connection. Users can assure their identity for remote VPN access by using user certificates. This certificate must be previously uploaded under Android > Security > Certificates. |
Configuring IPSec Xauth RSA Connection Type
| IPSec Xauth RSA Settings | Description |
|---|---|
| Ca Certificate | Choose the Certificate Authority (Ca) trusted certificate uploaded under Android > Security > Certificate for authenticating the connection. It is this certificate that establishes the connection between the device and the VPN server. |
| User Certificate | Select the user certificate required for establishing IPSec Xauth RSA connection. Users can assure their identity for remote VPN access by using user certificates. This certificate must be previously uploaded under Android > Security > Certificates. |
Configuring IPSec Hybrid RSA Connection Type
| IPSec Hybrid RSA Settings | Settings |
|---|---|
| Ca Certificate | For establishing IPSec Hybrid RSA connection, select the Certificate Authority (Ca) trusted certificate uploaded under Android > Security > Certificate. This certificate authenticates the device to establish a connection with the VPN server. |
Configuring IPSec IKEv2 RSA Connection Type
| IPSec IKEv2 RSA Settings | Description |
|---|---|
| User Certificate | Select the user certificate required for establishing IPSec IKEv2 RSA connection. Users can assure their identity for remote VPN access by using user certificates. This certificate must be previously uploaded under Android > Security > Certificates. |
Always-on VPN for Android
You can configure the selected VPN network to be always active on the device by checking Always-on option. Selecting this option makes the device get connected to the VPN network always. This option is available for L2TP/IPSec PSK, IPSec Xauth PSK, IPSec IKEv2 PSK, L2TP/IPSec RSA, IPSec Xauth RSA, IPSec Hybrid RSA, IPSec IKEv2 RSA, SonicWall, Check Point, F5 Access, Palo Alto, and Cisco AnyConnect.
Configuring Always-on Connection Type
The Always-on connection type in Hexnode allows administrators to configure and enforce VPN connections on devices through third-party applications that support VPN configuration.These applications include Enterprise Apps—privately distributed within an organization—and Managed Google Play Apps—publicly available apps that can be managed through Hexnode.
You can also configure an app to use an Always-on VPN for its network connection by deploying the necessary configurations.
To configure the Always-on connection type:
- Enter the VPN profile name.
- Select the connection type as Always-on.
- Click on the Select App option to choose the app to configure the VPN.
- Select Enterprise App or Managed Google Play App depending on the type of app you want to configure VPN.
- Click on the Select button to choose the app to configure.
- The app configuration screen is displayed. Configure the available options and click Done.
- For Enterprise apps, click on the Advanced settings option. Upload the JSON file with the required configurations and click Done.
- For Managed Google Play App configure the available options and click Done.
- Enable the VPN Lockdown option to enforce the configured VPN connection, restricting access to other networks, including mobile data, whenever the VPN is disconnected or unavailable.
- (Optional) You can enable the Bypass Lockdown option to allow selected apps direct access to the device’s cellular data or Wi-Fi network when the VPN is in lockdown mode but not connected.
This option is available only when the VPN Lockdown option is enabled.
- Click on the Allowed Apps option to allow specific apps to access the device’s cellular data/Wi-Fi network, even when the device is locked to the configured VPN.
This option is available only when the Bypass Lockdown option is enabled.
Configuring third-party VPN app Connection Types
You can configure third-party VPN apps like SonicWall, Check Point, F5 Access, Palo Alto, and Cisco AnyConnect as connection types from the Hexnode console.
| Settings | Description |
|---|---|
| Profile Name | Provide a name to identify VPN on the device. Among the list of available connections, this will be the displayed name for the VPN. |
| Server | Provide the domain name of the server or the IP address of the server to which the devices get connected. |
| Connection Type | Select the connection type to be used. The available third-party VPN app connection types are SonicWall, Check Point, F5 Access, Palo Alto, and Cisco AnyConnect. |
| Advanced configuration | This field provides the options to configure third-party VPN apps. |
| Always-on | Selecting this option makes the device get connected to the VPN network always. |
| VPN Lockdown | Enabling this option enforces the configured VPN connection, restricting access to other networks, including mobile data, whenever the VPN is disconnected or unavailable. |
| Bypass Lockdown | If enabled, this option grants selected apps direct access to the device’s cellular data/Wi-Fi network, when the VPN is in lockdown mode but not connected. This option is available when the VPN Lockdown option is enabled. |
| Allowed Apps | Admins can allow specific apps to access the device’s cellular data/Wi-Fi network, even when the device is locked to the configured VPN. This option is available only when the Bypass Lockdown option is enabled. |
Associate Policies with Devices / Groups
If the policy has not yet been saved.
- Navigate to Policy Targets.
- Click on +Add Devices.
- Select the devices and click OK.
- Click on Save to apply the policies to devices.
Apart from devices, you can also associate the policies with device groups, user and user groups from “Policy Targets”.
If the policy has been saved, you can associate it by another method.
- From Policies tab, check the policies to be associated.
- Click on Manage → Associate Targets and select the device.
- Click on Associate to apply policy to the devices.
What happens at the device end?
Once the policy is associated with the device, the pushed VPN network will be visible in the VPN section of the Settings app of the device. The user can connect to the configured network without authenticating with the network password.


