Category filter
How to configure supervision in macOS devices?
What is supervision?
Supervision is a specialized mode of device management introduced by Apple to give schools, businesses, and other organizations more control over their devices. Enabling supervision on corporate devices extends the management capabilities of an enterprise. It securely configures the devices for organizational work.
When a device is in supervised mode, administrators have better control over device settings and functionality enabling them to apply additional restrictions and automate actions. It offers more configurations and features that are not available on the unsupervised device.
History of macOS supervision
Supervision was first made available only for iOS 10.5 or later devices but was then extended to other Apple devices, including Macs. Supervision provides more device management features for iOS/iPadOS when compared to Mac. However, organizations possibly manage to attain granular control over Mac with supervision.
Before the 10.14.4 Mojave update, macOS devices were to be enrolled solely via Automated Device Enrollment (previously known as DEP) for supervision. IT administrators have to enable supervision while preparing the configuration profile for DEP enrollment. But following the introduction of the User-approved MDM (UAMDM) enrollment method, macOS devices could have supervision automatically enabled if the device enrollment is done with the approval of the local administrator account of the endpoint. UAMDM removed the restrictions for managing security-sensitive settings that were earlier present for macOS devices enrolled using DEP.
How to supervise macOS devices?
There are multiple methods to supervise a macOS device:
- For macOS versions below 10.14.4 Mojave, supervision can be enabled if the enrollment is done via DEP/Automated Device Enrollment. This method continues to be viable for macOS 10.14.4 or later devices.
- Adding the devices to Apple Business Manager using Apple Configurator (v2.5 or later) also enables supervision on Mac. However, the devices must run macOS 12 or later with an Apple M1 Silicon or T2 Security chip.
- Devices running macOS 10.14.4 and later get automatically supervised if enrolled via the manual, User-Approved MDM (UAMDM) enrollment. Hexnode offers UAMDM in the form of Email or SMS enrollment and Self-enrollment, where an administrator account has to approve the enrollment. Enrolled devices can also be supervised if they have been updated to macOS 11+ and enrollment in MDM has been permitted by a local administrator account.
Supervising macOS devices using DEP/ Automated Device Enrollment
Automated Device Enrollment facilitates bulk deployment of macOS devices by applying settings and configurations automatically upon initial device startup, making them ready for use right out of the box. In addition to adding the devices to DEP, we can apply supervision using this enrollment method.
Enroll your organization in Apple Business/School Manager before configuring DEP with Hexnode.
Configure the Device Enrollment Program (DEP) in Hexnode UEM
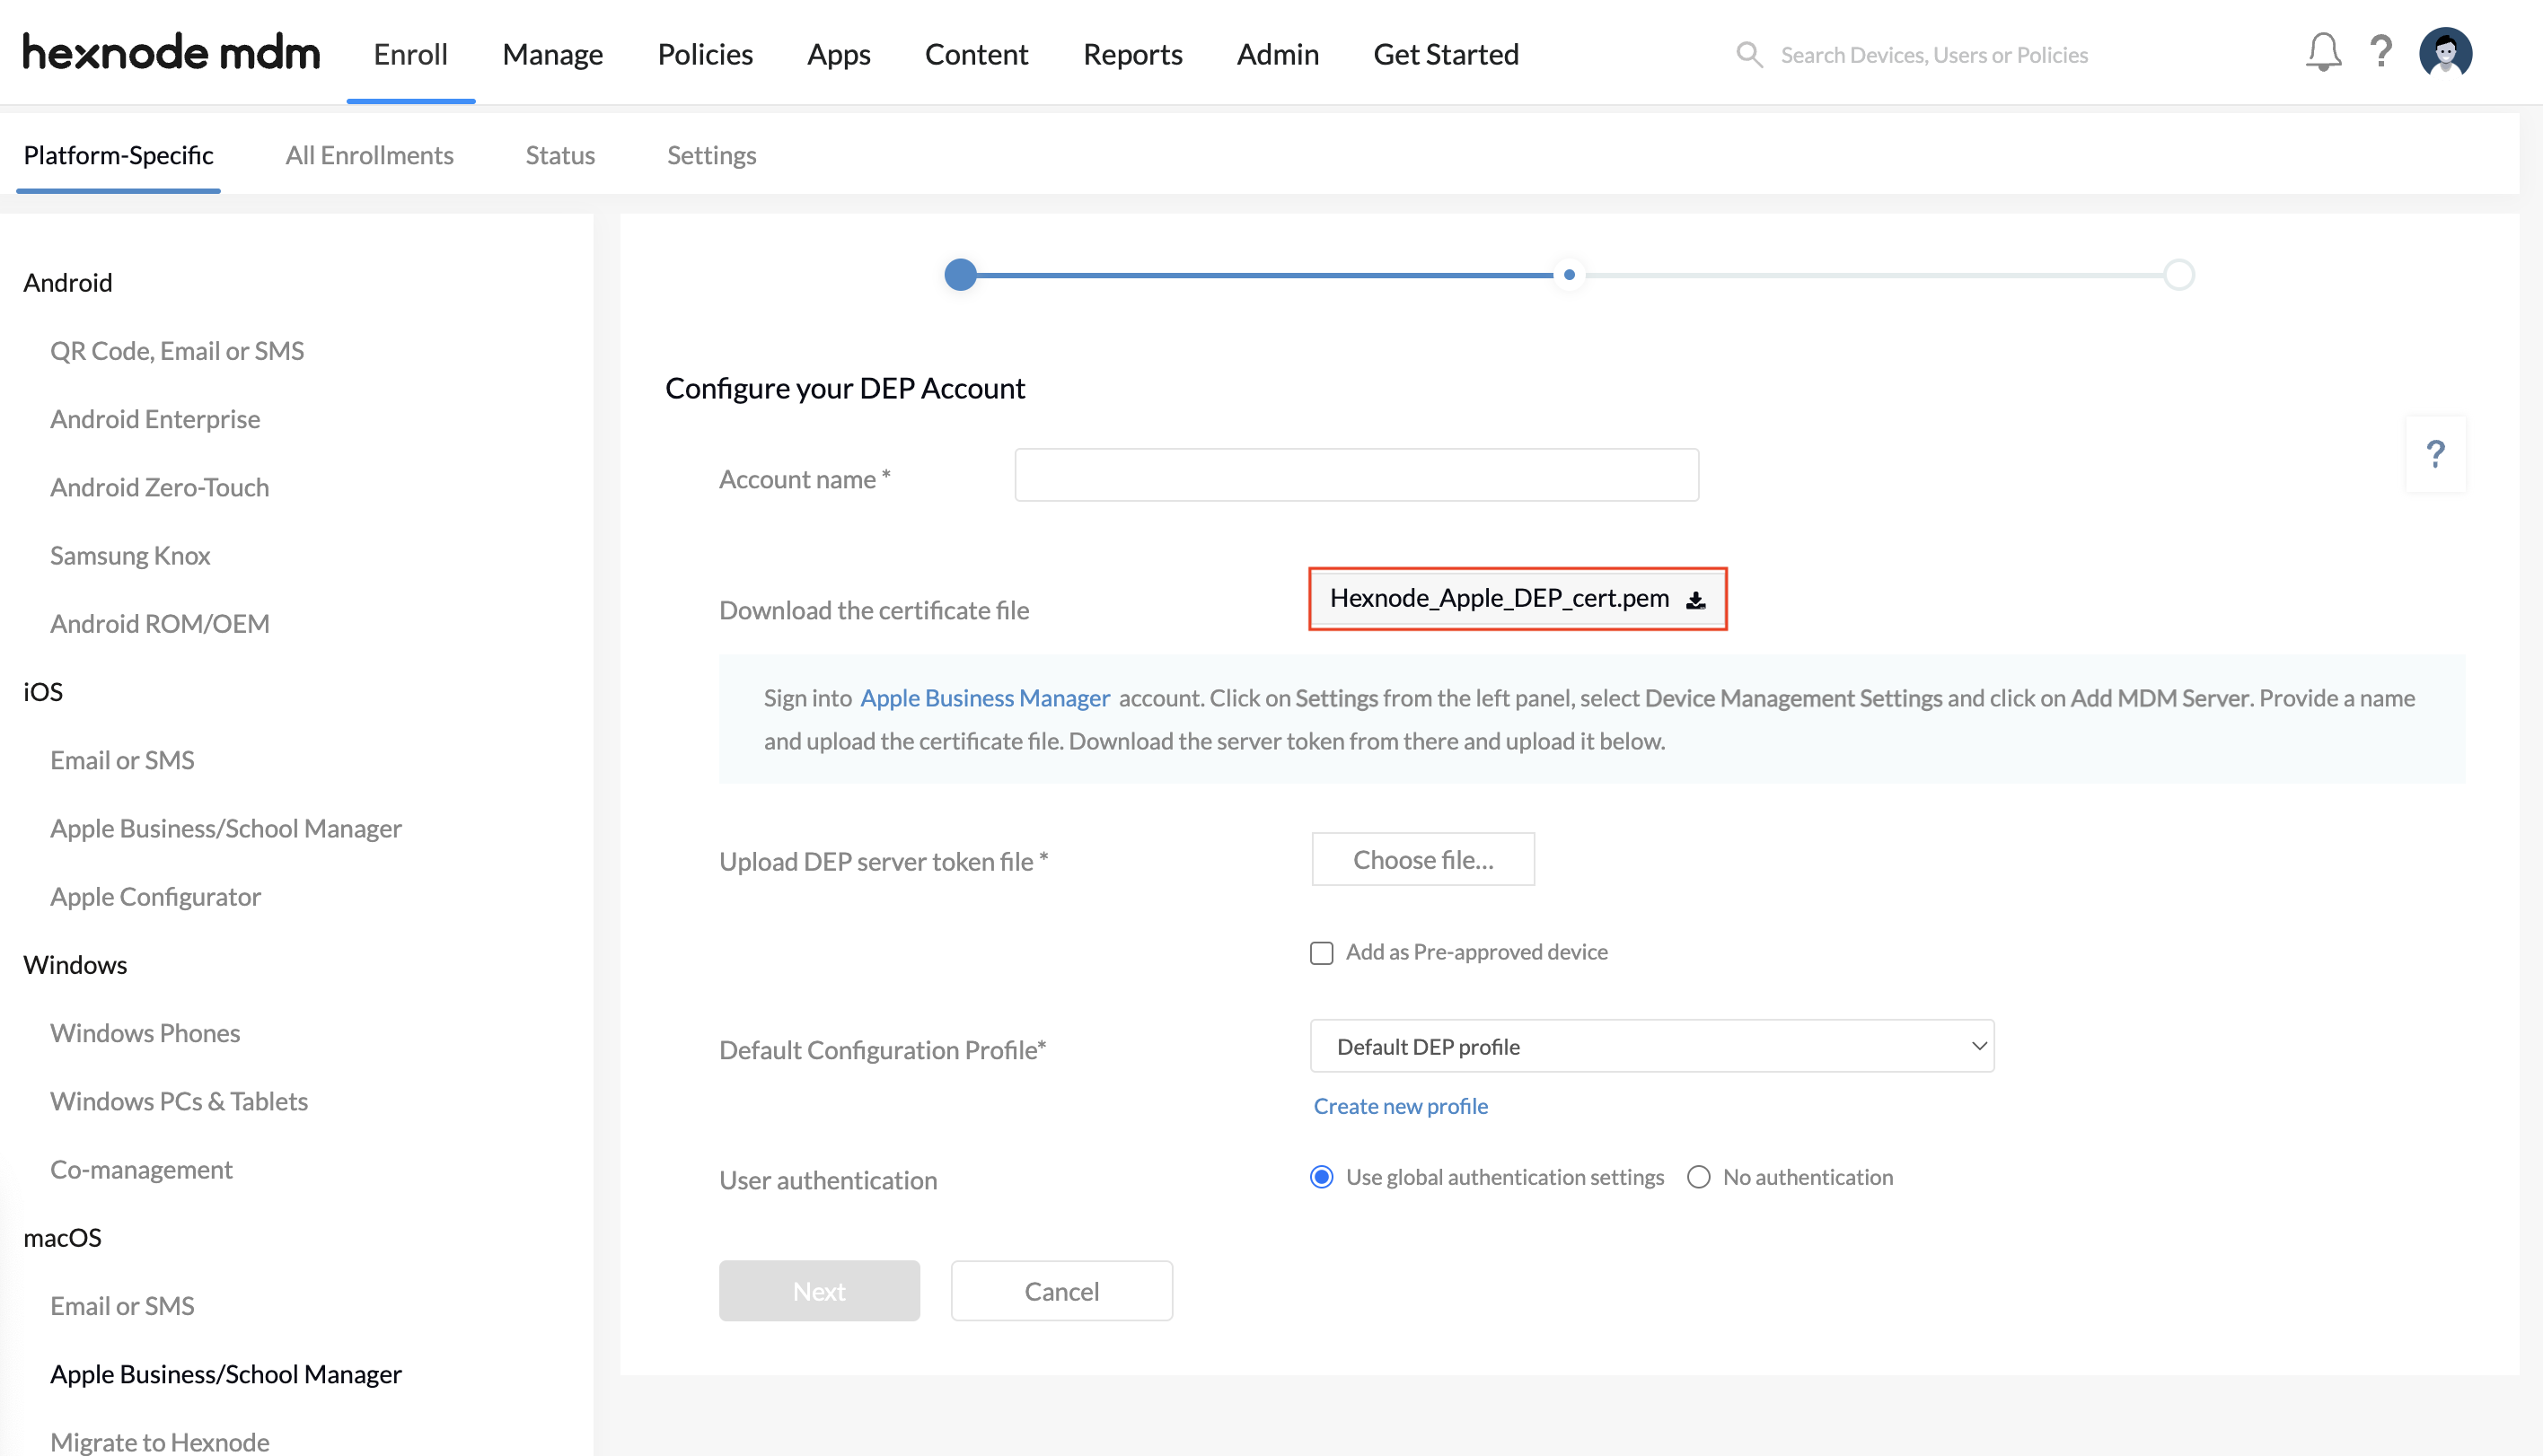
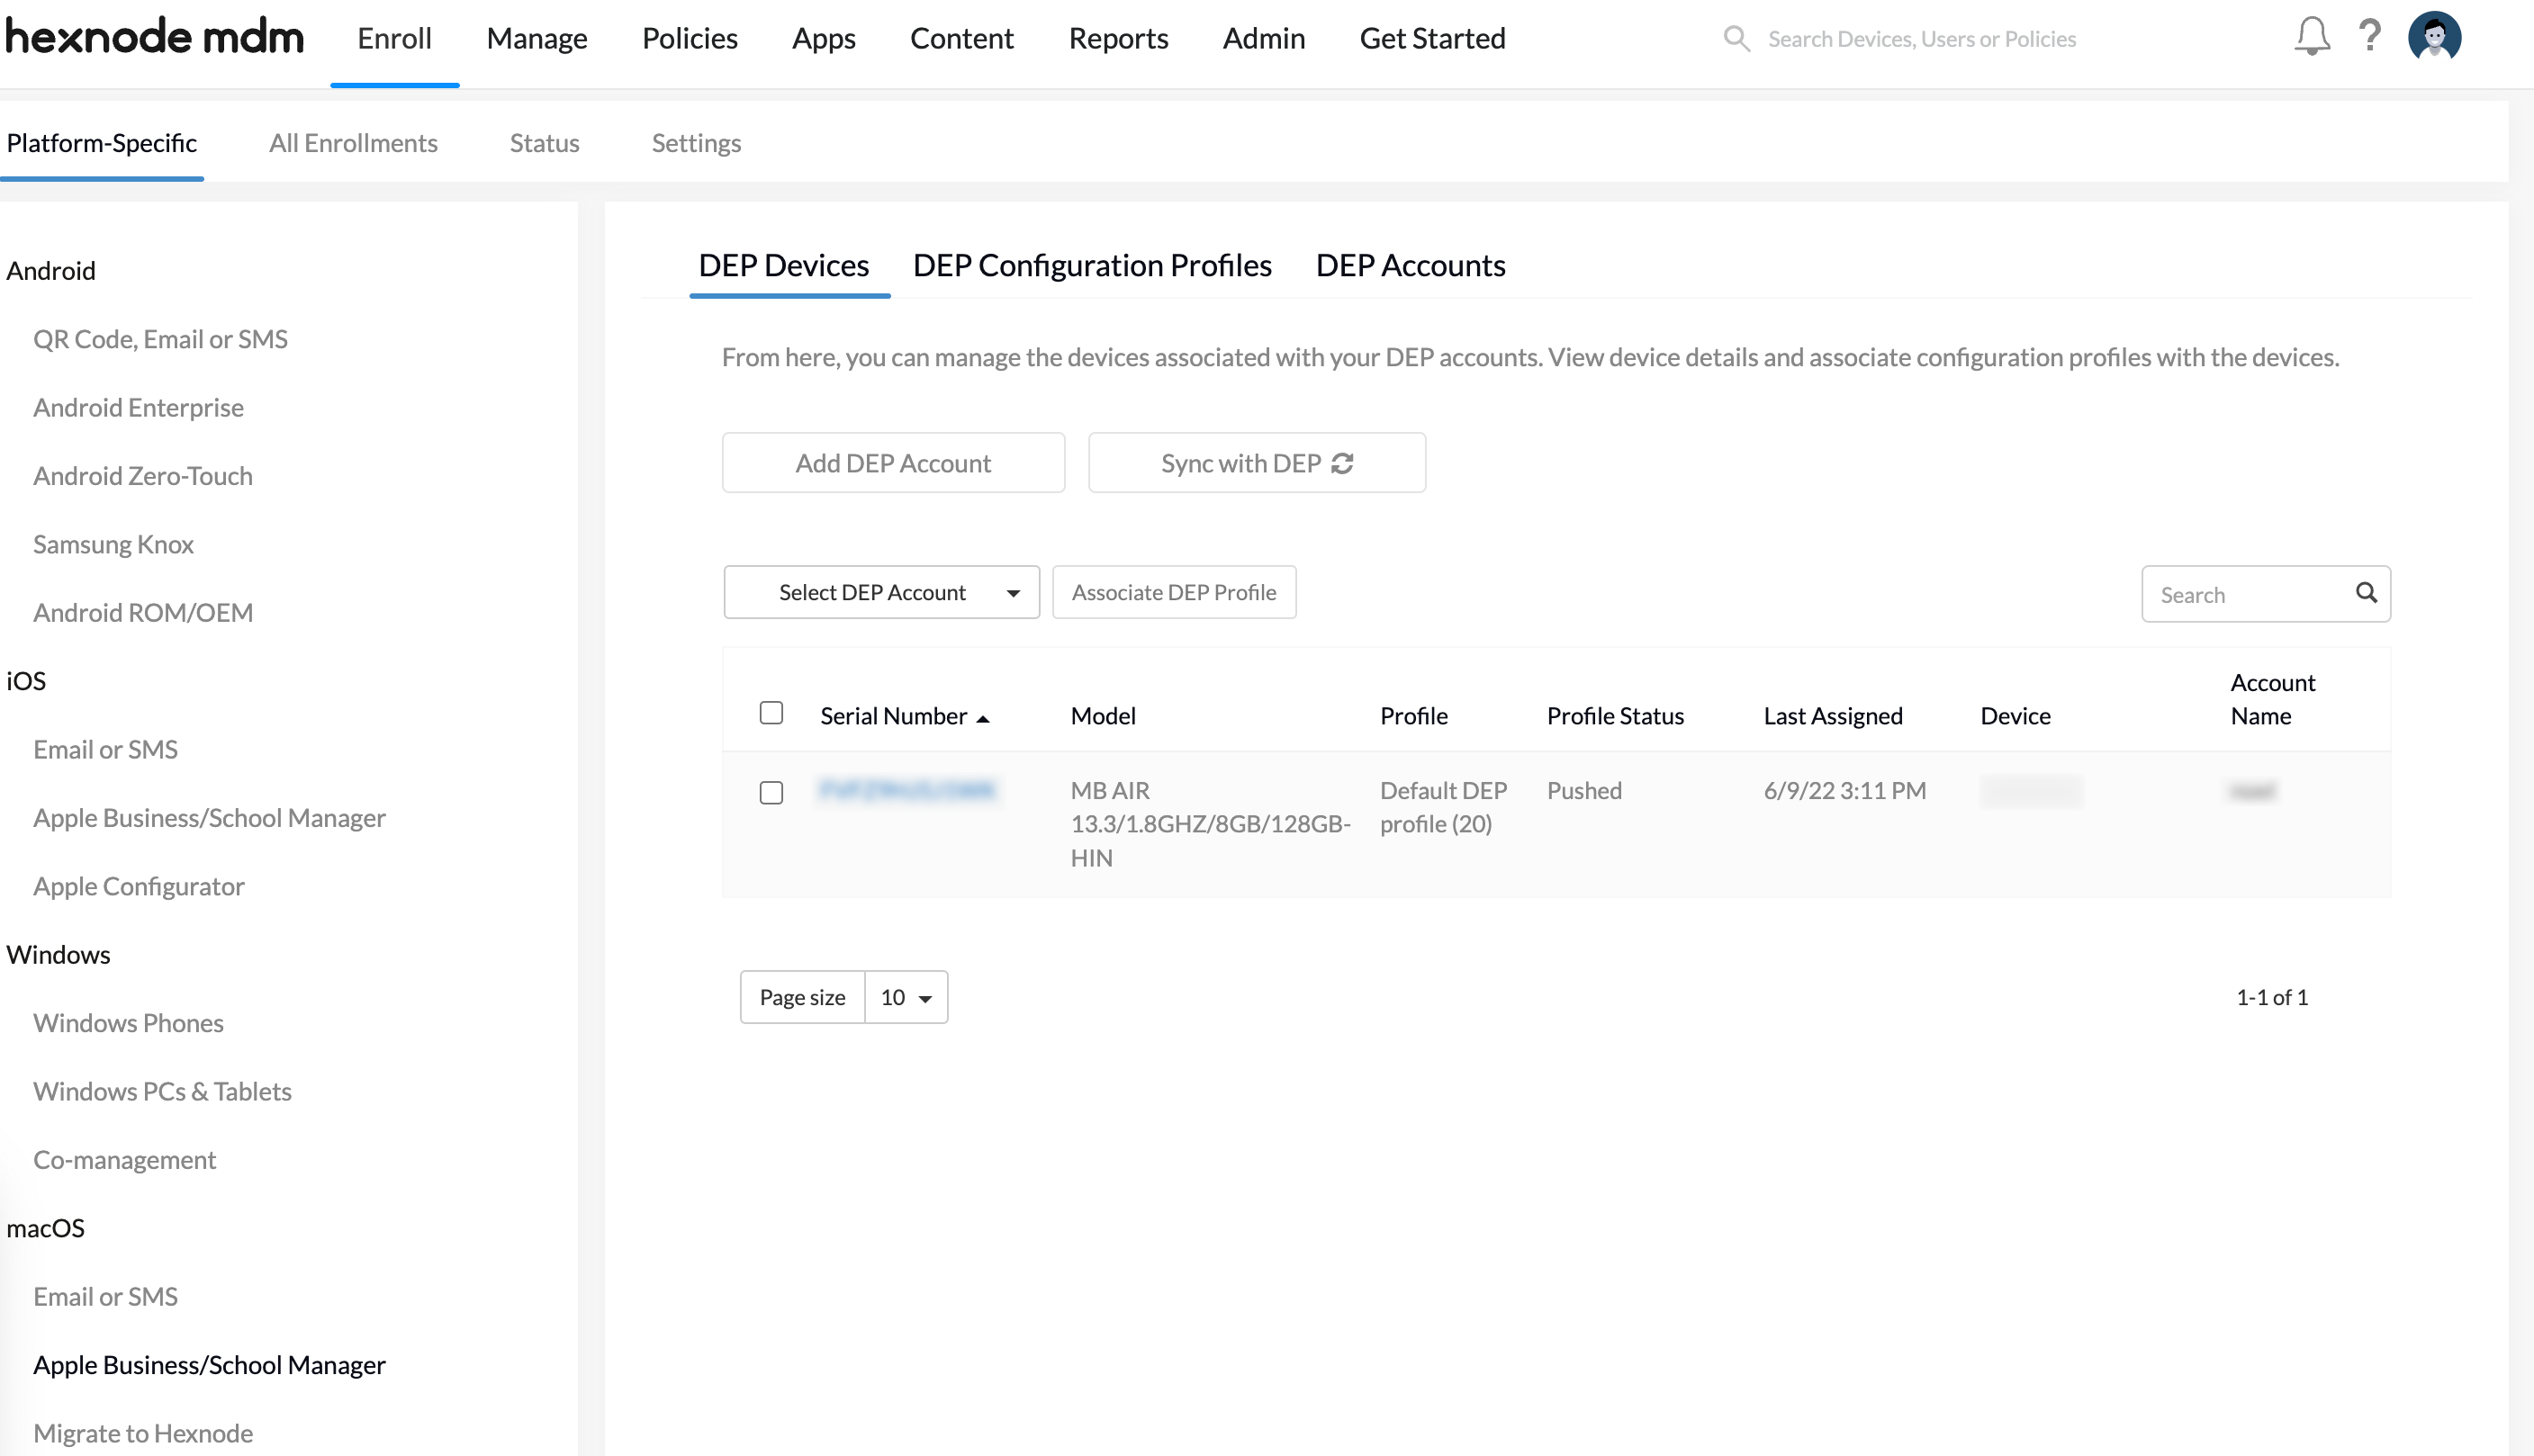
- Navigate to Enroll > Platform-Specific > macOS > Apple Business/School Manager.
- Select Add DEP Account. Set up a new DEP account and download the certificate file.
- Sign in to the Apple Business Manager portal using your organization’s managed Apple ID.
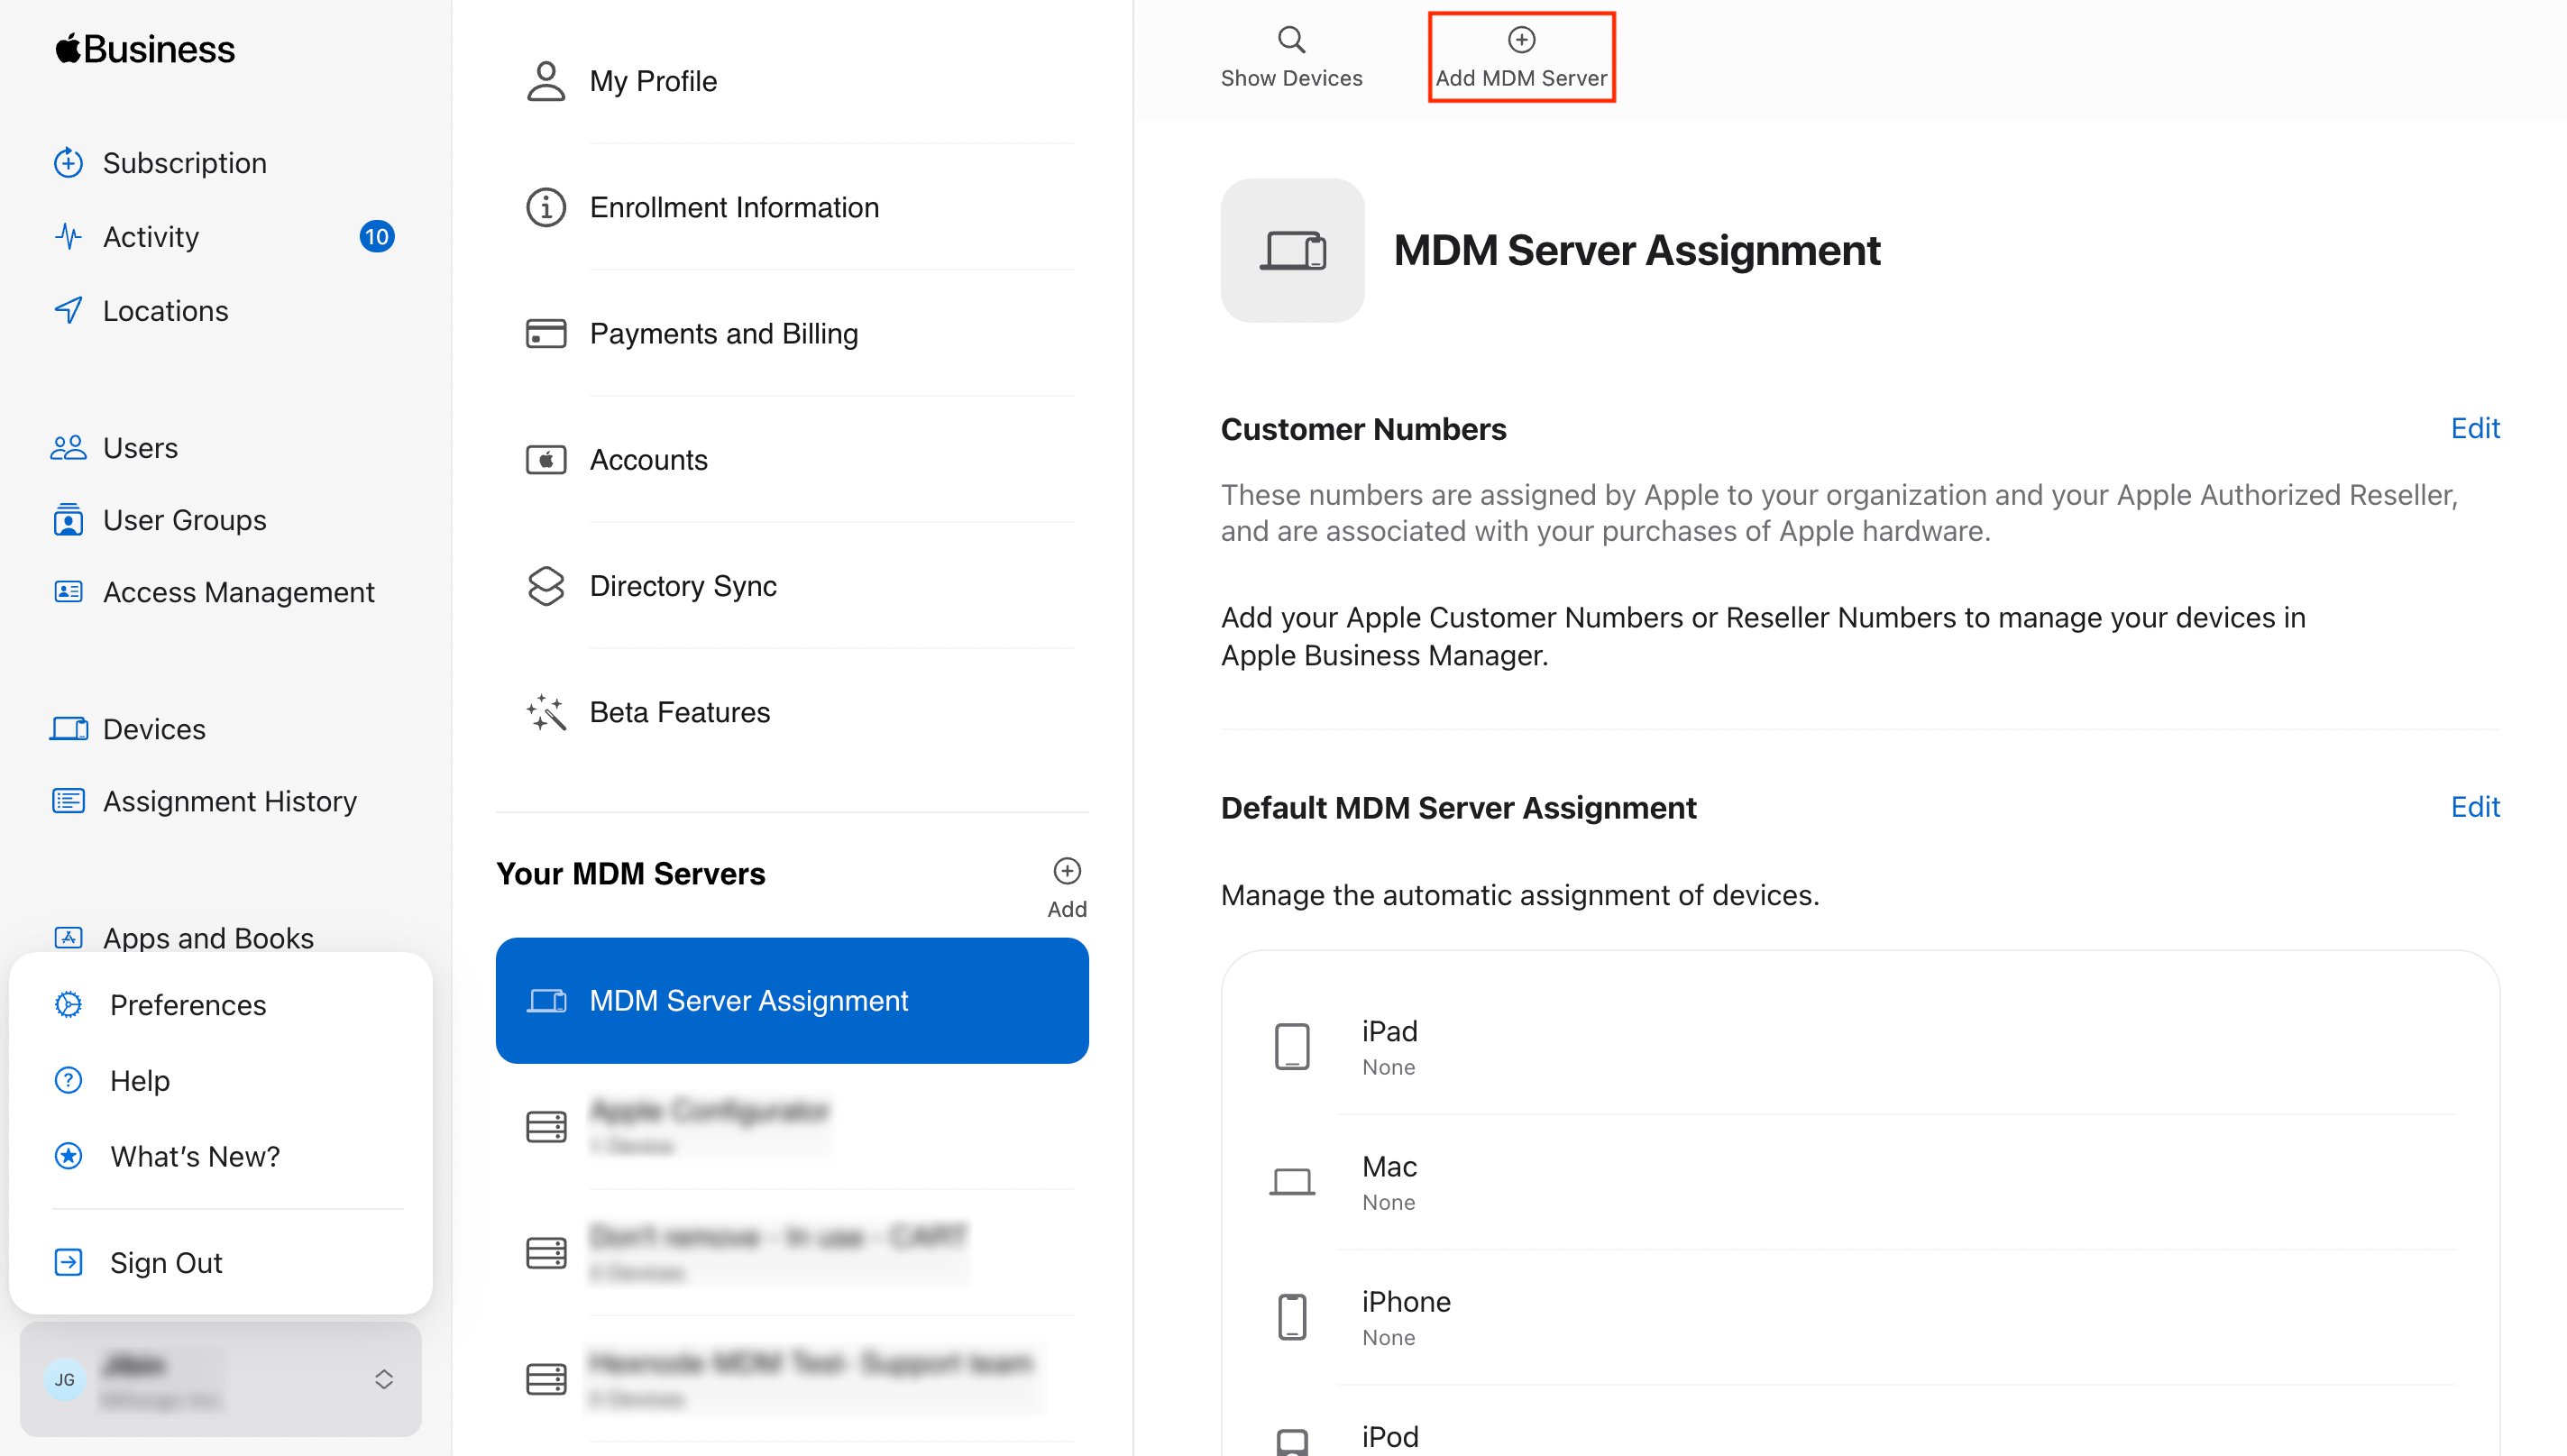
- Tap the account name on the bottom left side of the portal and navigate to Preferences > MDM Server Assignment.
- Select Add MDM Server.
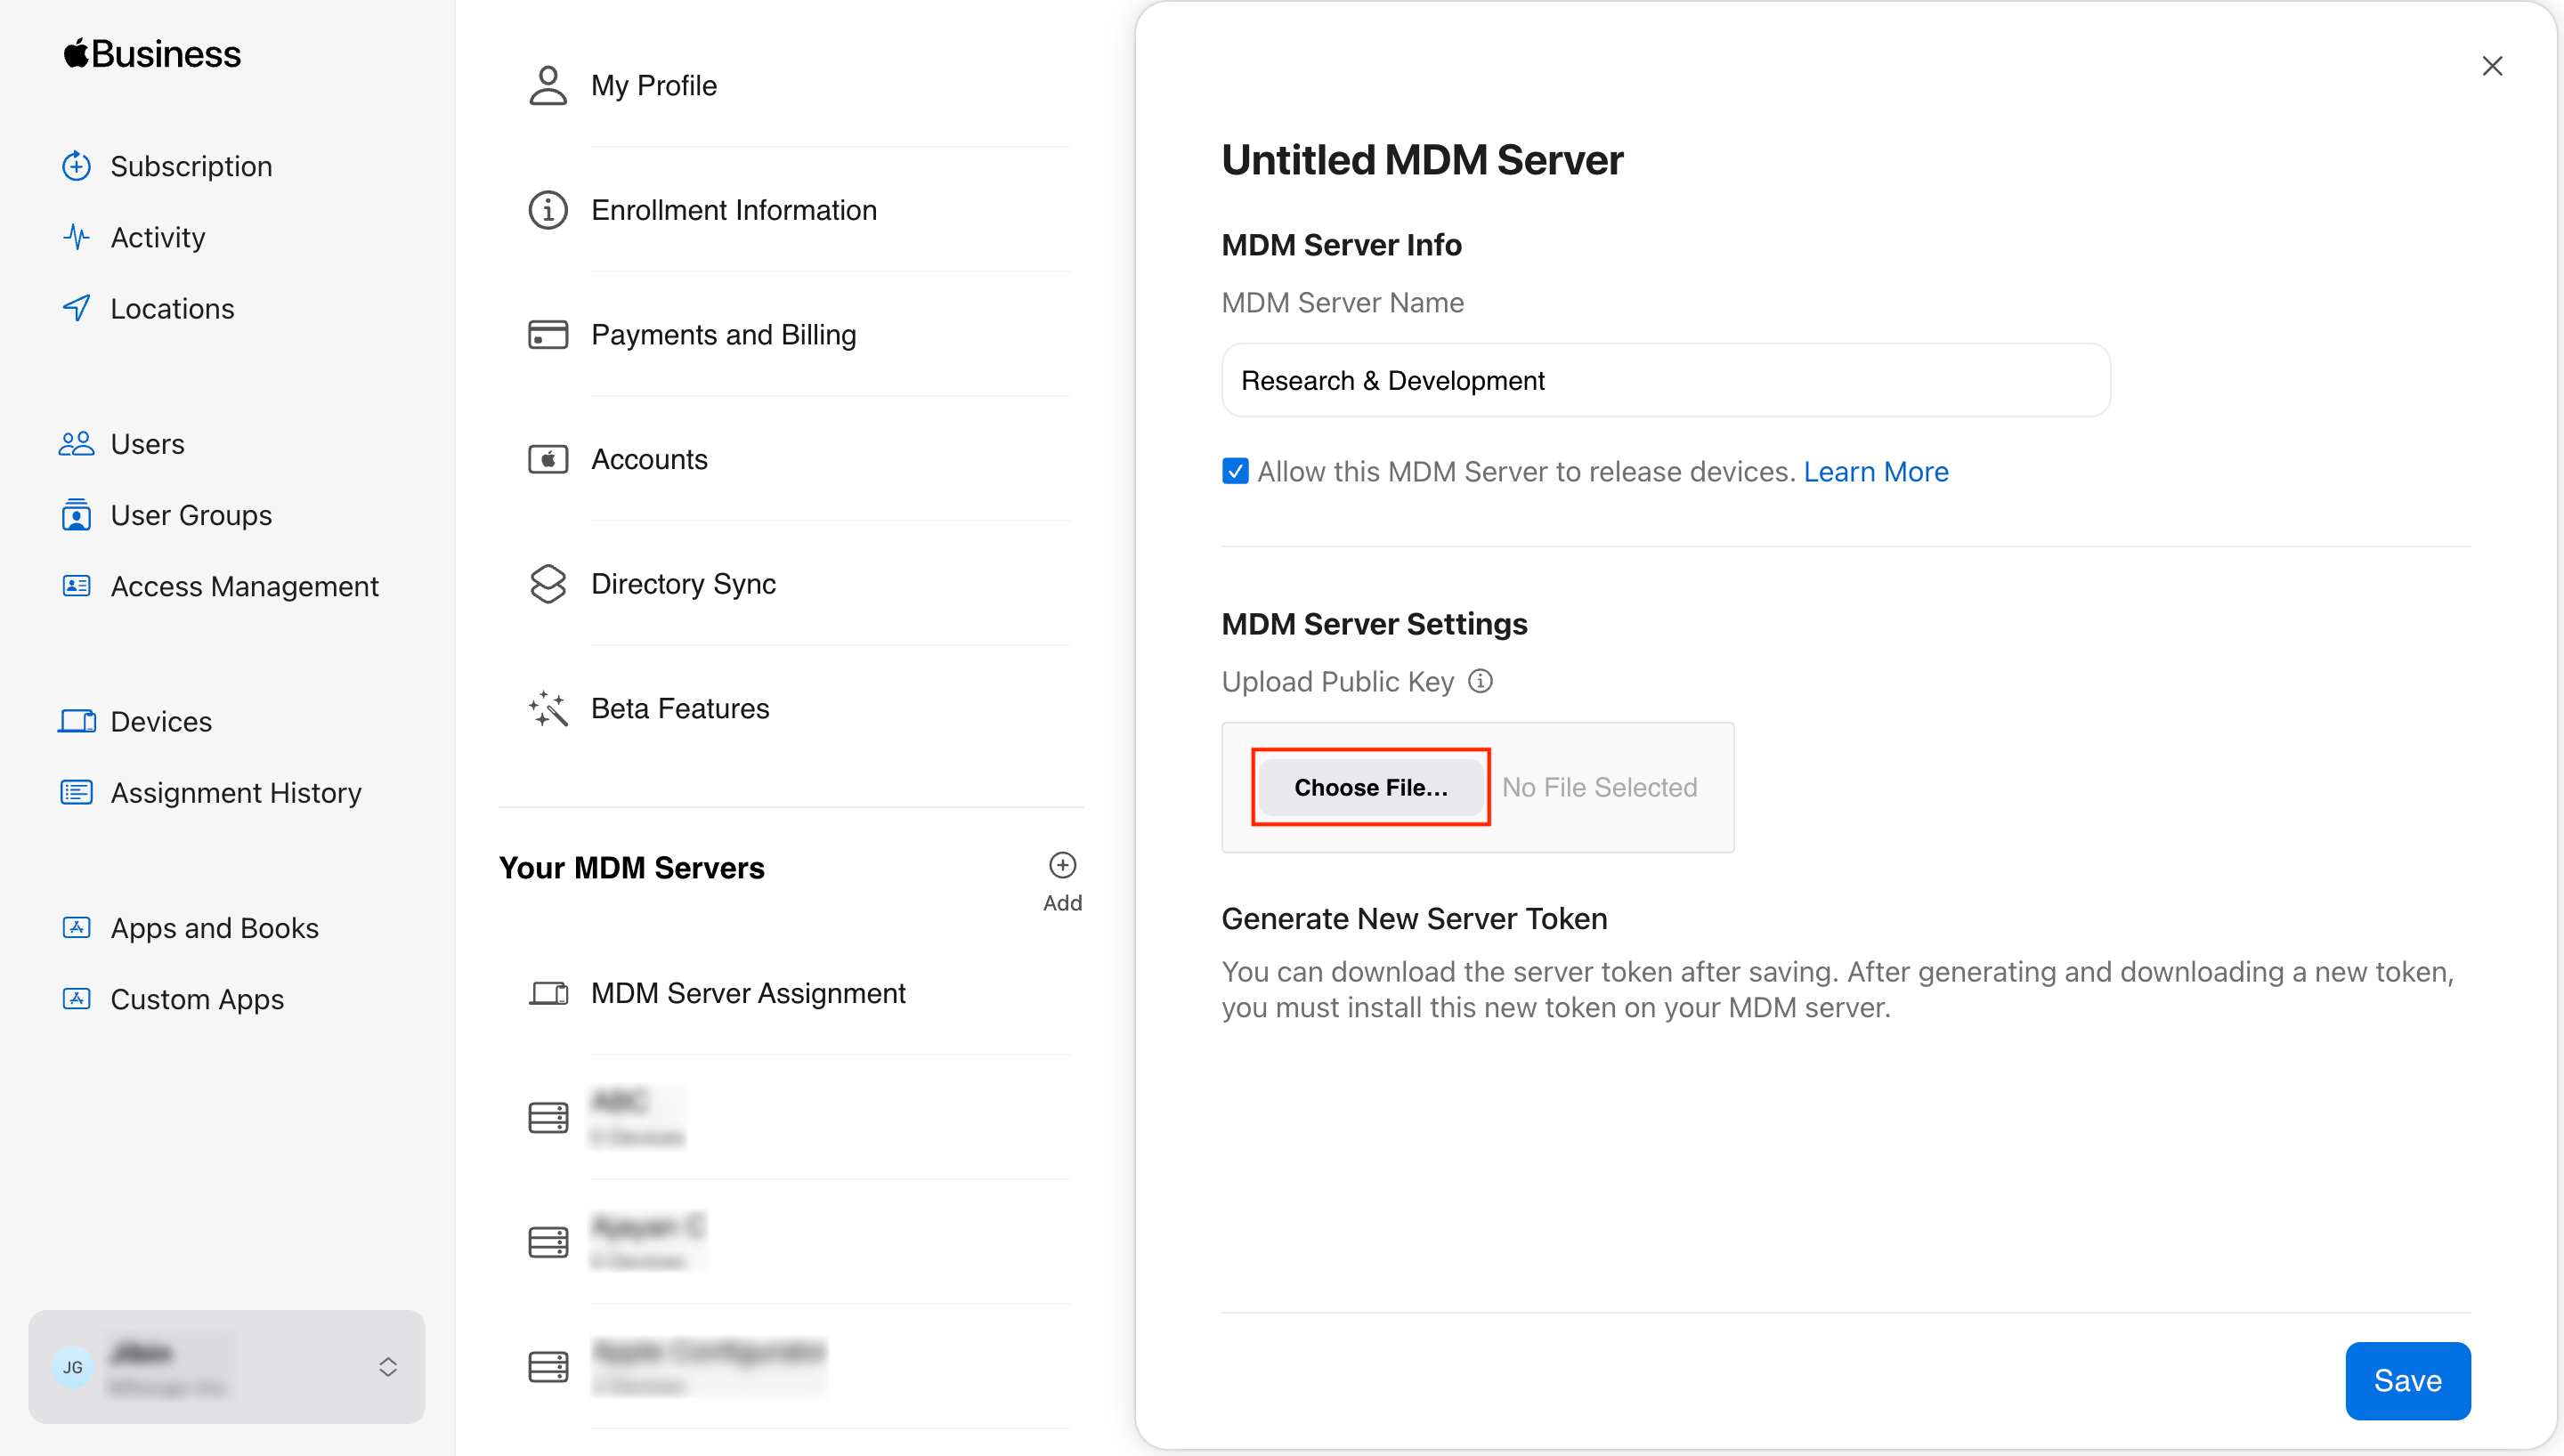
- Enter the MDM Server Name and upload the certificate file you had previously downloaded from the Hexnode portal.
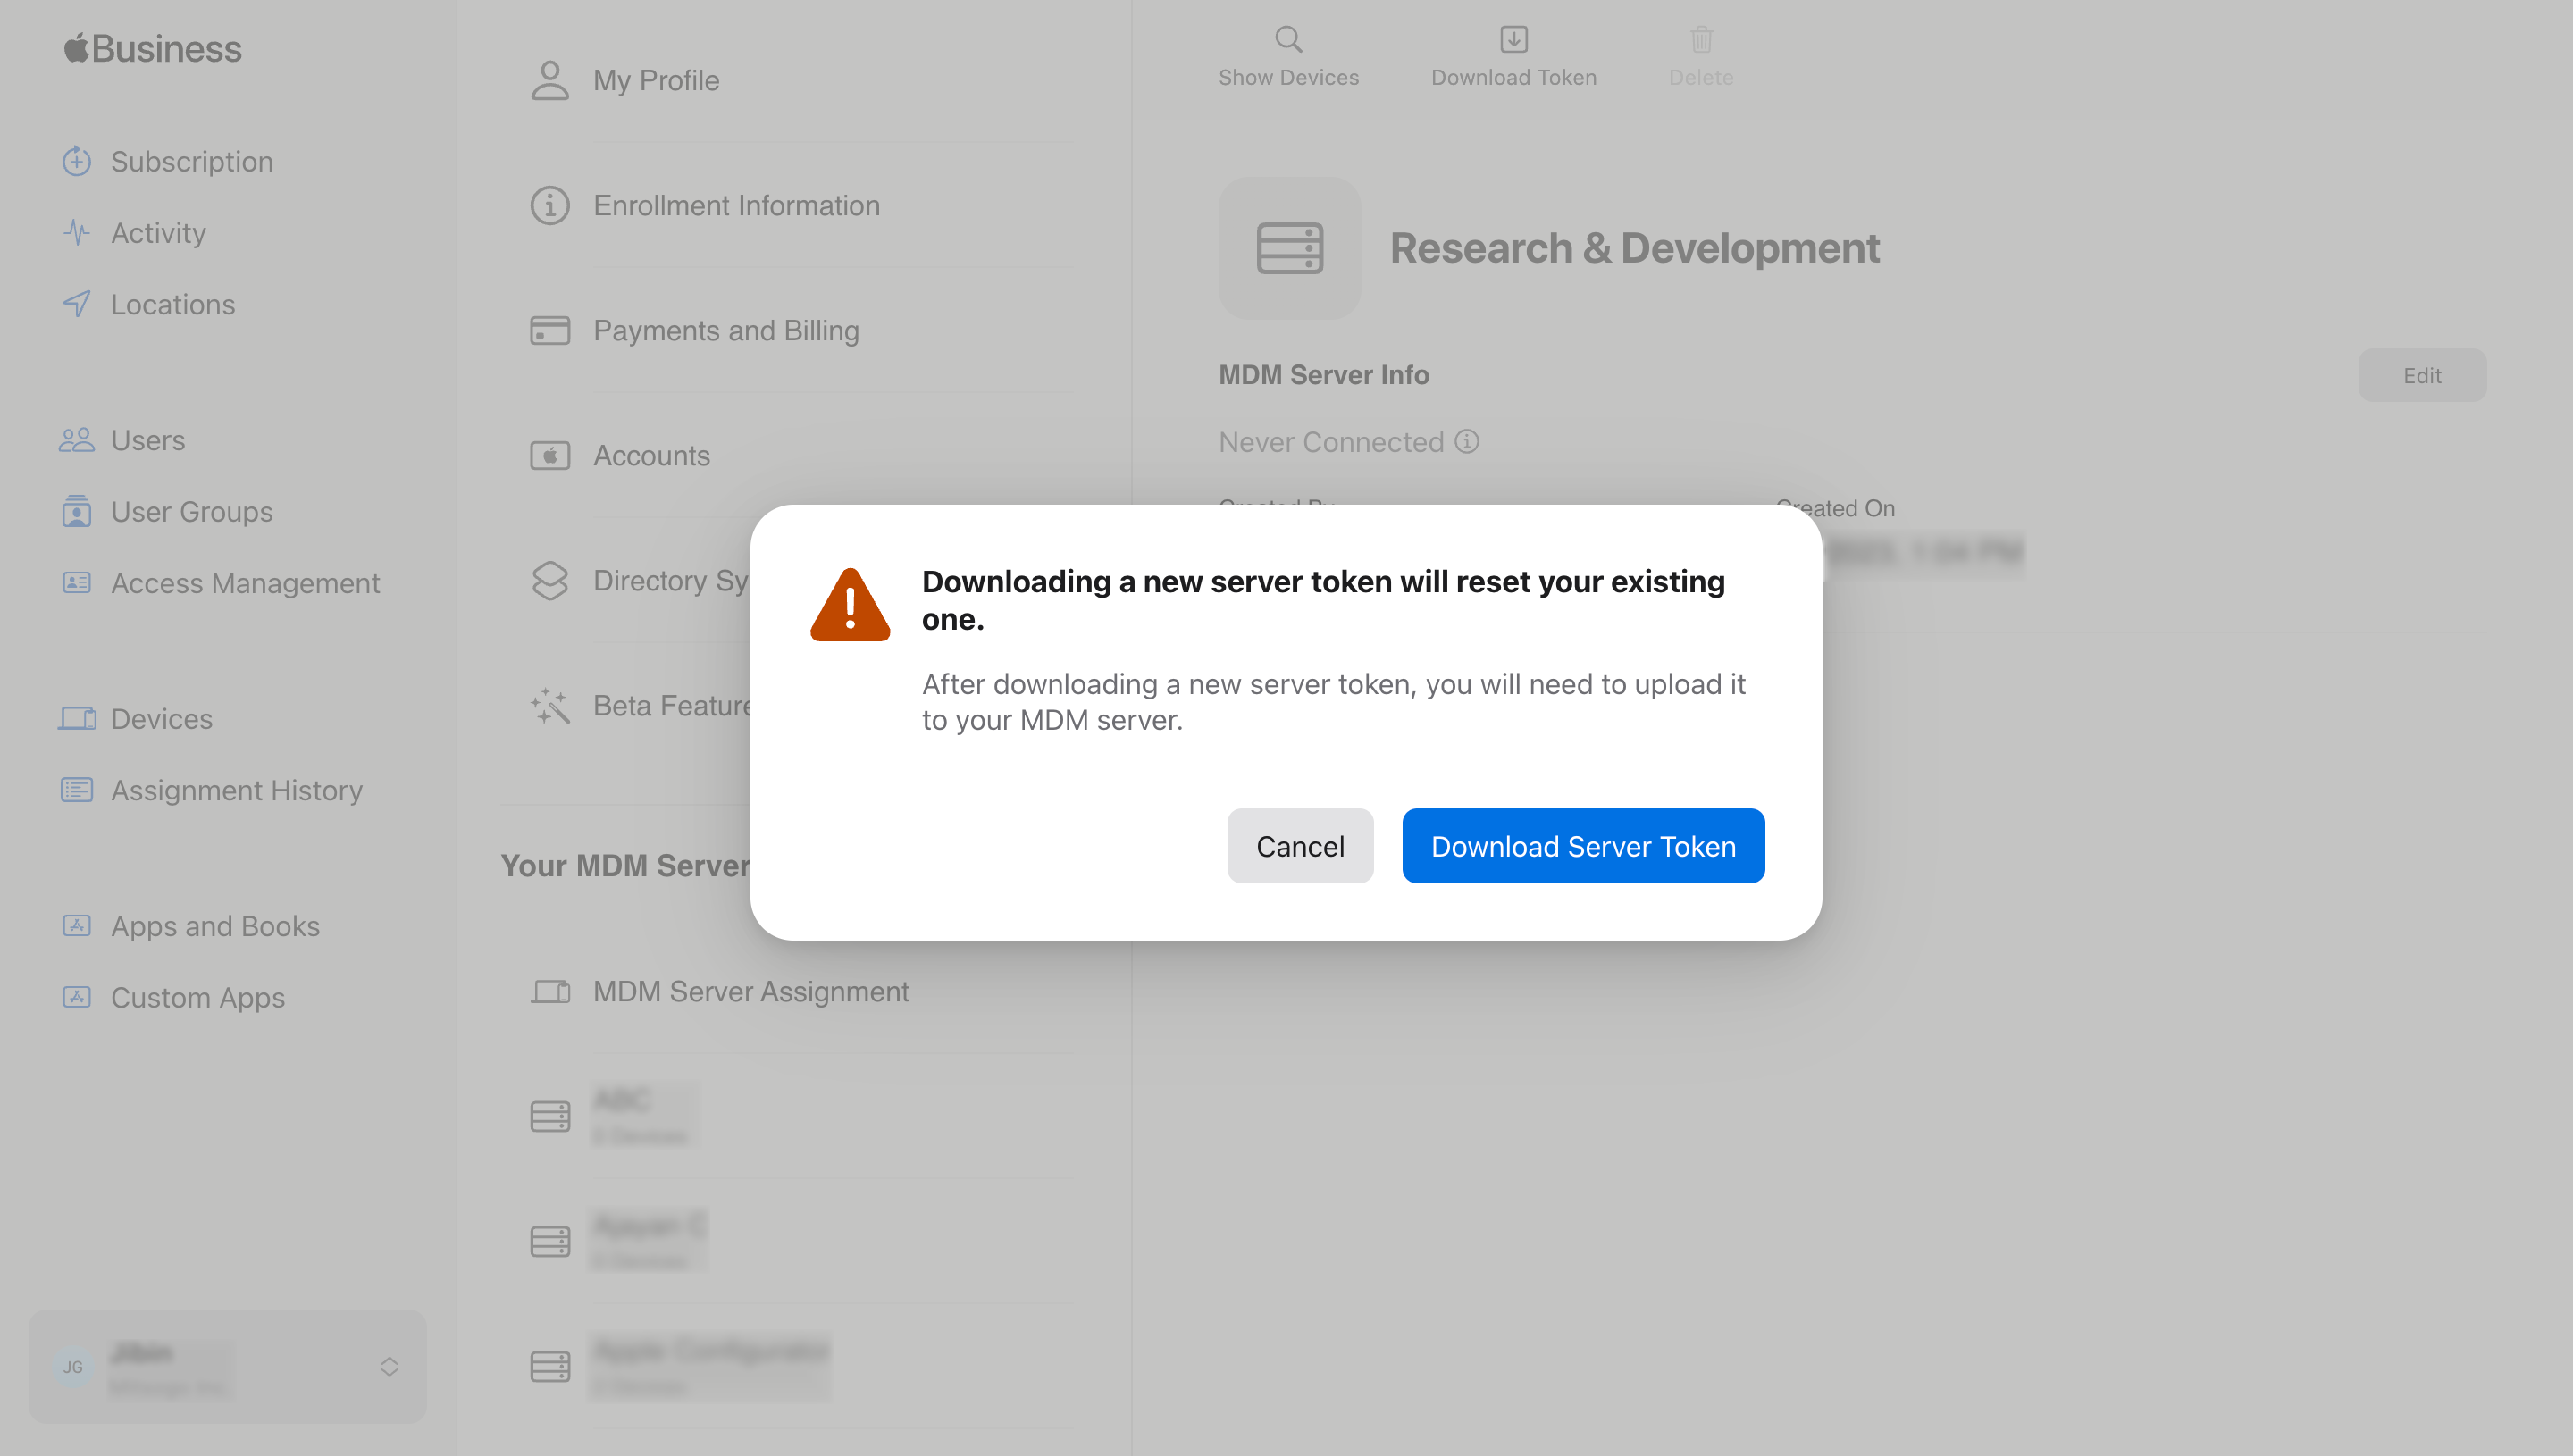
- Click Save, then click Download Token to download the server token.
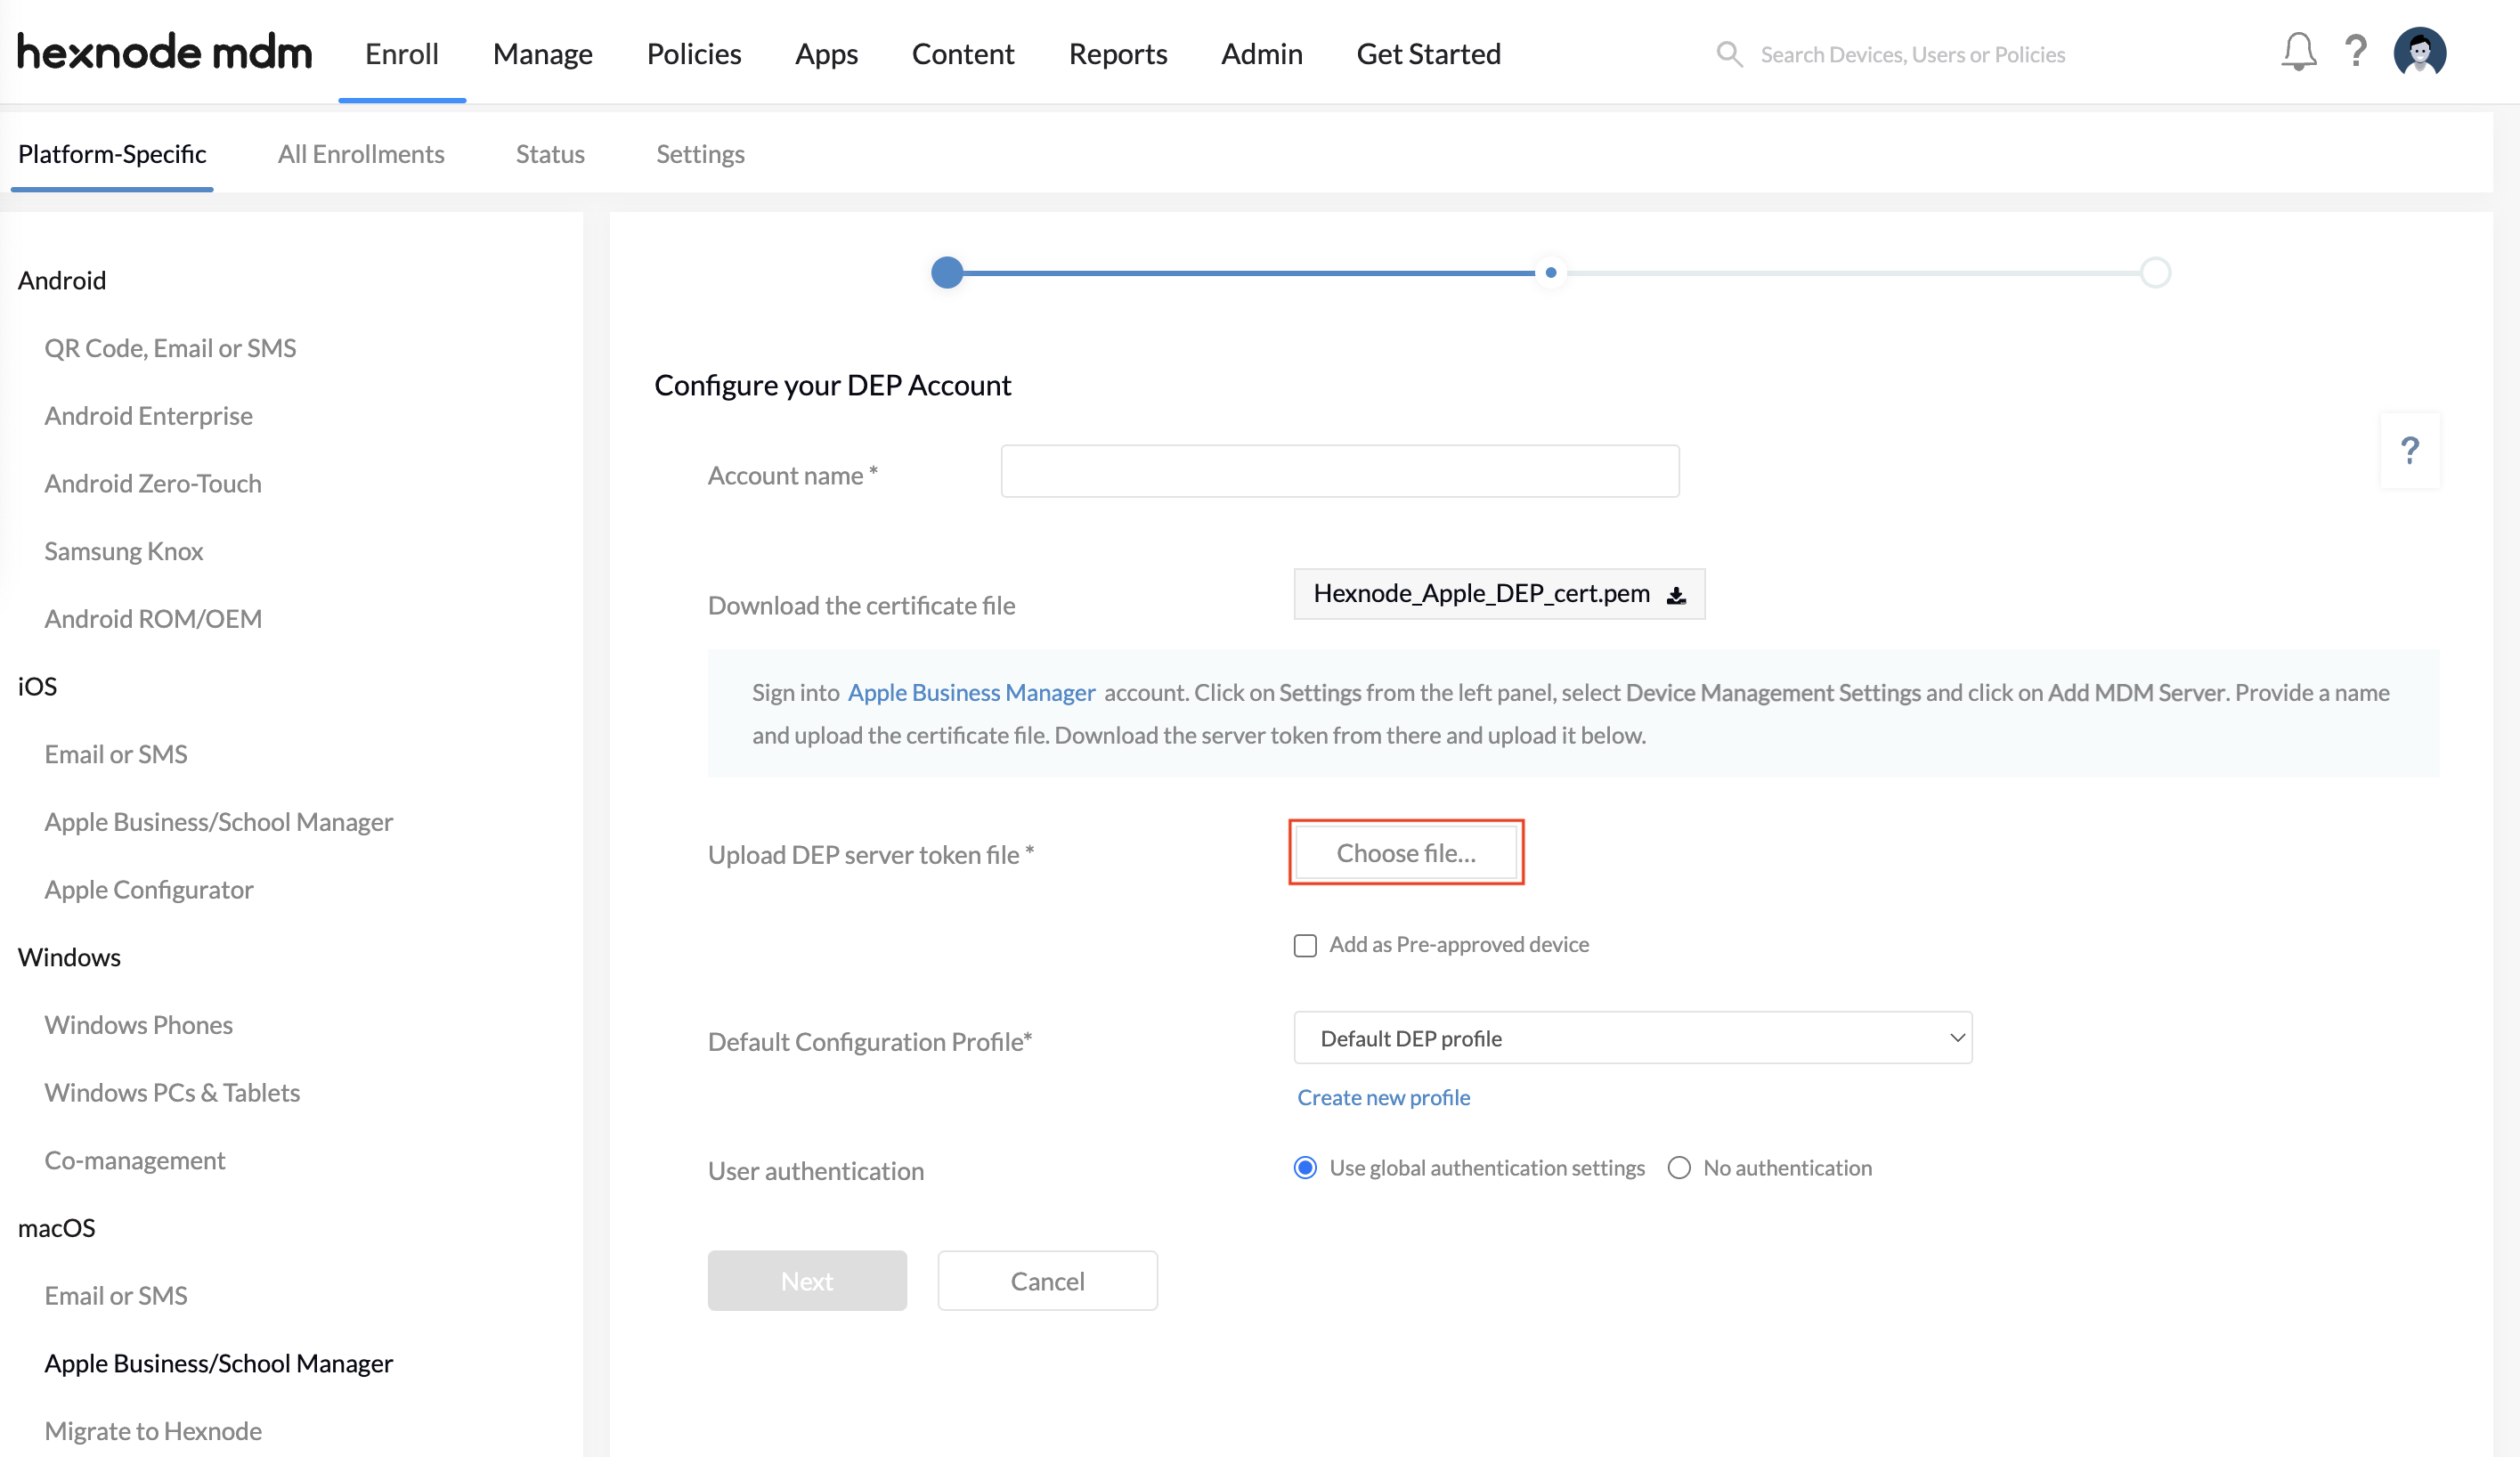
- Return to the Hexnode portal, to the DEP settings page, and upload the Server Token you just downloaded.
- Configure the settings Add as Pre-approved device or User Authentication, if required.
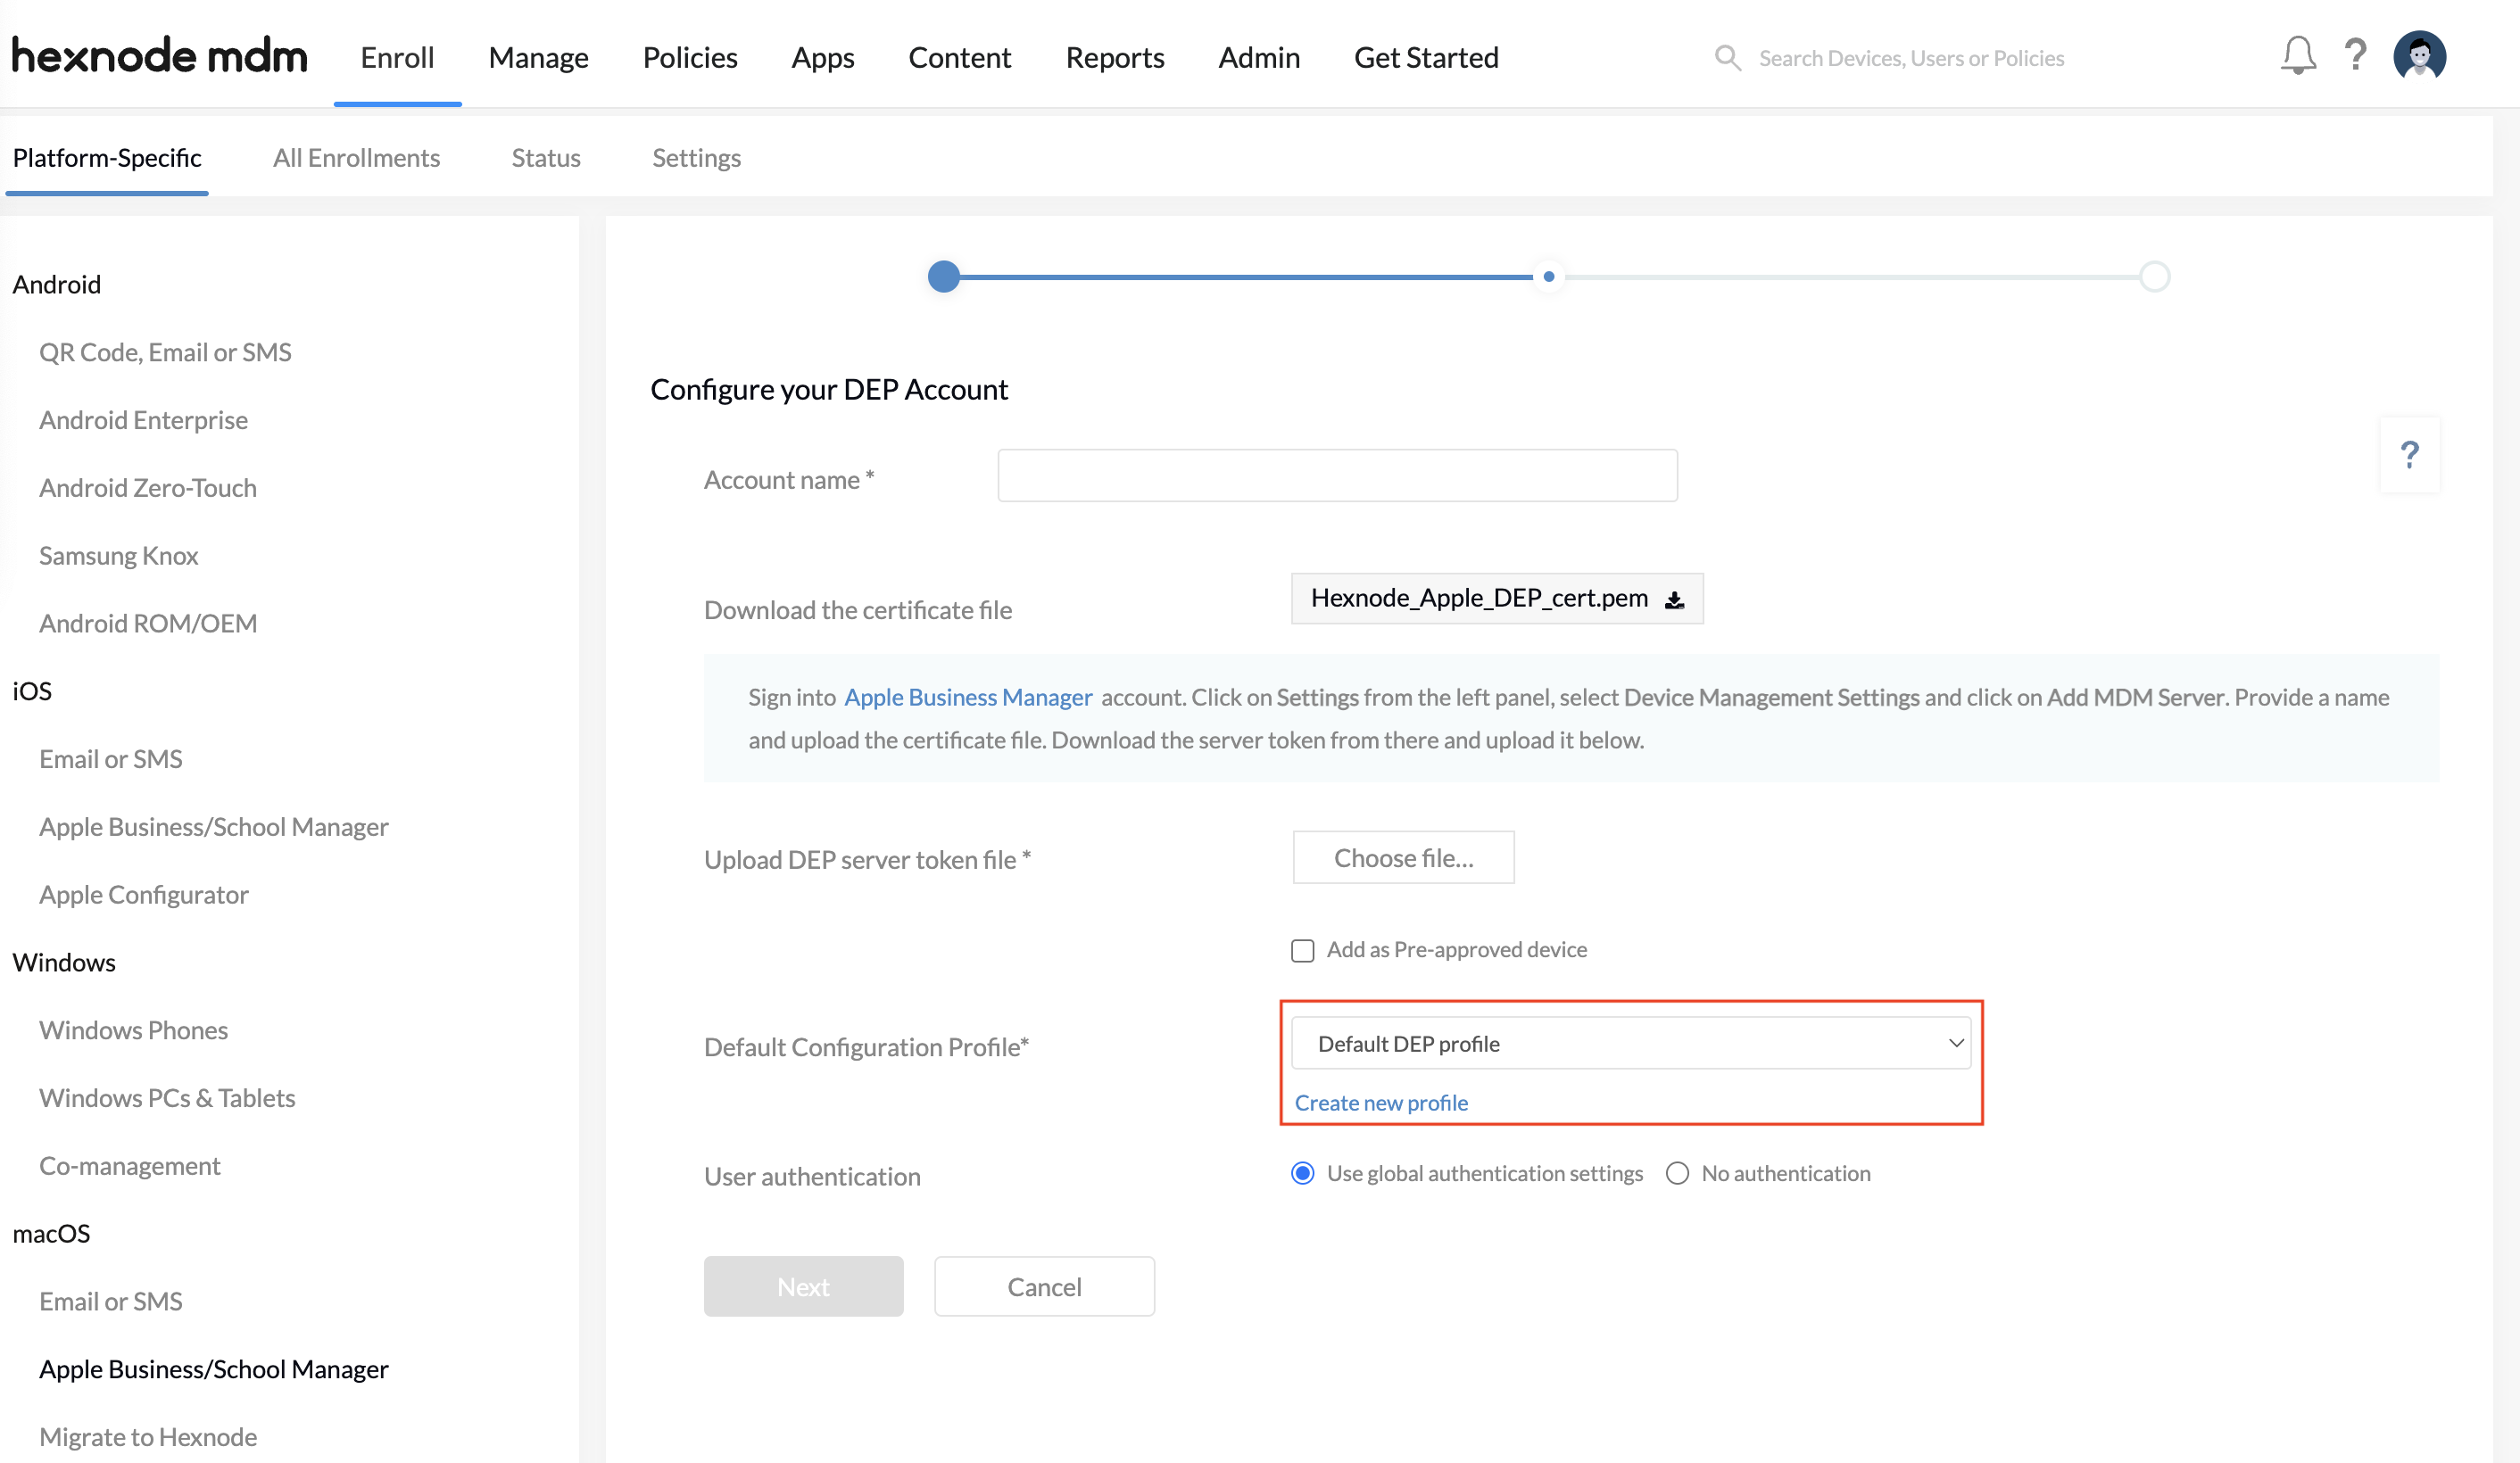
- Select Default DEP profile under Default Configuration Profile and click Next.
Assign devices to the Hexnode server
Once we configure the DEP account, assign the devices to the MDM server.
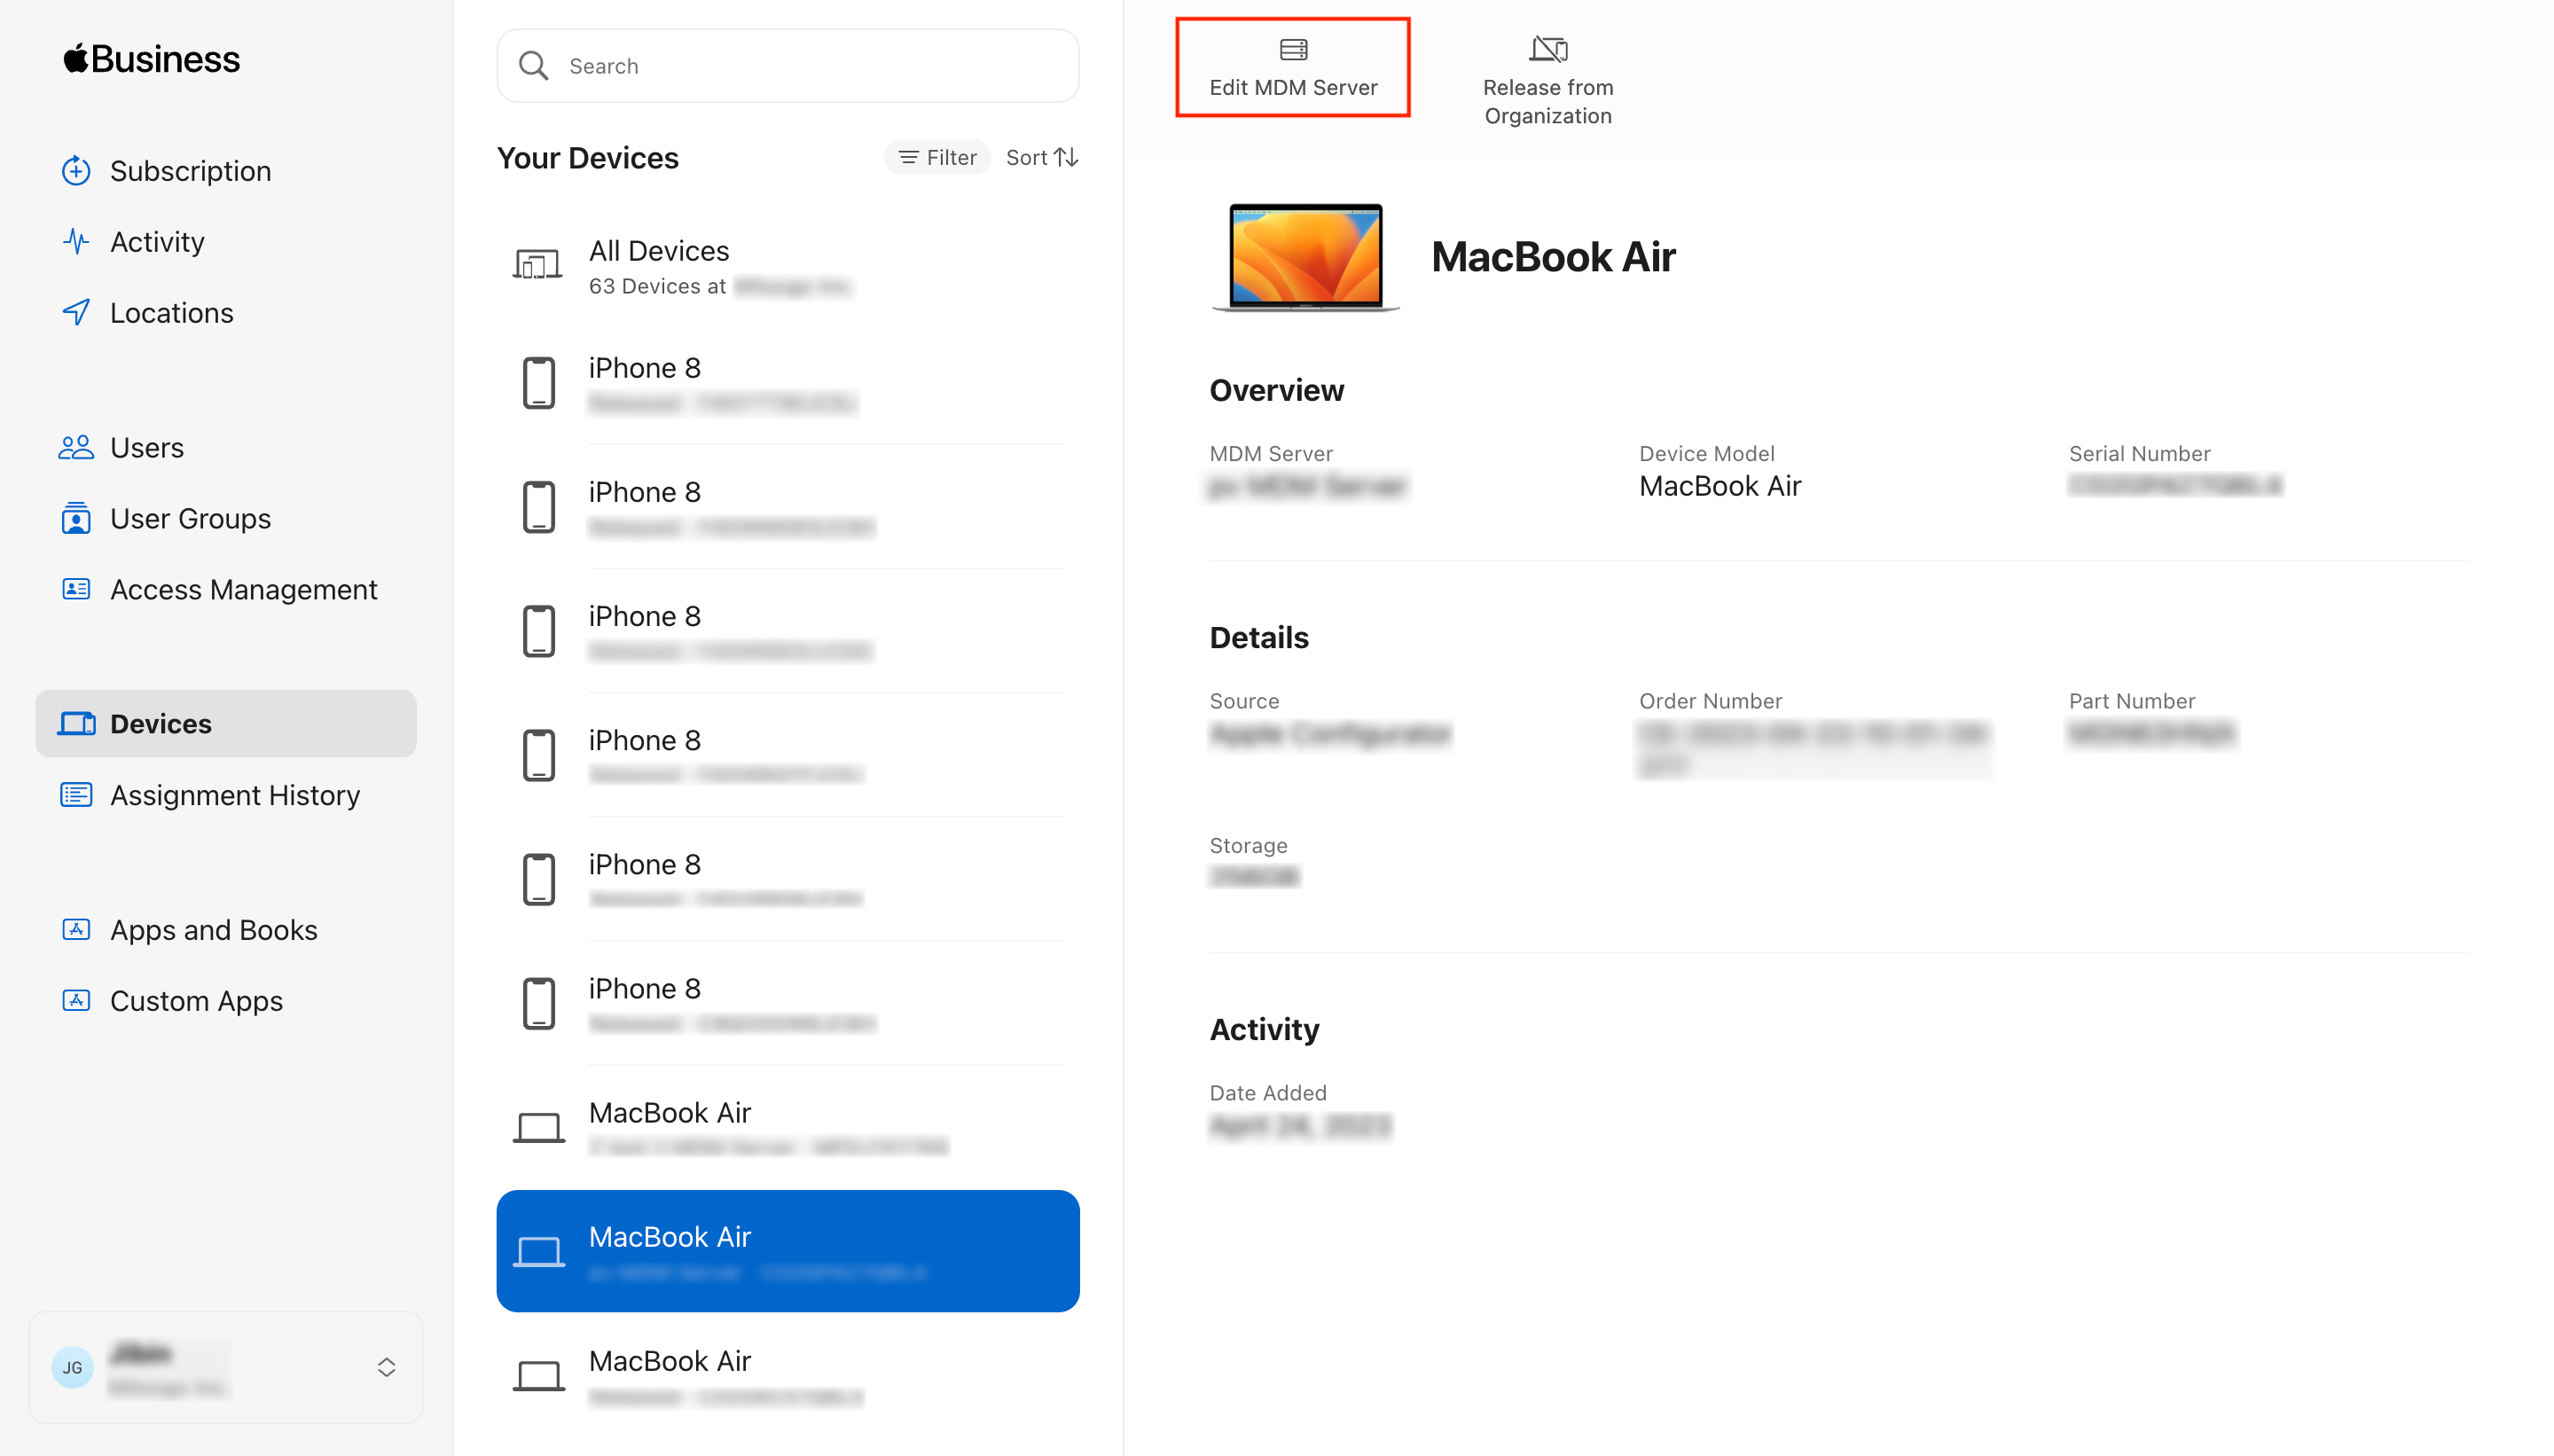
- Go back to your Apple Business Manager portal and select Devices. Select the macOS devices to be added from the list of available ones (Filter the search based on the source, order numbers, device types, etc. of the devices) and click on the Edit MDM Server button.
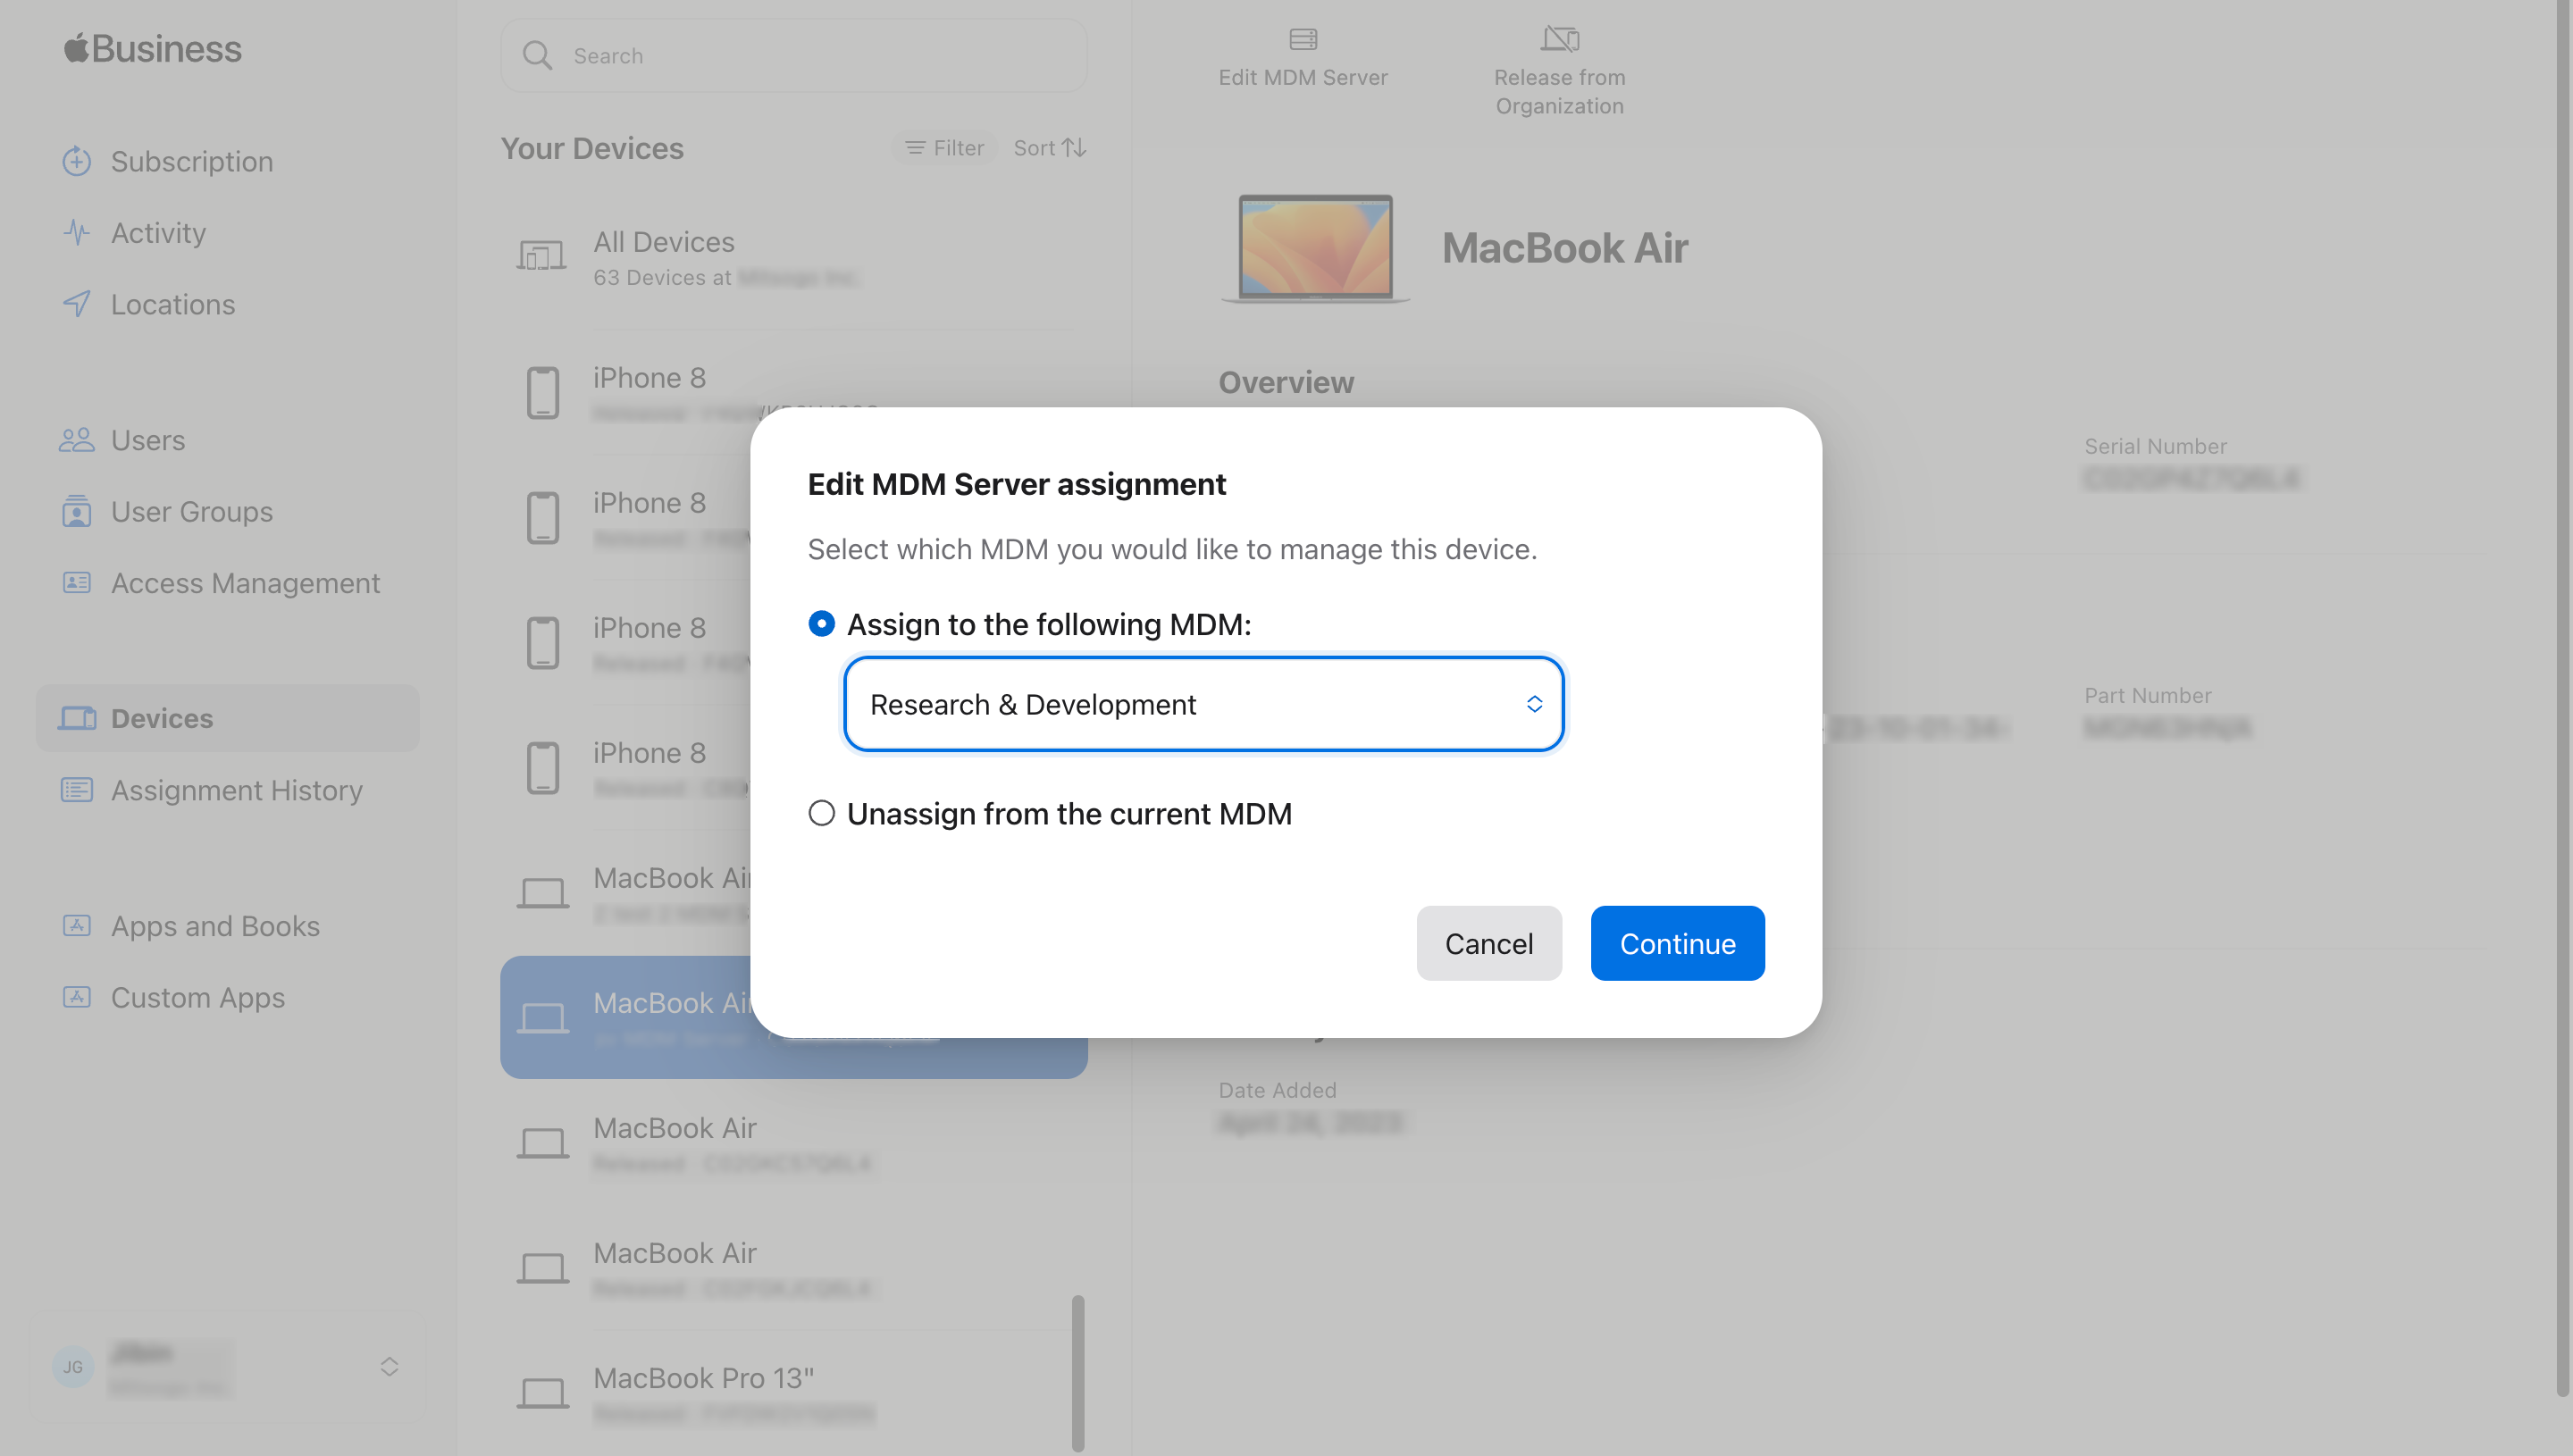
- From the Assign to the following MDM drop-down box, select the MDM server to which the devices must be assigned.
Supervision has to be enabled from the DEP configuration profile available in the Hexnode UEM console.
- From the Hexnode UEM portal, start a sync for the DEP account. Navigate to Enroll > Platform-Specific > macOS > Apple Business/School Manager and click on Sync with DEP. The sync imports the devices assigned to the MDM server to the Hexnode UEM console.
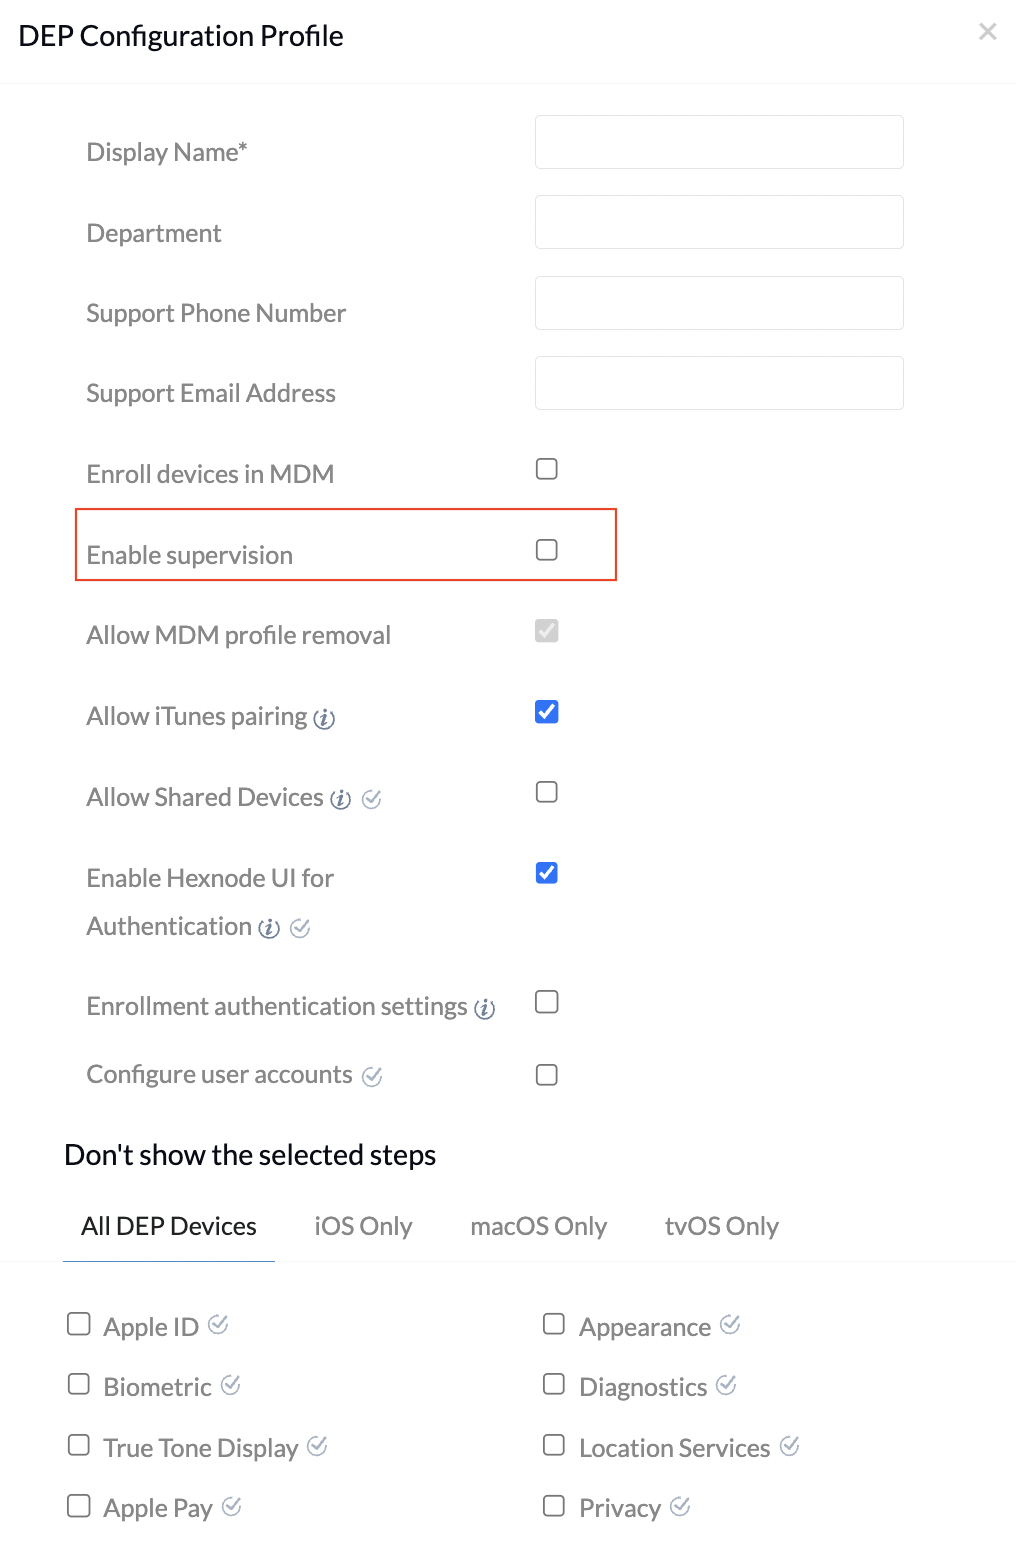
- Go to DEP Configuration Profiles. You could choose to either edit the Default DEP profile or create a new configuration profile by clicking on Configure DEP profile.
- Select the Enable supervision option and click on Save.
The configuration profile contains additional configuration parameters that can be used to customize DEP-enrolled devices in addition to the option to enable supervision.
- Display name: A friendly name for distinguishing the selected DEP policy from other DEP policies.
- Department: The name of the department that the devices are assigned to.
- Support Phone Number: A phone number that users can call if they have questions about DEP enrollment.
- Support Email Address: An email address for the users to use for communication in the event that they require setup assistance.
- Enroll Devices in MDM: Users will not be able to skip over “Remote Management” on the initial device setup screen if this option is enabled.
- Allow MDM Profile Removal: The MDM profile cannot be removed from the device by the user if it is disabled.
- Allow iTunes pairing: Allow users to sync their devices with iTunes by enabling this option. If disabled, all iTunes related actions will be prevented. The device must then be wiped and re-enrolled to re-enable the option.
- Enable Hexnode UI for Authentication: If the option is disabled, the device management must be set up using Apple’s default Remote Management setup wizard. When enabled, the user will be diverted to Hexnode’s default enrollment window. Before proceeding with enrollment, the user must read and accept the terms of the Hexnode EULA. Devices running macOS 10.15 or later can use this feature. When this option is enabled, enrollment authentication settings (Authentication Modes) in the Enroll > Settings tab will take effect, regardless of the DEP Account‘s User Authentication settings or the DEP Configuration Profile‘s Enrollment authentication settings.
- Enrollment authentication settings: Select the authentication method to employ while enrolling. The available options are:
- Use Global Authentication Settings – The authentication settings configured in Enroll > Settings > Authentication Modes is applied.
- No Authentication – The admin must pick the Domain and Default User to which the device will be assigned.
- Configure user accounts: Enable this option to create an ‘Administrator’ user on Mac. This feature is supported on devices running macOS 10.11 and later.
- Don’t show the selected steps: The setup process for your DEP devices can be tailored by Hexnode. Check the boxes for the steps that you want to skip while setting up your macOS device.
All DEP Devices
| Setup Assistant Options | Supported versions | Description |
|---|---|---|
| Apple ID | macOS 10.9+ | Skip Apple ID setup. |
| Biometric | macOS 10.12.4+ | Skip biometric setup. |
| True Tone Display | macOS 10.13.6+ | Skip True Tone Display pane. |
| Apple Pay | macOS 10.12.4+ | Skip Apple Pay setup. |
| Restore | macOS 10.9+ | Disable restoring from backup. |
| ScreenTime | macOS 10.15+ | Skip the Screen Time pane. |
| Appearance | macOS 10.14+ | Skip the Choose Your Look window. |
| Diagnostics | macOS 10.9+ | Skip sending diagnostic information to Apple. |
| Location Services | macOS 10.11+ | Skip setting up Location Services. |
| Privacy | macOS 10.13.4+ | Skips the privacy pane. |
| Siri | macOS 10.12+ | Disable users from configuring Siri. |
| Terms and Conditions | macOS 10.9+ | Keep terms and conditions hidden from the user. |
macOS only
| Setup Assistant Options | Supported versions | Description |
|---|---|---|
| FileVault | macOS 10.10+ | Disable FileVault Setup Assistant screen. |
| iCloud Storage | macOS 10.13.4+ | Skip iCloud Documents and Desktop screen. |
| iCloud Analytics | macOS 10.12.4+ | Skip the iCloud Analytics screen. |
| Registration | macOS 10.9+ | Prevent users from filling out the registration form and sending it to Apple. |
Navigate to DEP Devices to assign the configuration profile to the device. Click Associate DEP Profile after selecting a device. After choosing the profile, select Assign.
Supervising macOS devices using Apple Configurator
The disadvantage of Automated Device Enrollment is that it can only be used on macOS devices purchased directly from Apple or from authorized resellers. So, to manually add macOS devices to DEP regardless of their source of purchase, Apple offers the Apple Configurator enrollment method. Note that the enrollment is proceeded using the Apple Configurator app installed on an iOS device. Once the added macOS devices are assigned to the Hexnode UEM server, we can enable supervision using the configuration profile. Only Macs that run macOS 12 or later with an Apple M1 Silicon or T2 Security chip can be added to DEP via Apple Configurator.
Install Apple Configurator on iPhone
Use iPhones running iOS 15 or later for the enrollment process.
- Install Apple Configurator from the App Store of the iOS device.
- Launch the app. Grant access to Bluetooth and sign in with the managed Apple ID for the Device Enrollment Manager role.
- Permit access to Camera for scanning pairing codes that show upon on Mac.
- Configure additional settings by tapping on the gear icon. Pick how to connect the macOS devices to the network by either sharing Wi-Fi network credentials or utilizing a network configuration profile.
Add macOS devices to ABM
Check to see if your organization is already registered with Apple Business Manager (ABM)/Apple School Manager (ASM). Additionally, guarantee that Automated Device Enrollment is set up with Hexnode UEM. In order to use the Device Enrollment Manager Role in ABM, you need to be an administrator.
- Skip to step 2 if the Mac is newly purchased. However, you must first wipe and reset the device before assigning a macOS device that has already been configured.
- Open the Apple Configurator app on your iPhone once the Mac is in the Setup Assistant screen. Hold the iPhone close to the Mac until a screen for assigning the device to your organization pops up on the Mac.
- Scan the image that appears in the Setup Assistant screen using the Apple Configurator app. If pairing is unsuccessful, tap on Pair Manually in the Apple Configurator app and select Pair Manually in the lower-left corner of the Setup Assistant on Mac. Now, enter the six-digit code that appears on the screen.
- The Mac gets assigned to the ABM in a matter of seconds. On the iPhone, tap the menu in the lower right corner of the app to access the list of devices assigned by the Apple Configurator.
Assign devices to the Hexnode UEM Server
- Login to the Apple Business Manager portal and select Devices. Filter the device search by choosing filter type as Source > Manually Added > Apple Configurator.
- Select the required macOS device from the list of available devices.
- Click on the Edit MDM Server button and select the MDM server to which the devices must be assigned.
- Go to Enroll > Platform-Specific > macOS > Apple Business/School Manager in the Hexnode UEM portal and select the Sync with DEP button. The sync imports the devices assigned to the MDM server to the Hexnode UEM console.
- Go to DEP Configuration Profiles. Choose to either edit the Default DEP profile or create a new configuration profile by clicking on Configure DEP profile.
- Select the Enable supervision option. Configure other additional settings in the configuration profile and click on Save.
- Link the configuration profile to the device by navigating to DEP Devices. Choose a device and click Associate DEP Profile. Select the profile and click Assign.
What happens at the device end?
For devices enrolled via DEP, the Apple server pushes the configuration profile when the device starts up, initiating device enrollment. While devices already in use have to be factory reset for the configurations to be applied. Those devices that have opted for the UAMDM enrollment need to have it approved by the local administrator account.
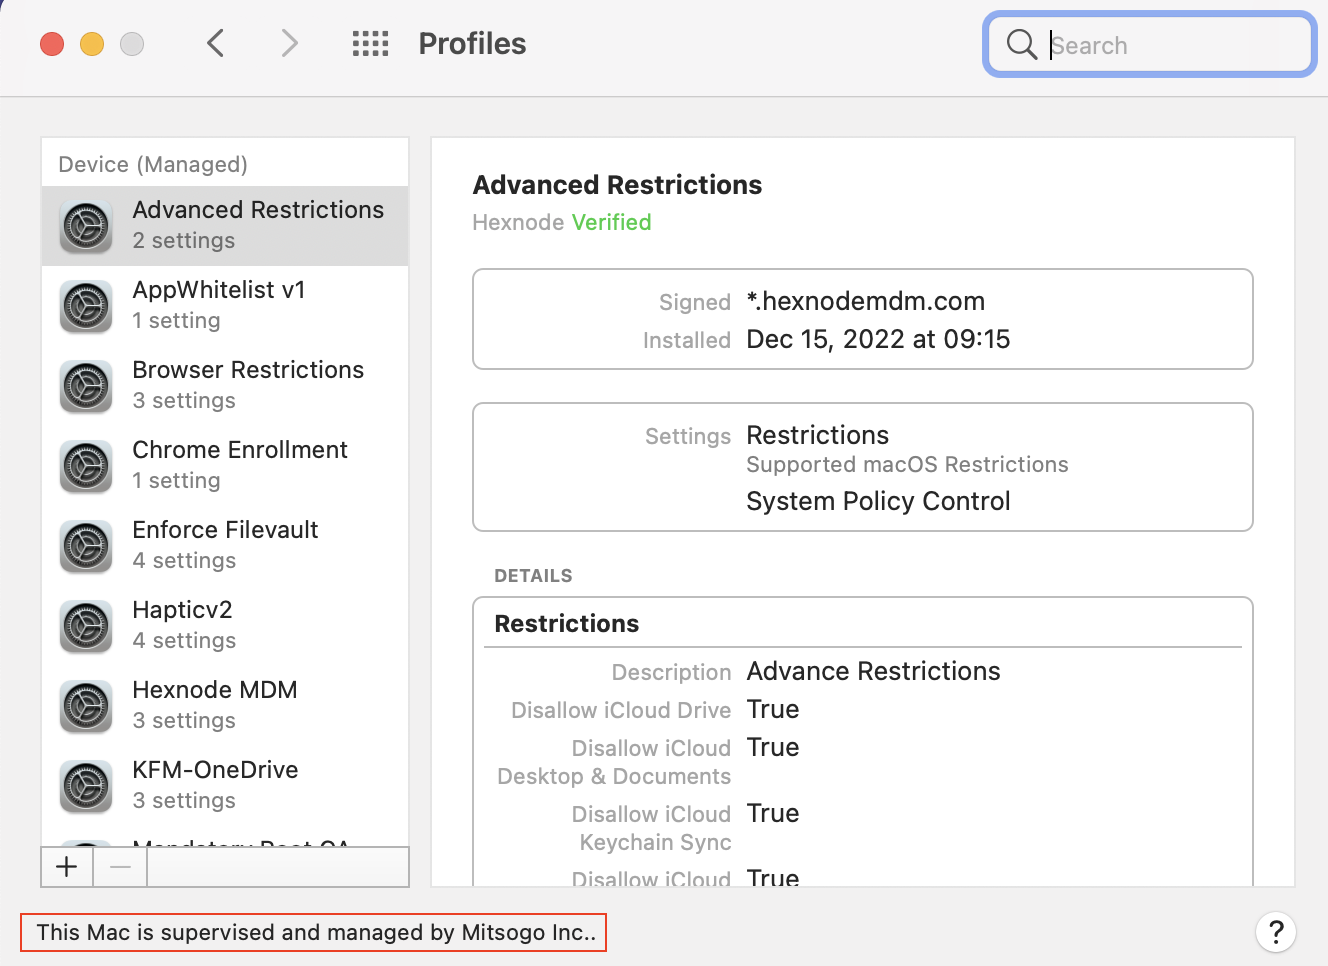
Once the device is enrolled and configuration is applied, the device supervision status is displayed as a brief message with the organization name at the bottom of the Profiles page in the System Preferences/System Settings of the device.
Features supported only by supervised macOS devices
Here’s a list of features that are supported on a macOS device only if it is supervised:
macOS Remote Actions
| Feature | Supervised | Unsupervised |
|---|---|---|
| Update OS | ✔ | ✖ |
macOS Configurations
| Feature | Supervised | Unsupervised |
|---|---|---|
| OS Updates | ✔ | ✖ |
macOS Restrictions
| Feature | Supervised | Unsupervised |
|---|---|---|
| AirDrop | ✔ (macOS 10.13+) | ✖ |
| Wallpaper Modification | ✔ (macOS 10.13+) | ✖ |
| Dictation | ✔ (macOS 10.13+) | ✖ |
| Passcode Modification | ✔ (macOS 10.13+) | ✖ |
| Autofill Passwords | ✔ (macOS 10.14+) | ✖ |
| Request passwords from nearby devices | ✔ (macOS 10.14+) | ✖ |
| Share passwords via Airdrop Passwords feature | ✔ (macOS 10.14+) | ✖ |
| Feature | Supervised | Unsupervised |
|---|---|---|
| Stream using Music app | ✔ (macOS 10.12+) | ✖ |
| Game Center | ✔ (macOS 10.13+) | ✖ |
| Multiplayer gaming | ✔ (macOS 10.13+) | ✖ |
How to remove supervision from macOS devices
1. Apple Business/School Manager enrolled devices
There are two ways to disable supervision for devices that are enrolled through ABM/ASM:
(i) Remove supervision without disenrolling from UEM
- On your Apple Business Manager account, navigate to Devices. Choose the device and select Edit MDM Server.
- Select the Unassign from the current MDM option, and then click Continue.
- Factory reset the device.
(ii) Remove both the supervision and the enrollment
- Unassign the device from the ABM portal.
- Then, reset the device to factory settings.
In either case, device data should be backed up if necessary.
2. UAMDM enrolled devices
To remove supervision, you must also remove the enrollment.
To disenroll your macOS device:
- In the Hexnode UEM portal, go to Manage > Devices.
- Choose the device from which you want to disenroll.
- Select Disenroll Device from the Actions list and click Yes on the confirmation message.
- Click Confirm after entering your administrator password.
