Category filter
How to Configure Smart Card Authentication for macOS Devices
A smart card is an access-control device that generally contains one or more security certificates for user authentication. The certificates, in combination with a user’s smart card PIN, can be used to authenticate the user.
Users can make use of their smart cards to log in to their Macs. Smart Card Authentication requires the users to possess their smart card and enter the smart card PIN to log in to their Mac devices. The authentication via smart card credential ensures more security and privacy than a normal device password because it uses encryption key for the process. This is because the former requires the possession of both the smart card and the pin for login. In the case of the latter, if the password is compromised, the data becomes vulnerable.
Hexnode UEM simplifies the process of Mac management by enabling IT admins to remotely configure smart card authentication settings for Macs. The admins can enable user login via smart cards, enforce users to pair with a single smart card, verify the authenticity of the certificate, and much more.
Configure Smart Card Authentication settings
- Log in to your Hexnode MDM portal.
- Go to Policies > New Policy. Assign a suitable name and description (optional) for the policy. Alternatively, you can choose to continue with an existing policy.
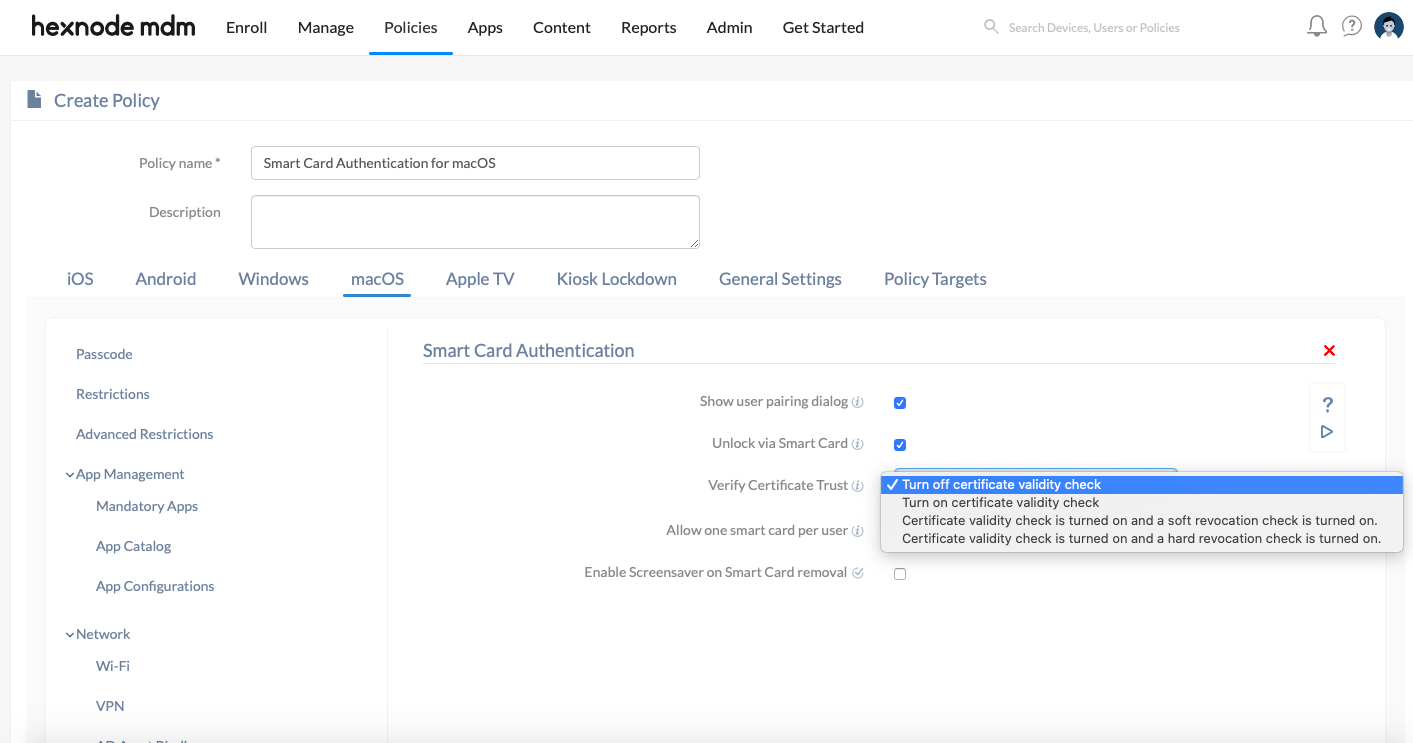
- From macOS > Security, choose Smart Card Authentication. Click Configure.
Next, configure the below smart card authentication settings for macOS devices:
| Settings | Description |
|---|---|
| Show user pairing dialog | Checking this option enables the user to see any new pairing dialogs. If disabled, the user won’t get the pairing dialog when he/she inserts an unpaired card into the system. However, the existing pairings will continue to work. |
| Unlock via Smart Card | Check this option to allow users to use their smart cards for logins, authorizations, and screensaver unlocking. If disabled, the users won’t be able to use smart cards for the above-mentioned purposes. However, it can still be used for web access and signing emails. The device must be restarted for the change in settings to take effect. |
| Verify Certificate Trust | Select the setting required to determine the credibility of the certificate file. The following conditions determine whether a certificate is valid:
You can select among any of the four available options here.
|
| Allow one smart card per user | Check this option to allow the user to pair with only one smart card. However, the existing pairings for that user will still work. |
| Enable Screensaver on Smart Card removal (macOS 10.13.4+) |
Check this option to automatically enable screensaver on Mac if the smart card has been removed. |
Associate the policy with target macOS devices
If the policy has not been saved,
- Navigate to Policy Targets > +Add Devices.
- Choose the target devices and click Ok.
- Click Save.
Apart from devices, you can also associate the policies with Device Groups, Users, User Groups, or Domains from Policy Targets.
If the policy has been saved,
- From Policies, select the policy to be associated.
- Click on Manage drop-down and select Associate Targets.
- Choose the target devices and click Associate.
