Category filter
How to bulk import users with a CSV file?
Users are individuals who use the devices managed by the Hexnode. A device is assigned to the corresponding user as part of the enrollment. In addition to making the enrollment process smoother, creating users in Hexnode allows the enforcement of customized policies for employees, especially helpful when the employees have more than one device assigned. Adding users to the Hexnode console is much easier when bulk importing users using a CSV file that contains all the necessary user information. Users imported using a CSV file are added and categorized as the Local user type.
While importing users in bulk, IT administrators can choose to send enrollment requests to them if needed. Even if the IT administrators opts not to send them during the import, they can still send enrollment requests to the users later.
Add users in bulk to the Hexnode UEM console
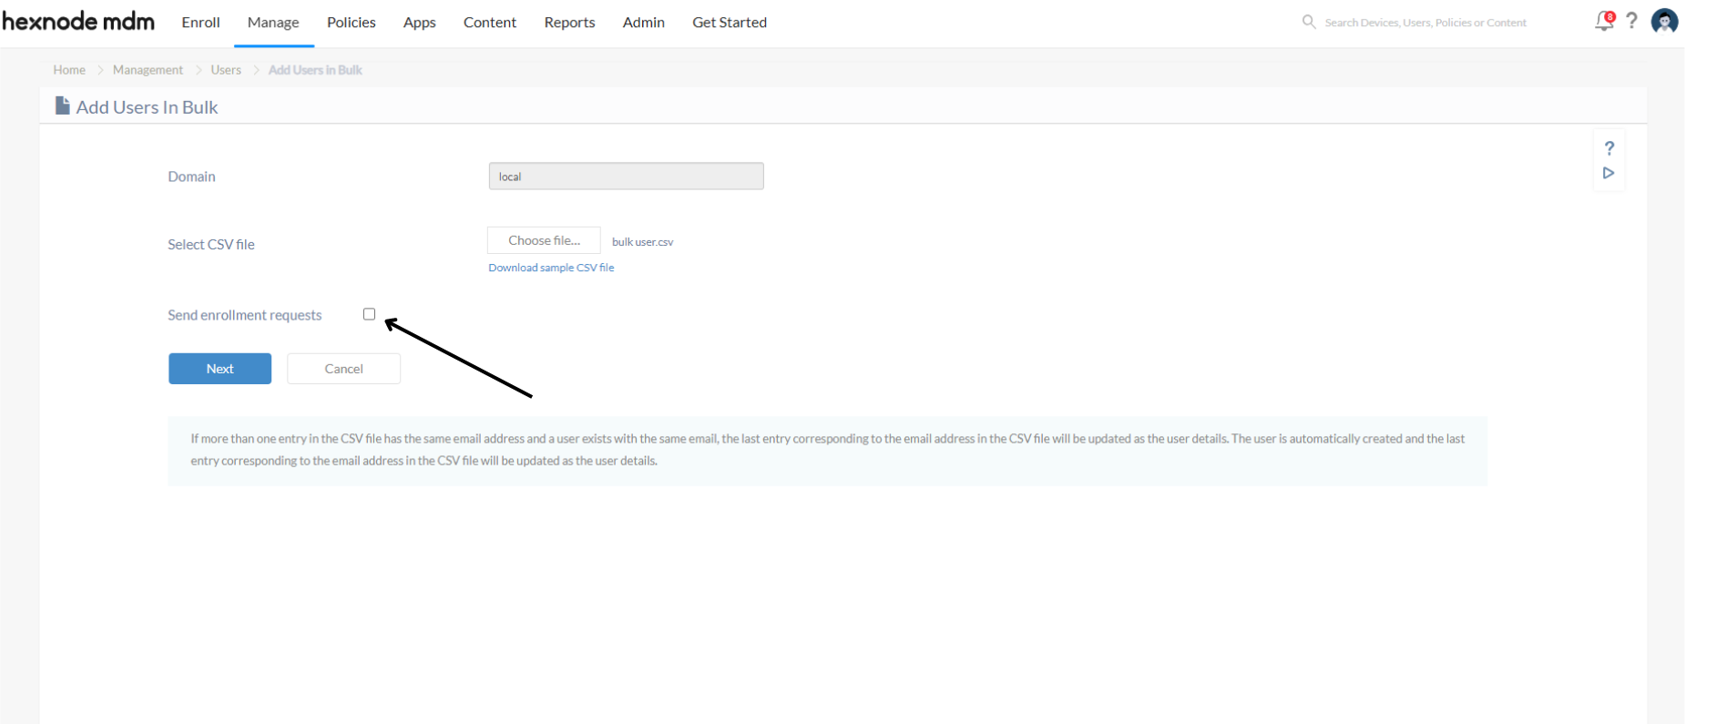
- Go to Manage > Users > Bulk user.
- The Domain drop-down will show “local” and cannot be changed.
- Upload the CSV file containing all the users and their details. There is a Download sample CSV file option to download a sample CSV file.
- Choose the “Send enrollment requests” option accordingly:
- If the option is enabled, an enrollment request will be sent to the user’s email.
- If the option is disabled, no enrollment request will be sent to the user’s email.
- If you have provided the required fields such as display name, email, and ownership in the uploaded CSV file, then proceed to click “Next”. This will take you to the Add Users In Bulk page.
But if you didn’t provide or label the required fields correctly in the CSV file, a prompt will ask you to manually map the fields to make sure each one matches the intended data.
Only the following fields provided in the CSV file will be mapped.
Field Name Description Display Name Provide the name of the user. This field is mandatory. Email Provide the email address of the user. This field is mandatory. Mobile Provide the mobile number of the user. Ownership Specify the device ownership type either as Personal, Corporate, or Allow Users to select. This field is only mandatory if the “Send enrollment requests” option is selected.
Device Name Provide a suitable name to identify the device. Serial Number Provide the serial number of the device. Platform Specify the device platform as either iOS, macOS, Android, Windows, or tvOS. - Click on Submit and verify the details of the uploaded CSV.
- You will be able to select which users should be added and click on Add.
- If the user already exists in the portal, you can replace them by checking the “Replace existing user(s)” option in the Replace Existing Users popup that appears and click Continue.
- Now, the users will be added to the Hexnode portal, and you can find them on the Users page under the Manage tab.
Sending enrollment requests after bulk user addition
If the “Send enrollment request” option was not selected during the bulk user addition process, it is still possible to send enrollment requests later using the following method:
Method 1: Send enrollment requests by accessing the “Enroll” tab:
- Go to Enroll > All Enrollments > Invite > Email.
- Select the domain as ‘local‘.
- Click on User and select the user.
- Click on the Send button to send enrollment request to that user.
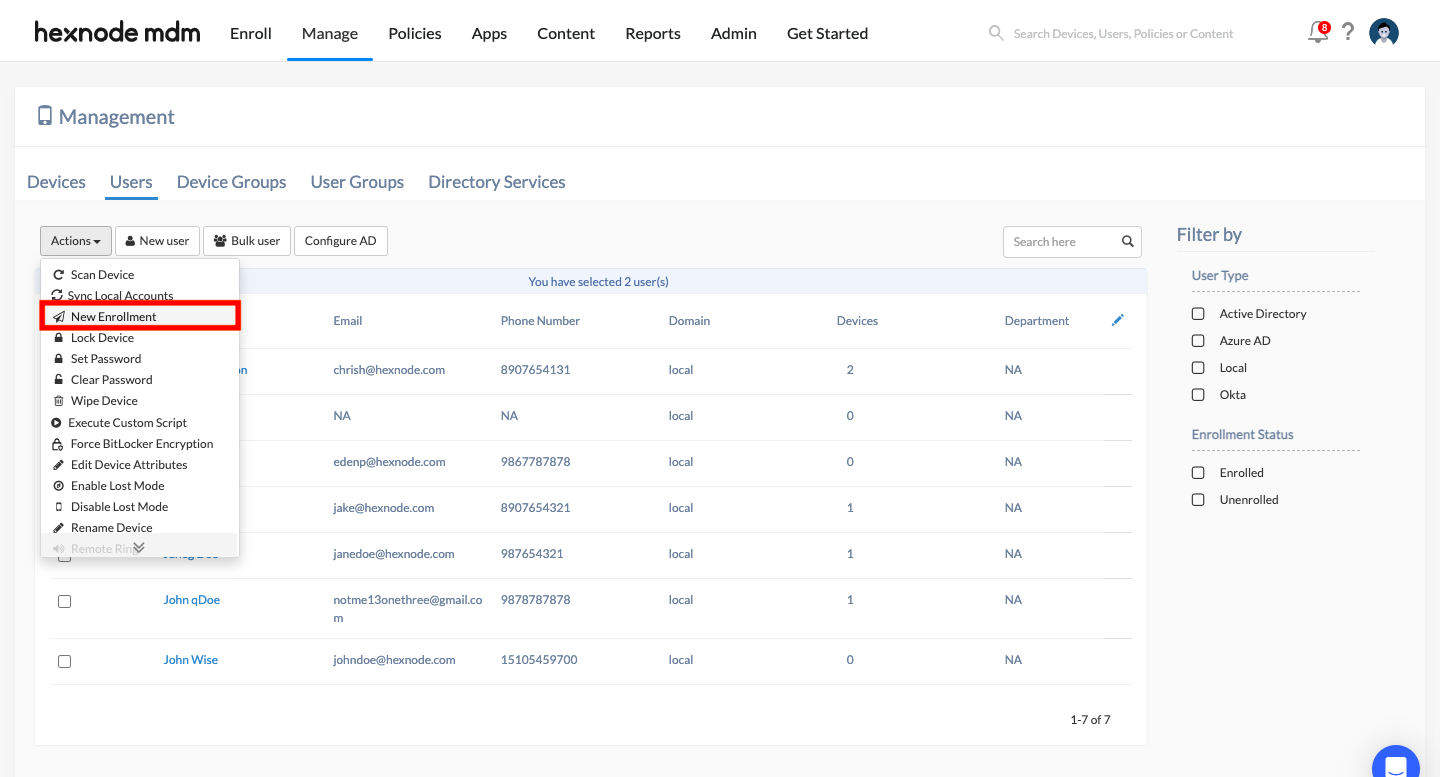
Method 2: Send enrollment requests by using “New Enrollment” action:
- Go to Manage > Users.
- Choose the users.
- From the Actions, select “New Enrollment” to send the enrollment request to the selected users.


