Category filter
Configure APN for Android Enterprise (DO) devices
The APN policy for Android Enterprise devices lets you deploy custom APN configurations in your digital workspace. It serves as a gateway between the mobile network and the internet, enabling devices to connect and communicate with the network. APN configuration allows organizations to create private, secure networks for their devices, separating them from public internet traffic and protecting data. With Hexnode’s APN (AE – DO) policy, organizations can now configure APN for Android enterprise Device owner devices.
Configure APN for Android Enterprise devices
Configure APN for devices enrolled as Android Enterprise devices,
- Login to your Hexnode UEM portal.
- Go to Policies > New Policy. Assign a suitable name and description (optional) for the policy. Alternatively, you can also choose to continue with an existing policy.
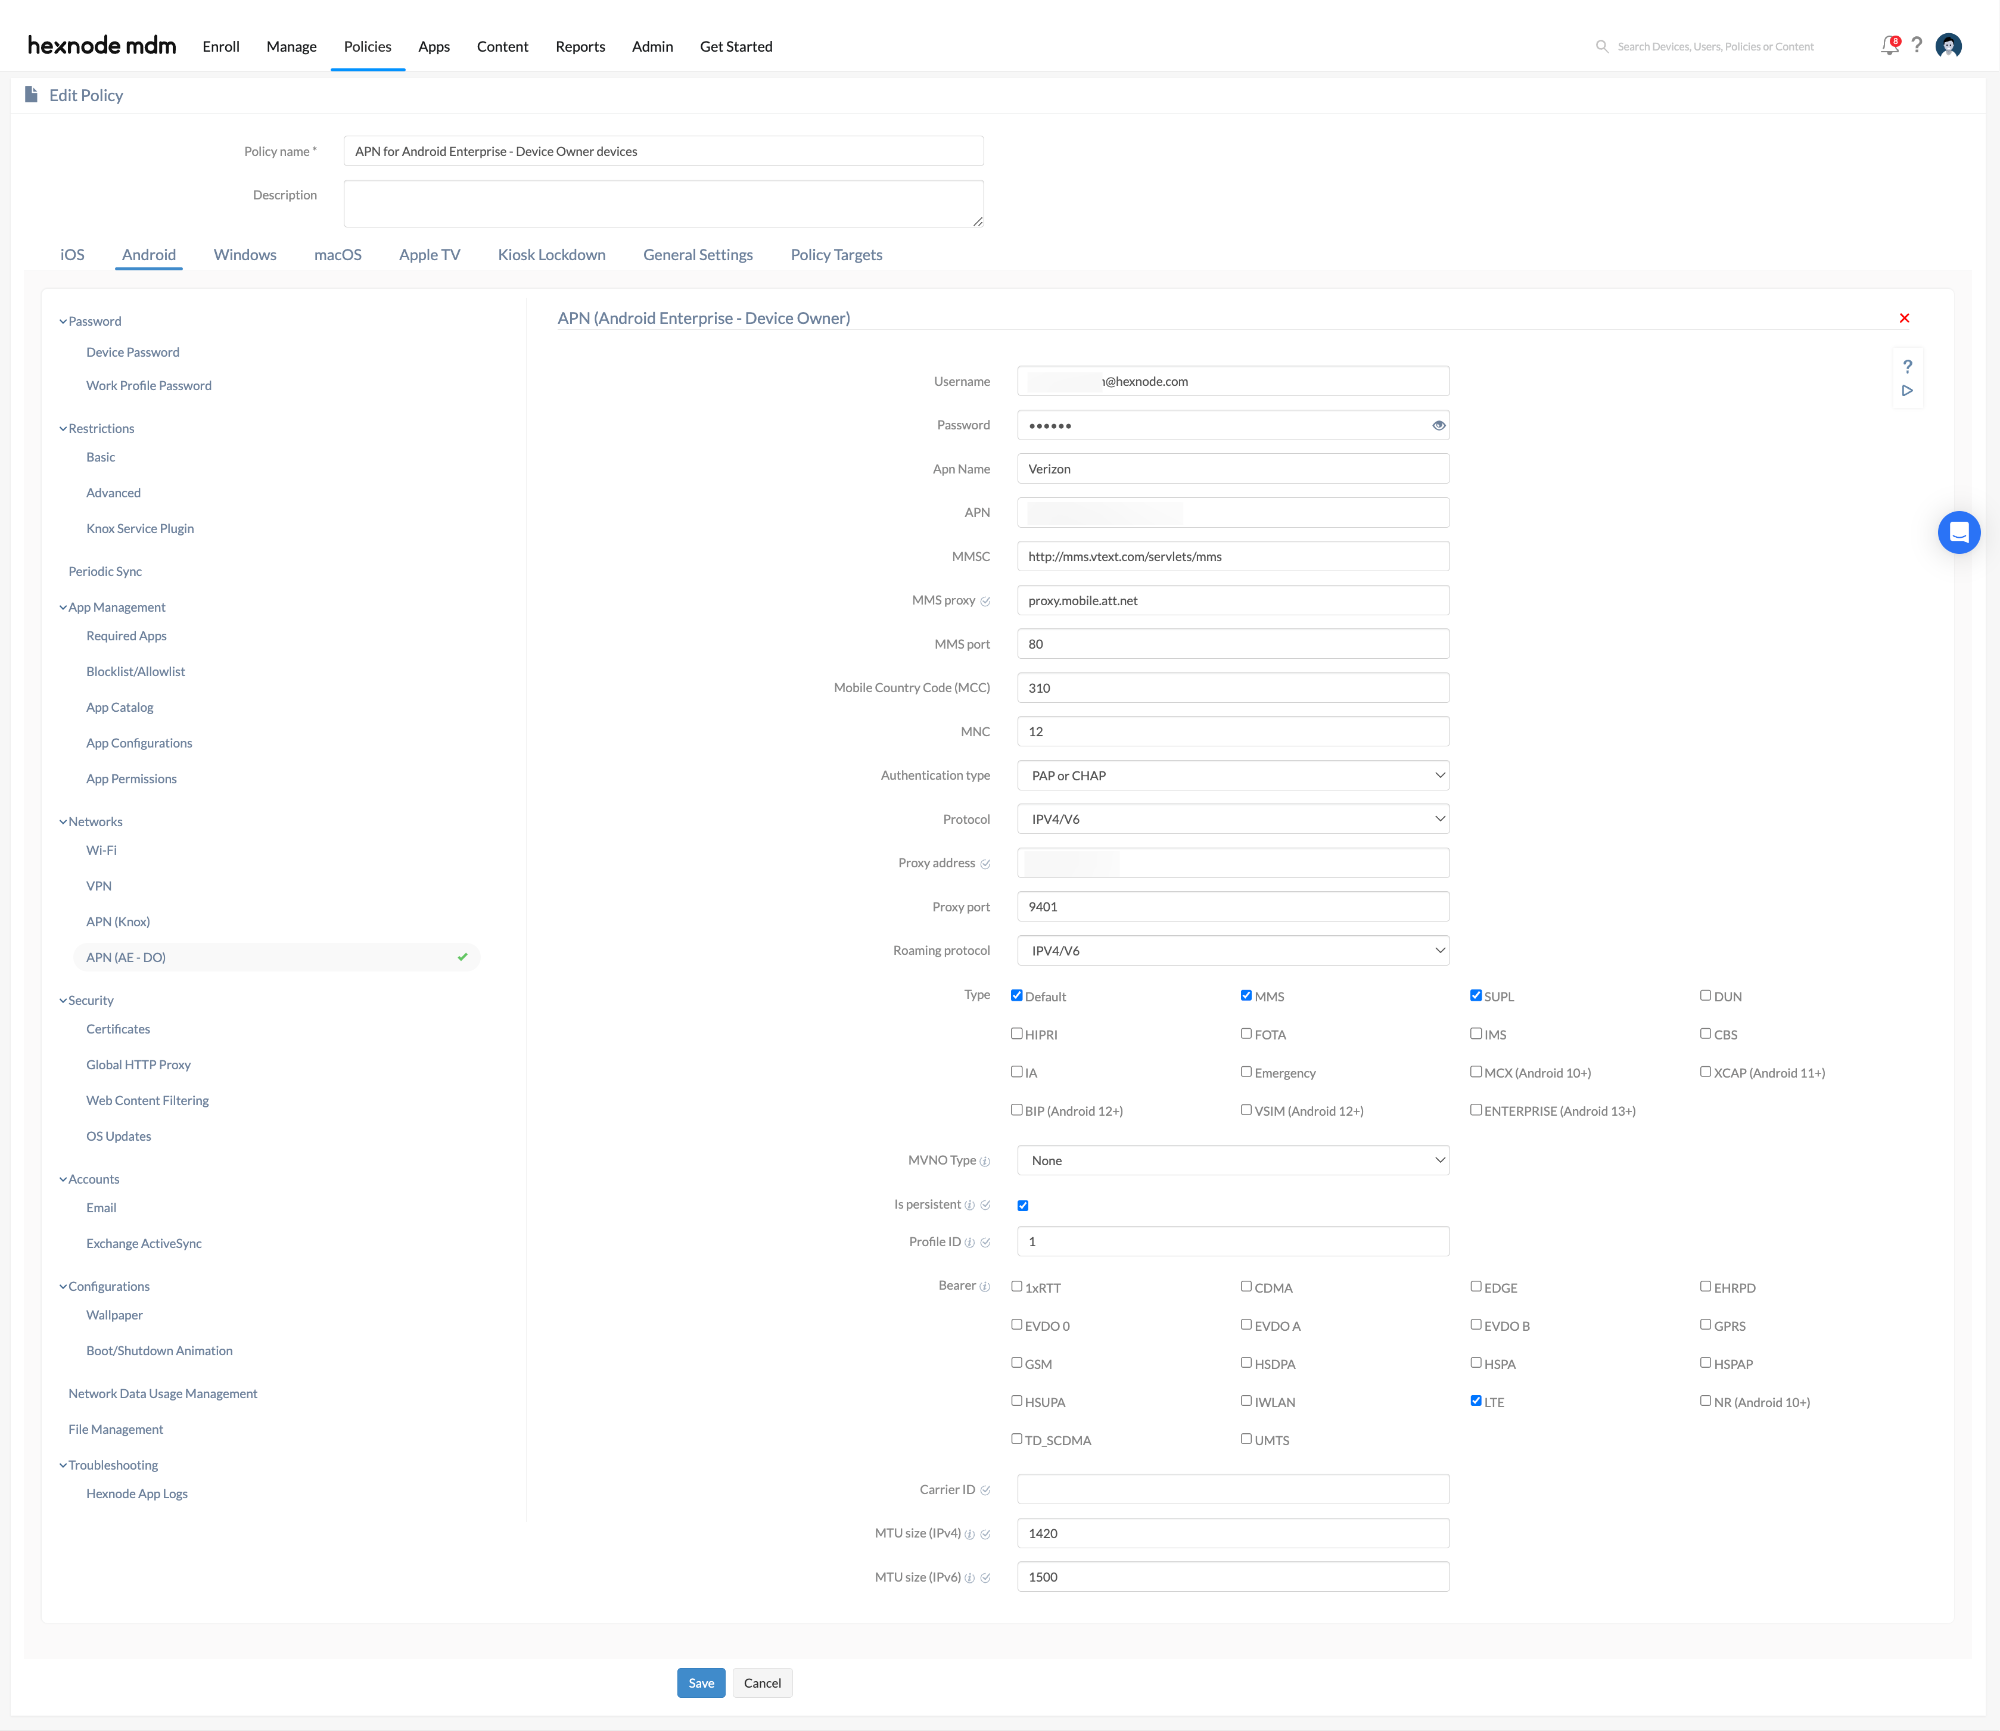
- Select Android > Networks > APN (AE – DO).
| Settings | Description |
|---|---|
| Username | Specify the username of the APN. |
| Password | Specify the password associated with the username. |
| Apn Name | Specify the name for the APN settings to distinguish it from other saved APN configurations. |
| APN | Enter the Access Point Name that the device needs to use to access cellular data. |
| MMSC | Specify the Multimedia Messaging Service Center (MMSC) address, which resembles a web URL, to be used for sending and receiving MMS messages. |
| MMS proxy (Supported on Android 10.0+ devices) | Specify the proxy address for connecting to the MMSC server. |
| MMS port | Specify the port number for the MMS proxy endpoint that connects to the MMSC server. |
| Mobile Country Code (MCC) | Specify the MCC, a three-digit code used to identify a country or a group of networks sharing the same MCC. The MCC is used with the MNC (Mobile Network Code) to uniquely identify a network. |
| MNC | Specify the Mobile Network Code (MNC), a two or three-digit code assigned to a network. Use it with the MCC to uniquely identify the home network. |
| Authentication type | Choose the type of authentication to be used from the options None (default), PAP (Password Authentication Protocol), CHAP (Challenge Handshake Authentication Protocol), or PAP or CHAP. The authentication type in APN settings determines how your device will authenticate on the network when accessing data services. It specifies the security protocol for sending your username and password to the server to establish a network connection. |
| Protocol | Specify the protocol the device must use to access the Internet through cellular data. Select one of the following options:
|
| Proxy address(Supported on Android 10.0+ devices) | Specify the proxy address for the device to route all network traffic. Routing all network traffic through a proxy can enhance security and potentially improve connection speed by hiding your IP address and encrypting your data. |
| Proxy port | Specify the proxy port to route all cellular data network communications on the device through the designated proxy. |
| Roaming protocol | Select the roaming protocol for the device to use when connecting to the Internet via cellular data while roaming. Select one of the following options:
|
| Type | Select the types of data connections for the APN configuration. You can select multiple options from the following:
|
| MVNO Type | Specify the type of Mobile Virtual Network Operator (MVNO) to be configured. The available options are:
|
| Is Persistent (Supported on Android 13.0+ devices) | Enable this option for the APN settings to be persistent in the modem. |
| Profile ID(Supported on Android 13.0+ devices) | Enter the numeric profile ID where the APN settings are stored in the modem. |
| Bearer | Select one or more types of bearer services used for data transmission. The bearer determines the quality of your data connection, including factors like speed, latency, and reliability. You can select one or more services from the following:
|
| Carrier ID (Supported on Android 10.0+ devices) | Specify the unique Carrier ID associated with the mobile carrier. |
| MTU (IPv4) (Supported on Android 13.0+ devices) | Enter the default MTU (Maximum Transmission Unit) size in bytes for IPv4 routes established through this APN setting. |
| MTU (IPv6) (Supported on Android 13.0+ devices) | Enter the default MTU (Maximum Transmission Unit) size in bytes for IPv6 routes established through this APN setting. |
Associate APN (Android Enterprise) policy with Android devices
If the policy has not been saved,
- Navigate to Policy Targets > +Add Devices.
- Choose the target devices and click OK. Click Save.
- You can also choose to associate the policy with device groups, users, user groups, or domains from the left pane of the Policy Targets tab.
If the policy has not been saved,
- Go to the Policies tab and choose the desired policy.
- Click on the Manage drop-down and select Associate Targets.
- Choose the target entities and click Associate.
What happens at the device end?
After associating the policy with the device using valid configurations, the APN profile will be added to the device’s APN settings. Users cannot modify the APN settings once the policy is associated, as the settings will be greyed out. You can find them under Settings > Network & internet > Internet > Click on the settings icon > Network > Access point names. Navigation for the settings might be varied based on the device.


