Category filter
Perform Hexnode app UI customizations for iOS
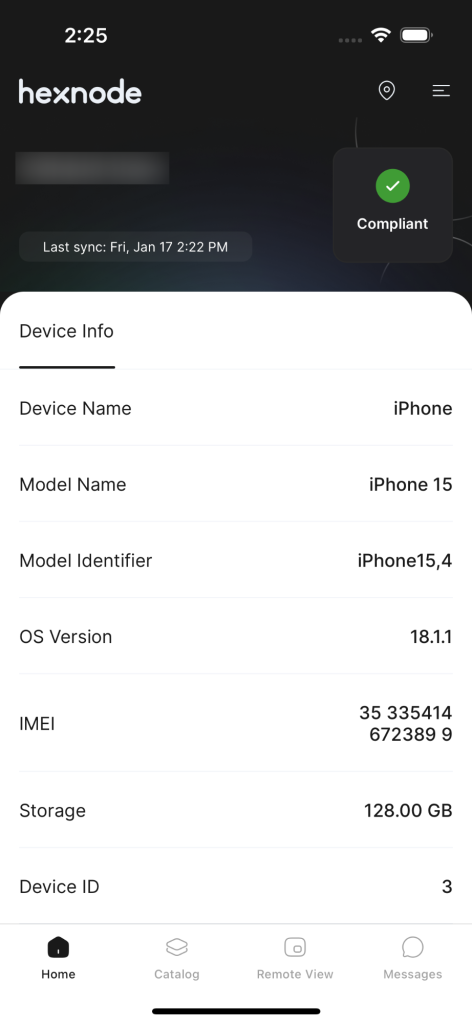
The Hexnode UEM application installed on the device post-enrollment plays a critical role in device-server communication. The users can view the device’s overview and the compliance details through this app. Moreover, the Hexnode UEM application helps users send and download app logs, view messages received from the admin, install applications from the Catalog tab, and more.
But, as an administrator, you can decide which app functionalities should be available to the user. You can choose what the users can view or access from the Hexnode UEM application. The Hexnode App UI policy allows the administrators to configure the application UI presented on the device, which can be associated after it is enrolled. Here’s how you customize the Hexnode App UI for iOS devices.
Configuring Hexnode App UI on iOS devices
To customize Hexnode App UI on your iOS device,
- Log in to your Hexnode UEM portal.
- Navigate to Policies > New Policy. Assign a suitable name and description (optional) for the policy. You can also choose to continue with an existing policy.
- Go to iOS > Customizations > Hexnode App UI. Click Configure.
| Settings | Description |
|---|---|
| Compliance details | Unchecking this option removes the “Compliance Info” tab from the Hexnode UEM application. |
| Send location | The “Send location” option in Hexnode UEM app allows the user to send the enrolled device’s location to the Hexnode UEM server. When unchecked, the option ‘Send location’ is unavailable on the Hexnode UEM application. |
| Maps | Allows the user to view the map on the device. When unchecked, this option is not available on the app. |
| Messages | Enabling this option allows the user to view the received messages from the app and also lets you configure the following related settings. |
| Message notifications | Choose whether or not to receive message notifications on the Hexnode UEM app. Allowed by default. |
| Delete messages | Allows the user to delete the received messages. Enabled by default. |
| Pin messages | This feature can be enabled to mark messages that might be important. Enabled by default. |
| Star messages | When enabled, the user can star messages. Enabled by default. |
| Search | Allows the user to search for previously received messages. Enabled by default. |
| Copy messages | Allows users to copy messages received on the Hexnode UEM app. When disabled, the users are prevented from copying messages sent by the admin using the Broadcast Message remote action. This setting is enabled by default. |
| Hyperlinks in messages | When enabled, broadcasted messages containing URLs, phone numbers, emails, calendar events, app links, or locations are received as clickable links on the Hexnode UEM app. Tapping them triggers relevant actions, such as opening emails, launching apps, or viewing locations on maps. If disabled, clicking the hyperlink will display the error message: “URL not accessible. Web browser is restricted on this device.” This setting is enabled by default. |
| App catalog | The necessary applications are segregated by the admin to form a curated list of apps called app catalogs. When deployed to the devices from the Hexnode console, it acts as a customized app store, letting the user selectively install apps. Disabling this option disables the Catalog tab. |
| Allow app installation | When checked, it allows the user to install the applications directly from the app catalog. Enabled by default. |
| Hide installed apps | The applications added to the app catalog that are already installed on the user device will be hidden, if this option is enabled. Disabled by default. |
| Logs | Manages the app logs of the enrolled device and allows sending and downloading them. Enabled by default. |
| Send app logs | Enabling this setting gives users the option to send app logs of the managed device to the Hexnode UEM server. Enabled by default. |
| Download app logs | When enabled, users can download the app logs of the managed device. Enabled by default. |
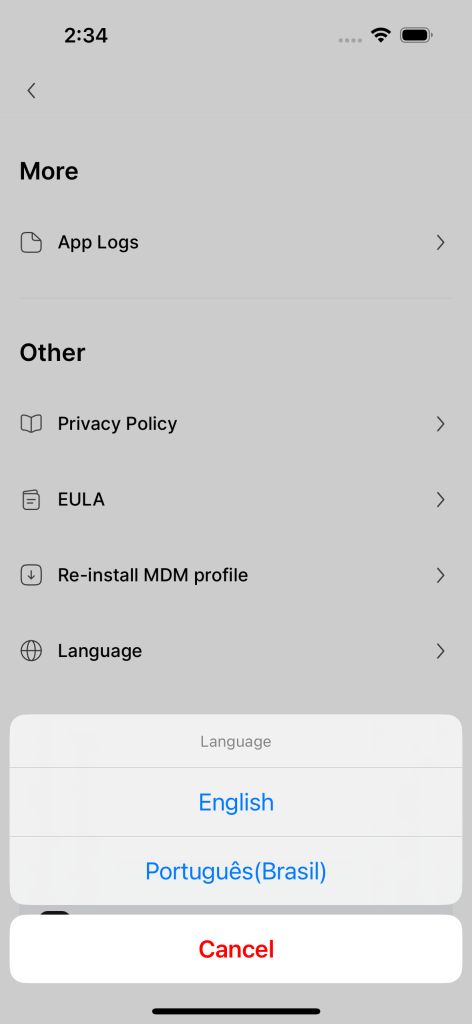
| Language | This feature allows the administrator to configure the language in the application. The language options include: ‘Let the user choose’, ‘English’ and ‘Portuguese’. |
How to Associate the Policies with Device/Groups?
There are two ways by which you can associate restrictions with the devices in bulk.
If the policy has not yet been saved,
- Navigate to Policy Targets.
- Click on +Add Devices.
- Select the devices and click OK.
- Click on Save to apply the policies to devices.
Apart from devices, you can also associate the policies with Device Groups, Users, User Groups, or Domains from Policy Targets.
If the policy has been saved, you can associate it with another method.
- From Policies, check the policies to be associated.
- Click on Manage > Associate Targets and select the device.
- Click on Associate to apply the policy to the devices.
What happens at the device end?
Here, the Compliance Info and the Maps tabs have been removed from the Hexnode UEM of the device.

To change the language of the Hexnode UEM, users can select the preferred language from the Language option on the app.


