Category filter
Configure Screensaver settings for Windows devices
Screensavers present users with a diverse array of visual elements like blank screens, dynamic patterns, or captivating images when their devices remain inactive for an extended period.
Setting up screensavers allows administrators to brand company logos on users’ devices. This ensures a consistent visual identity across the network and enhances the overall visual appeal of the devices. Since screensavers activate automatically after a certain period of device inactivity, they also contribute to basic security by prompting users to enter a password when they try to regain access to the device. The Hexnode Screensaver feature for Windows allows administrators to efficiently set up screensavers on multiple Windows devices simultaneously, reducing the time and effort required.
Configure Windows screensaver
To configure screensaver settings on your Windows via Hexnode,
- Log in to your Hexnode UEM console.
- Go to Policies > New Policy. Assign a suitable name and description (optional) for the policy. You can also choose to continue with an existing policy.
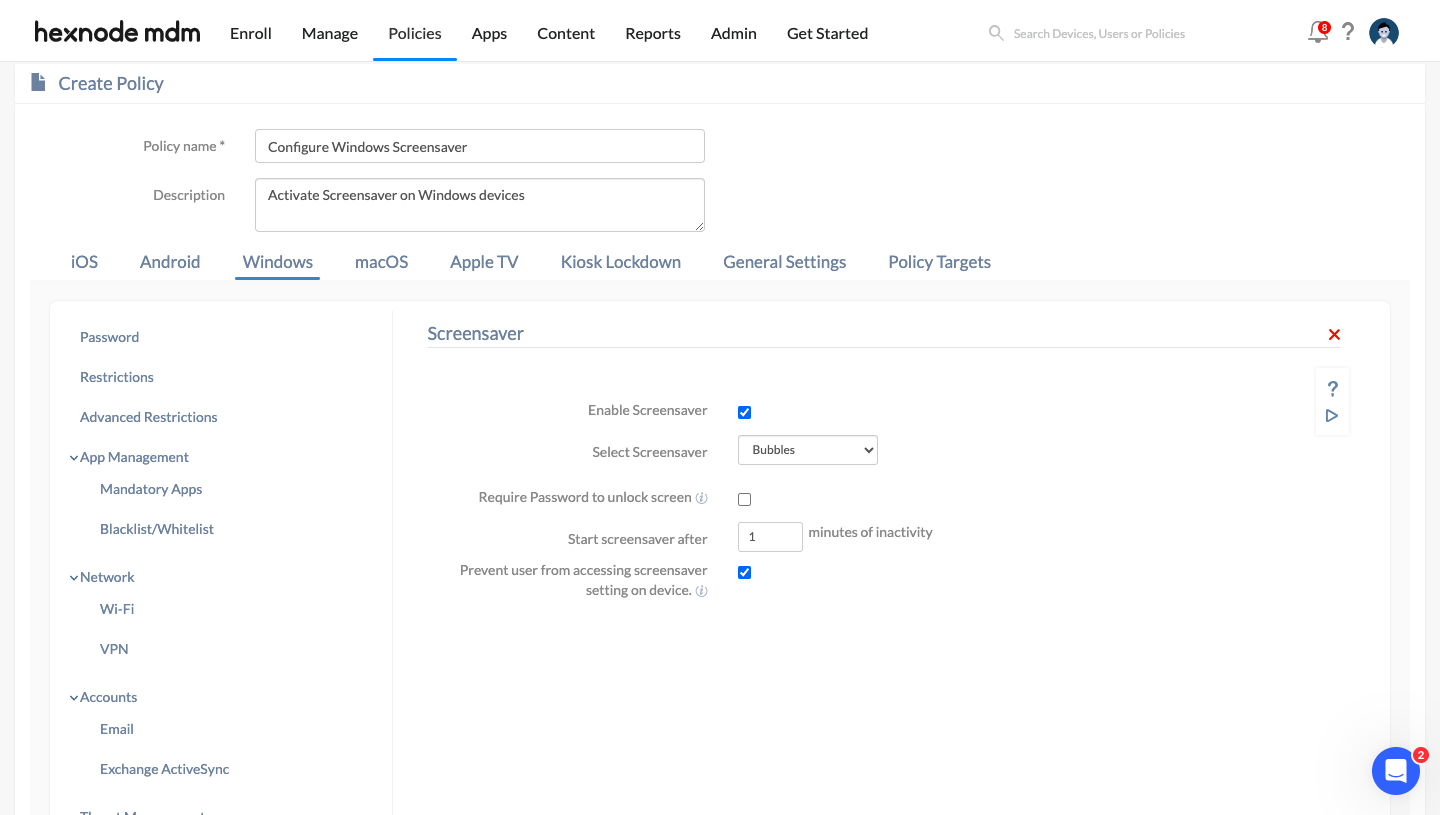
- Navigate to Windows > Configurations and choose Screensaver. Click Configure
- Blank: This option just reflects a blank screen. (Default)
- 3D Text: This option displays text in 3-D. You can customize the text font, size, color, etc.
- Bubbles: This option generates colorful, floating bubbles that move across the screen.
- Mystify: This option creates dynamic, multi-colored lines that move over a blank screen.
- Photos: This option shows a slide show of pictures on the device.
- Ribbons: This option features multi-colored ribbons that dance and flow across the screen.
- Custom: This option allows the user to upload any custom screensaver file. The file should be in .scr format.
- 3D Text
- Text: Specify the text that you want to appear in the screensaver. It could be either a custom text or the current time.
- Font: Select the font to be used for the 3D text from a list of available fonts.
- Size: Adjust the size of the 3D text using the slider.
- Text color: Choose the color for the 3D text.
- Resolution: Adjust the resolution for the 3D text using the slider.
- Rotation style: Choose the rotation style for the text from the available options:
- None
- Spin
- See-Saw
- Wobble
- Tumble
- Rotation Speed: Adjust the rotation speed for the 3D text using the slider.
- Show specular highlights: Check this option to enable specular highlights. Specular highlights can make objects on the screen appear more realistic and visually engaging, by adding a sense of depth and dimension to the visuals. They are especially helpful in screensavers with 3D animations or images.
- Photos
- Add Images: Add the images that you want to be displayed on the screensaver. You can select a maximum of 10 images.
- Slide show speed: Specify the speed of the slide show:
- Slow (Default)
- Medium
- High
- Shuffle images: Choose if you want to shuffle the images.
- Go to Policy Targets > +Add Devices.
- Choose the target devices and click Ok.
- Click Save.
- Choose the desired policy from the Policies tab.
- Click on Manage drop-down, select Associate Targets.
- Choose the target devices, device groups, users, user groups or domains and click Associate.

Screensaver
| Settings | Description |
|---|---|
| Enable Screensaver | Check this box to activate the screensaver on your Windows device. The option is disabled by default in the portal. |
The following settings work only if Enable Screensaver is checked, otherwise these options will be greyed out. Also, note that these settings will take effect after a period of inactivity which will be specified in the policy.
| Select Screensaver | Select the required screensaver from the options given below:
|
| Require Password to unlock screen | Check this option to prompt the user to enter a password for the device to wake from the screensaver. |
| Start screensaver after | Specify the duration of inactivity in minutes after which the screensaver can become active. It is “1 min” by default. |
| Prevent user from accessing screensaver setting on device | Check this option to restrict user access to screensaver settings on the device. If the ‘Prevent user from accessing screensaver settings on the device’ option is checked, users will be restricted from accessing the screensaver settings under Settings > Personalization > Lock screen on their Windows devices. |
Screensaver Settings
Custom screensaver settings can be configured for the following options:
Associating policies with Windows devices
If the policy has not been saved.
You can also choose to associate the policy with device groups, users, user groups, or domains from the left pane of the Policy Targets tab.
If the policy is saved,
What happens at the device end?
Once the policy is associated, screensaver will be activated on the target devices and the settings configured in the policy will be applied.


