Category filter
Distribute enterprise apps to Android devices
An enterprise app or in-house app is an application developed to use within the organization. Since these apps are designed to be used internally, they cannot be distributed to the public. Therefore, they are not published in the Play Store. Hexnode simplifies the process of distributing enterprise apps in many ways.
Add enterprise app to the Hexnode app inventory
First, you need to add the app to the Hexnode console.
Follow the steps to add the app as an enterprise app to the Hexnode console.
- Login to your Hexnode portal.
- Go to Apps.
- Select +Add Apps > Enterprise App.
- Select the Android as the Platform.
- The enterprise app can be added in two ways.
- APK or XAPK file.
- From manifest path.
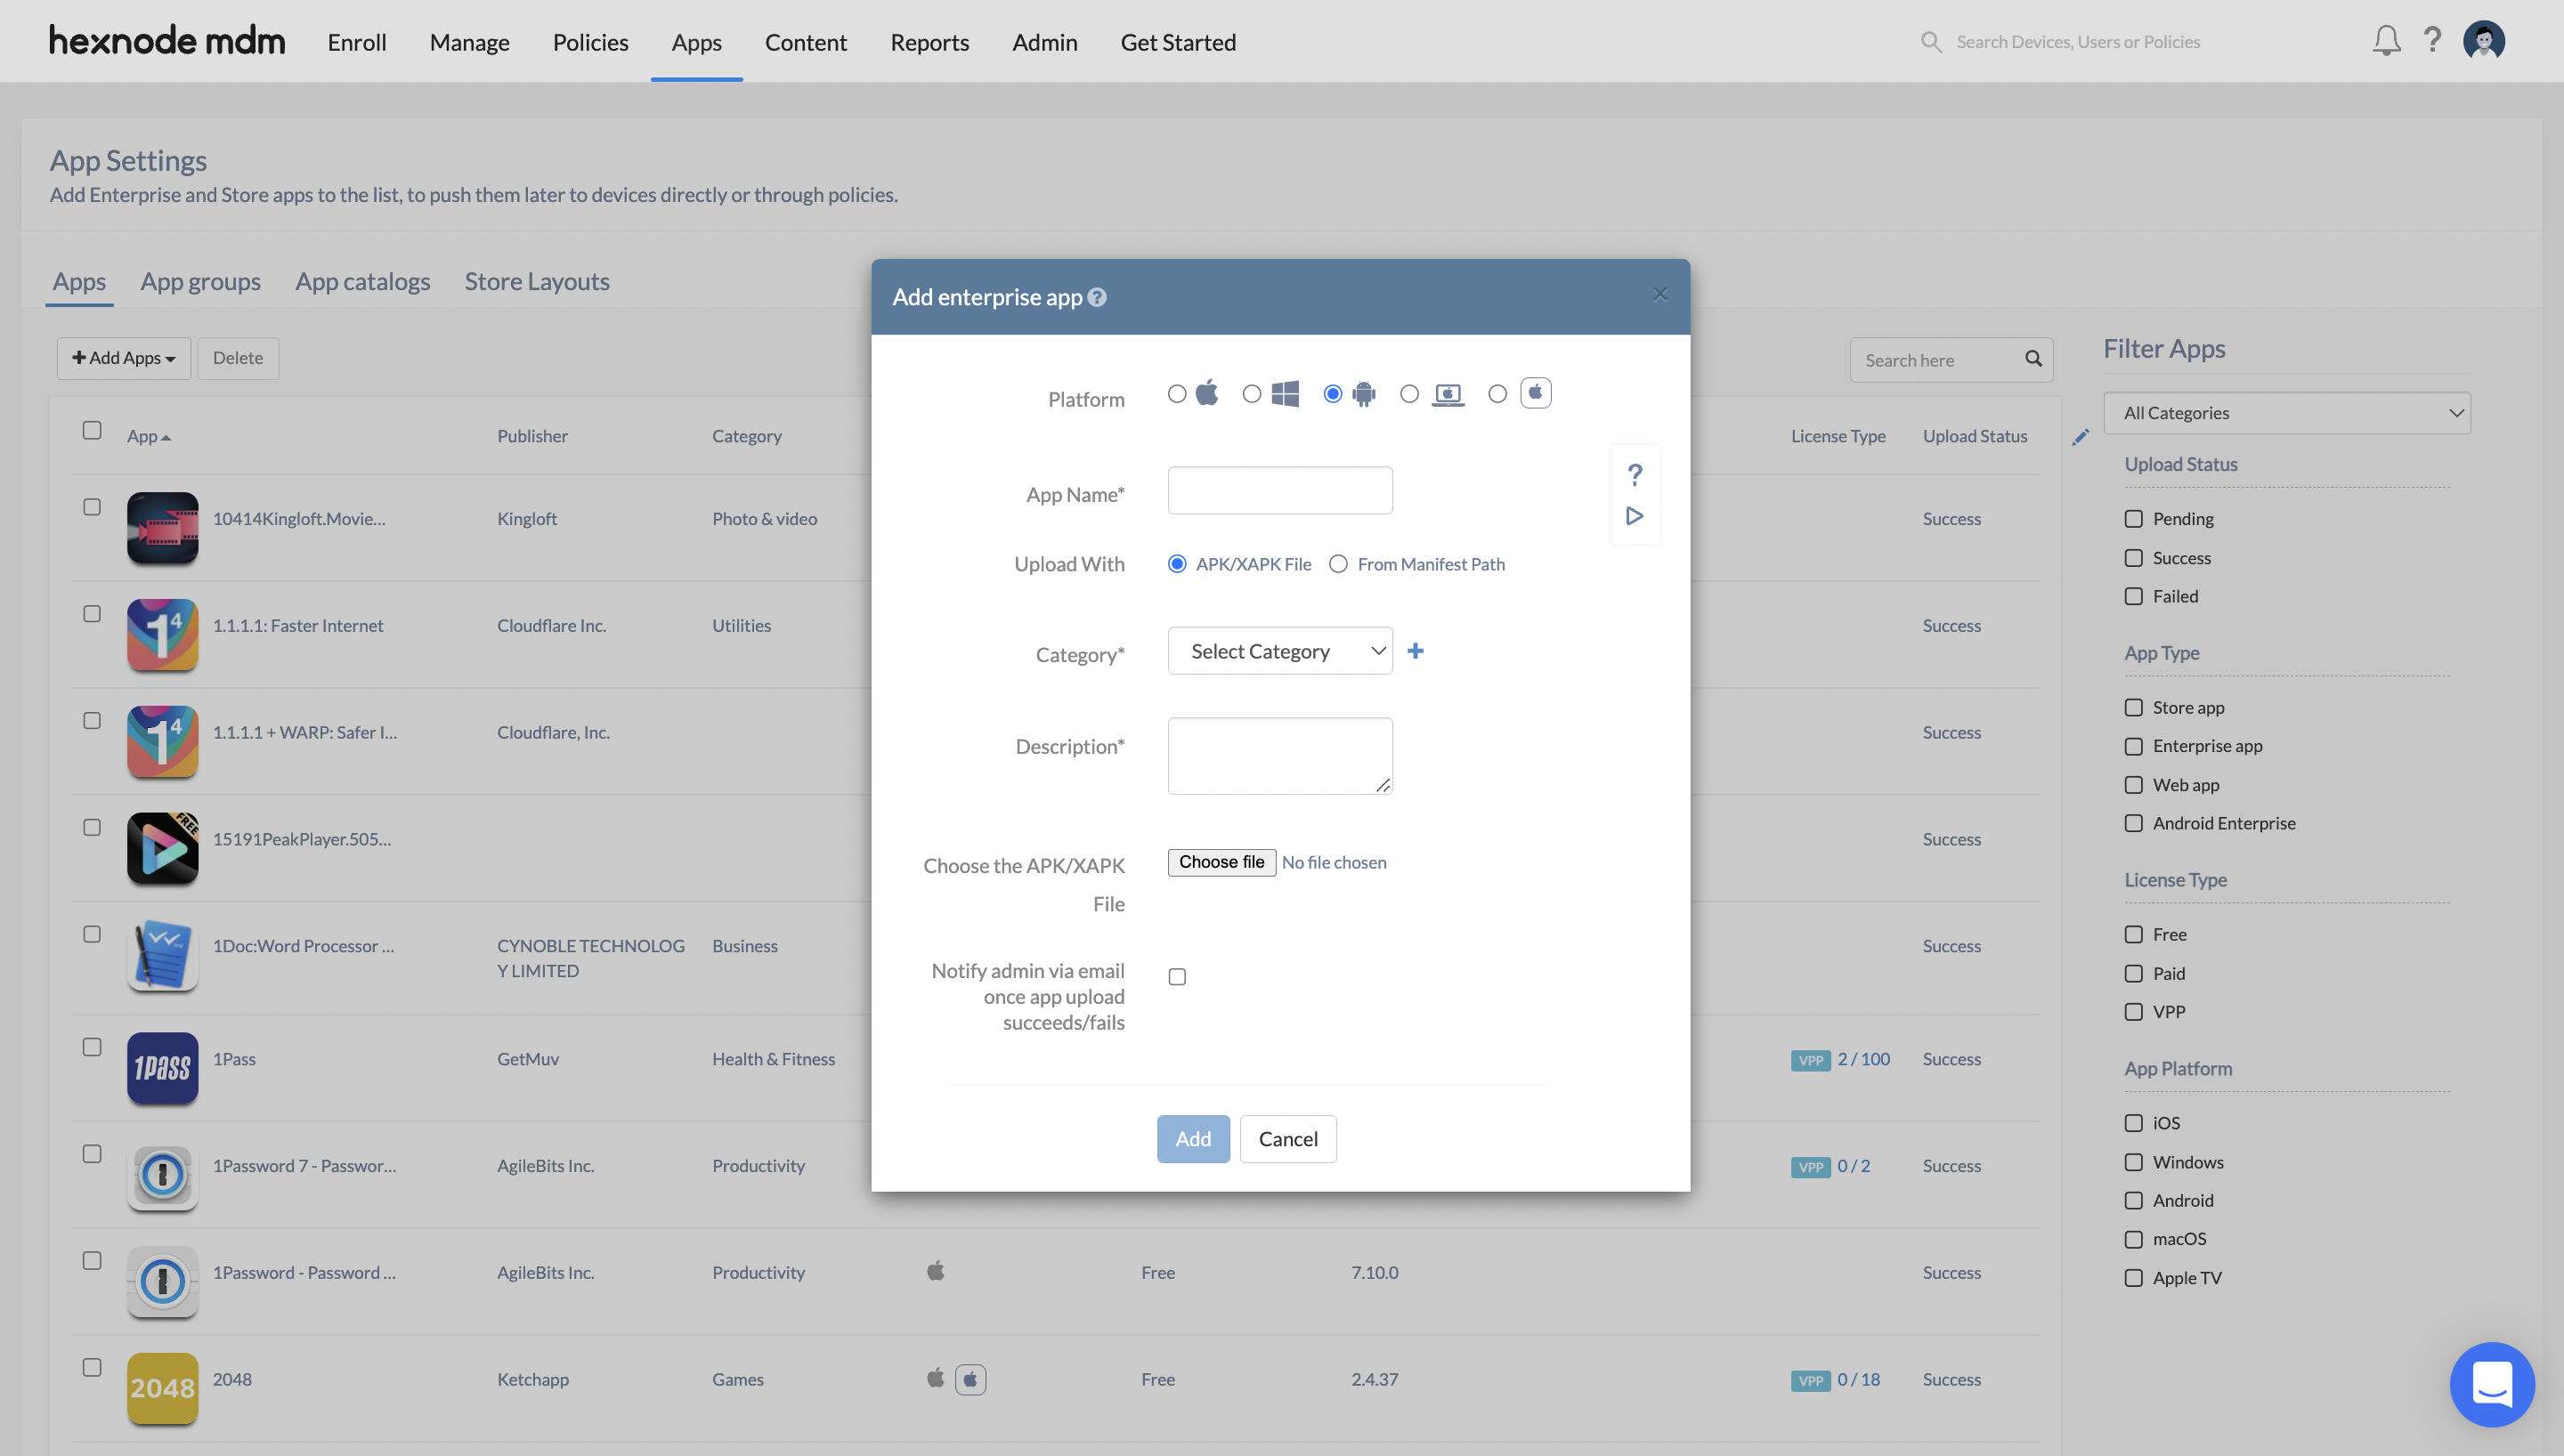
Upload enterprise apps using APK/XAPK files
- App Name: Provide a name to identify the app.
- Category: Select a category available from the drop-down list. You can also add a missing category by clicking on the add (+) button and providing a suitable name.
- Description: Provide a description of the app.
- Choose the APK/XAPK file: Select the APK/XAPK file of the app to be distributed as an enterprise app.
- Notify admin via email once app upload succeeds/fails: Checking this option will notify the admin via mail on the app upload status.
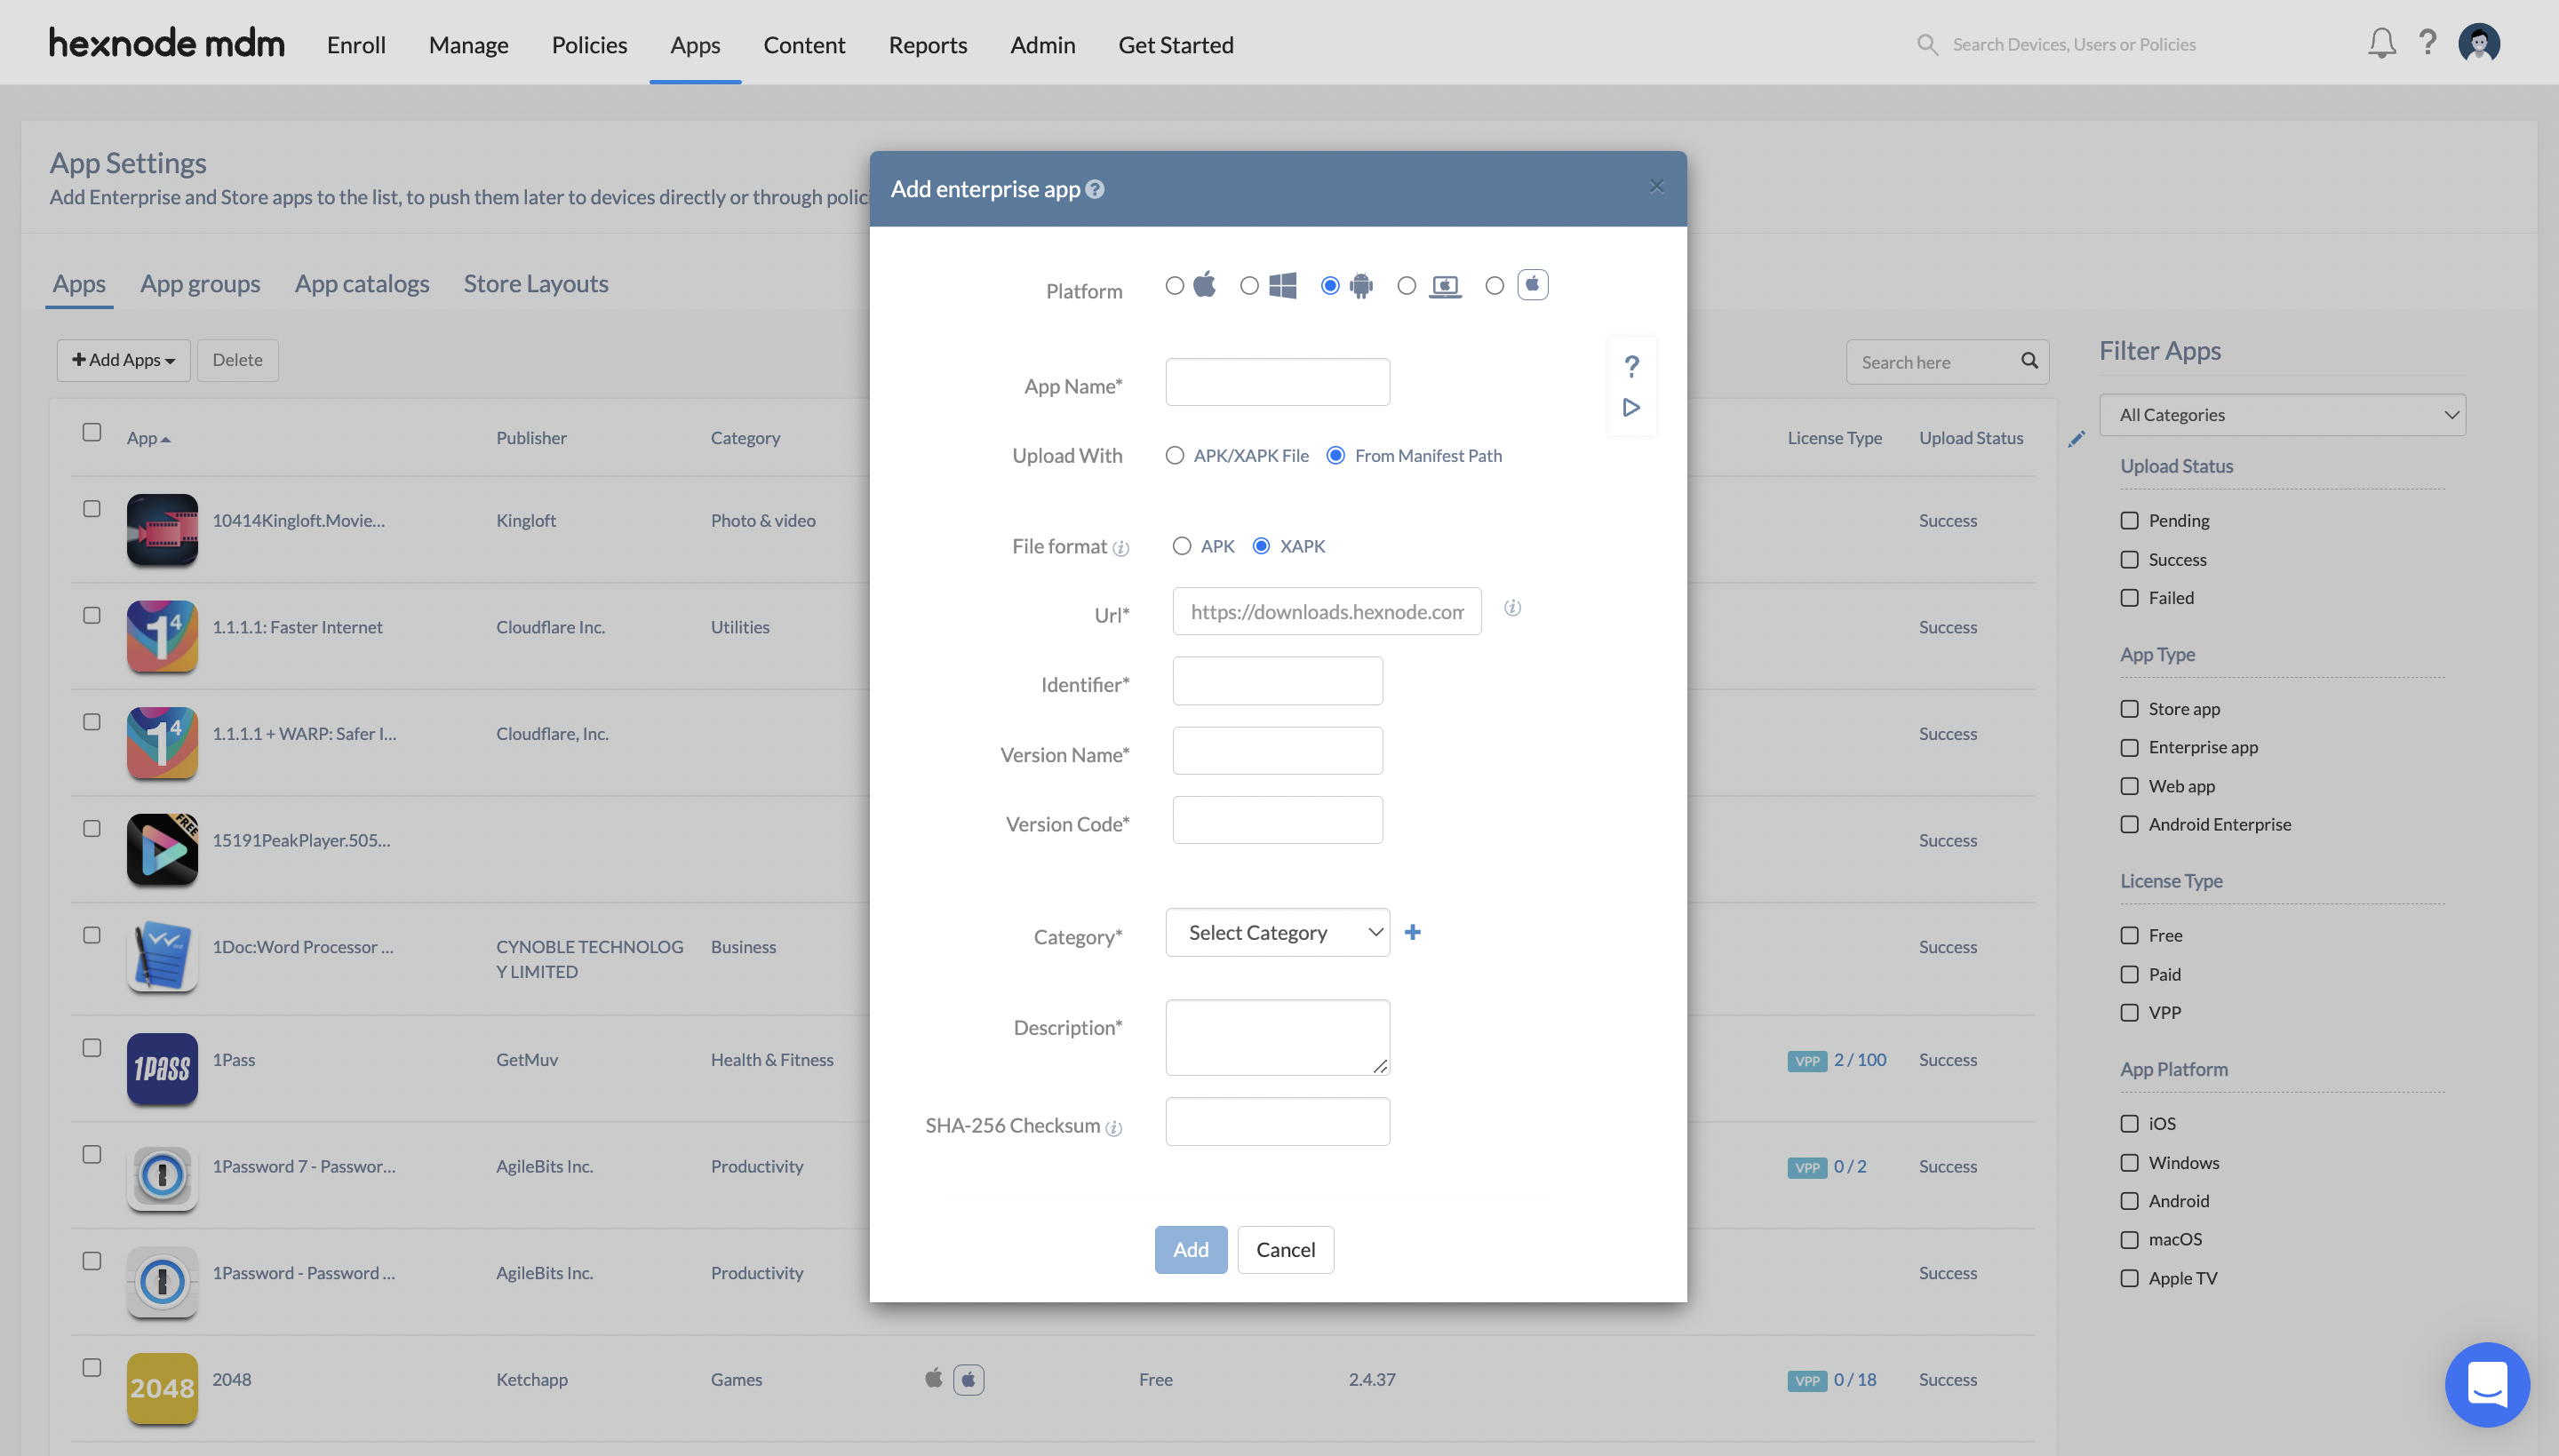
Add enterprise apps from manifest path
- App Name: Provide a name to identify the app.
- File format: Choose the file format present in the manifest path.
- Url: Provide the direct download link to the APK/XAPK file.
- Identifier: Provide the identifier of the URL.
An identifier will be of the form,
‘Domain name.Company/Publisher’s name.Application Name’.
For example, com.hexnode.hexnodemdm - Version Name: Provide the version name of the APK or the base APK in the XAPK file.
- Version Code: Provide the version code of the APK. If you chose the XAPK file format, provide the version code of the base APK in the XAPK file.
- Category: Select a category available from the drop-down list. You can also add a missing category by clicking on the add (+) button and providing a suitable name.
- Description: Provide a description of the app.
- SHA-256 Checksum: Hexnode uses the SHA-256 checksum to ensure that the apps are not corrupted while uploading them to the portal and deploying them to devices. Provide the SHA-256 checksum (hash) of the file to verify the file integrity before distribution. If left blank, Hexnode UEM will skip the file verification.
Install apps to devices via Actions
To install the app(s) on a device via the Install Application action:
- Go to Manage > Devices and click on the device name.
- From the device details page, click on Actions > Install Application.
- Select the app(s) from the list and click Done.
To install the app(s) on multiple devices:
- Go to Manage > Devices.
- Select the devices on which the app(s) should be installed.
- Click on Actions > Install Application.
- Select the app(s) from the list and click Done.
Install apps to devices via Policies
You can also add an enterprise app from Policies, in several ways as given below.
Method 1: Set required apps.
Follow the steps to push the enterprise app as a required app.
- Login to your Hexnode portal.
- Go to Policies.
- Select an existing policy or create a new one by clicking on New Policy. If you are creating a new policy, provide a suitable policy name and description.
- Navigate to Android > App Management > Required Apps and click on Configure.
- Remove apps from the device on policy removal: Checking this option removes the required apps from the device on deleting/disassociating the policy from the device, and on removing the required app from the policy.
- Enforce app downgrade: Check the option to downgrade an app to its lower versions. Learn more.
- Update apps only over Wi-Fi: Checking this option allows apps to update only when the device is connected to a Wi-Fi network. When a new update for the application is available, connect the device to a Wi-Fi network and keep it in an inactive state. Ensure that the app to be updated is not running in the foreground and the device should be in charging mode.
- Click on +Add > select Add Apps or Add Group.
- Select the apps already added to the Apps tab. If you’ve created an App Group at Apps > App Groups, then select the app group from the list.
- Save the policy after associating target entities.
Method 2: Push enterprise apps through App Catalog
Follow the steps to push the enterprise app through App Catalog. First you need to create an App Catalog.
- Go to Policies.
- Select an existing policy or create a new one by clicking on New Policy.
- Navigate to Android > App Management > App Catalog and click on Configure.
- Click on +Add Catalogs. Select the catalogs with enterprise apps you need to add and click on Done.
Associate Policies with Devices / Groups
If the policy has not yet been saved.
- Navigate to Policy Targets.
- Click on +Add Devices.
- Select the devices and click OK.
- Click on Save to apply the policies to devices.
Apart from devices, you can also associate the policies with device groups, users, user groups, and domains from Policy Targets.
If the policy has been saved, you can associate it with another method.
- From Policies, check the policies to be associated.
- Click on Manage > Associate Targets and select the device.
- Click on Associate to apply the policy to the devices.


